Ingredients
Pastry Dough
In order to make the perfect pastry dough for homemade Pop-Tarts, you will need a combination of all-purpose flour, salt, granulated sugar, and cold unsalted butter.
All-purpose flour serves as the base ingredient in this recipe, providing structure and texture to the pastry dough. It’s essential to use high-quality flour that is fresh and has not been sitting on your pantry shelf for too long.
Salt adds a touch of flavor to the pastry dough and helps to balance out the sweetness of the sugar. Use kosher salt or sea salt for the best results, as they have a more nuanced flavor profile than table salt.
Granulated sugar adds a hint of sweetness to the pastry dough and helps to balance out the savory flavors of the other ingredients. You can adjust the amount of sugar to your taste, but be aware that too little sugar may result in a slightly dense or tough pastry dough.
Unsalted cold butter is essential for creating a flaky and tender pastry crust. Make sure to use high-quality butter that has not been melted or softened before using it in the recipe. The cold butter will help to create a layered structure in the pastry dough, giving it a light and airy texture.
In addition to these ingredients, you may also want to have some water on hand to help bring the pastry dough together. However, be careful not to add too much water, as this can make the dough sticky and difficult to work with.
1 package of frozen puff pastry, thawed according to package instructions
The foundation of this Pop-Tarts recipe lies in the ingredients, which include a variety of sweet and savory components. One key component is the frozen puff pastry, which serves as the outer crust of the pastries. When thawed according to package instructions, the puff pastry becomes pliable and easier to work with.
The first step in preparing the puff pastry is to roll it out to a thickness of about 1/4 inch (6 mm). This allows for an even coating of the desired fillings, as well as providing sufficient room for shaping each pastry into its signature form. The surface area of the puff pastry can be visualized as a square or rectangle, depending on the original package shape and size.
To give your Pop-Tarts their iconic flavor, you’ll need to mix together a combination of ingredients such as granulated sugar, brown sugar, salt, and cinnamon. These dry components work in harmony with each other to create a harmonious balance of sweet and savory notes. Additionally, the use of unsalted butter or margarine adds an extra layer of flavor depth, while also contributing to the overall richness of the pastry.
Another crucial aspect of this recipe is the filling, which serves as the core component that defines the type of Pop-Tarts being produced. Some classic fillings include strawberry jam or preserves, peanut butter, and even chocolate chips. Each of these options offers a unique flavor profile that can be perfectly balanced with the puff pastry crust.
To bring all these components together, it’s essential to assemble each pastry by carefully spreading the filling over one half of the puff pastry, leaving a 1/2 inch (13 mm) border around the edges. The remaining portion of the puff pastry is then folded over to enclose the filling, using gentle pressure to seal the pastry and prevent any air from escaping during baking.
Before placing the assembled pastries on a baking sheet lined with parchment paper, make sure to brush them lightly with an egg wash (beaten egg mixed with water or milk) or melted butter. This step not only enhances the appearance of the pastries but also provides additional moisture and flavor.
Finally, bake the pastries in a preheated oven at 375°F (190°C) for about 20-25 minutes, or until they are golden brown. Let them cool on a wire rack before serving, as this allows excess heat to dissipate and the pastry to retain its crispiness.
Enjoy your homemade Pop-Tarts, carefully crafted with love and attention using the right combination of ingredients, including that special frozen puff pastry.
1/4 cup granulated sugar
The key to making a delicious and authentic Pop-Tarts is using the right ingredients, starting with 1/4 cup of granulated sugar.
Granulated sugar is a type of sucrose that has been crystallized into small, white crystals. It’s a common sweetener used in baking and cooking to add flavor and texture to foods.
When making Pop-Tarts, the granulated sugar serves several purposes. First, it helps to balance out the sweetness of the other ingredients and provides a subtle sweetness to the finished pastry. Second, it helps to bring out the flavors of the other ingredients, such as the fruit or chocolate fillings.
In addition to its sweetening properties, granulated sugar also plays a role in browning and crisping the pastry during baking. When heated, the sugar caramelizes and forms a crispy, golden-brown crust on the surface of the Pop-Tarts.
To use granulated sugar in your Pop-Tarts recipe, simply measure out 1/4 cup of the sugar and mix it with other dry ingredients such as flour, baking powder, and salt. Then, add the sugar mixture to your wet ingredients, such as eggs and butter or oil, and mix until a smooth dough forms.
When working with granulated sugar, be sure to use the correct type of sugar for the recipe. Granulated sugar is different from other types of sugar, such as brown sugar or confectioner’s sugar, which have different textures and flavor profiles.
In summary, 1/4 cup of granulated sugar is an essential ingredient in making delicious Pop-Tarts. Its sweetening properties, ability to balance out flavors, and role in browning and crisping the pastry make it a must-have for any Pop-Tarts recipe.
1/4 cup allpurpose flour
All-purpose flour is a fundamental ingredient in baking, and when used in the right proportion, it can make a significant difference in the texture and flavor of the final product. In this recipe for homemade Pop-Tarts, 1/4 cup of all-purpose flour is an essential component that helps to achieve the perfect balance between crunchiness and softness.
All-purpose flour, also known as wheat flour or plain flour, is a versatile type of flour made from wheat grains. It contains a mix of different types of gluten, which gives dough its strength and elasticity. In the context of this recipe, all-purpose flour serves several purposes: it adds structure to the filling, helps to bind the ingredients together, and provides a foundation for the crust.
The 1/4 cup measurement is significant because it represents approximately 2-3 tablespoons or about 15 grams of all-purpose flour. This amount may seem small, but it’s crucial in achieving the right texture for the Pop-Tarts filling. Too little flour can result in a fragile and crumbly texture, while too much can lead to an overly dense and chewy consistency.
When using all-purpose flour in this recipe, it’s essential to note that the type of flour you choose can affect the final product. Bread flour or whole wheat flour may produce slightly different results due to their higher gluten content or coarser texture. However, for the best results, stick with all-purpose flour as specified in the recipe.
The role of all-purpose flour is not limited to the filling; it’s also a key component in making the crust for your Pop-Tarts. By using all-purpose flour, you’ll create a delicate yet sturdy crust that complements the filling perfectly. The combination of all-purpose flour and other ingredients will yield a delicious, homemade version of Pop-Tarts that’s sure to satisfy your cravings.
In summary, 1/4 cup of all-purpose flour plays a vital role in achieving the perfect texture and flavor balance for this homemade Pop-Tarts recipe. Its versatility, strength, and binding properties make it an essential component in both the filling and crust, ensuring a delightful eating experience that’s hard to resist.
1/2 teaspoon salt
The ingredients for making homemade Pop-Tarts are relatively simple and can be found in most kitchen pantries.
Key Ingredients
- All-Purpose Flour: 2 cups of all-purpose flour is needed to create the dough for the Pop-Tart crust. This type of flour provides structure and elasticity to the pastry.
- 1/4 cup granulated sugar adds sweetness to the filling and helps balance out the flavors in the Pop-Tarts.
- Vegetable Shortening: 1/2 cup vegetable shortening, such as Crisco, is used to add flakiness and tenderness to the dough.
- Egg: 1 large egg is necessary for binding the ingredients together in the dough.
- Water: 1/4 cup cold water is added to help hydrate the flour and create a workable dough.
- Salt:
- 1/2 teaspoon salt, adds flavor and helps control yeast growth in the dough (optional).
- Filling Ingredients: Depending on the desired flavor, you may choose to add fruit preserves, jam, or another filling of your choice.
In addition to these key ingredients, you will also need a pastry blender or a fork to work the cold shortening into the flour, and a rolling pin to roll out the dough to the desired thickness.
1/2 cup unsalted butter, softened
To make a delicious homemade version of Pop-Tarts, we will first need to gather the necessary ingredients. The following are the key components required for this recipe:
Main Ingredients
- Butter (Unsalted):1/2 cup unsalted butter, softened – This is used as the base ingredient for making the pastry dough.
- Granulated Sugar:1/4 cup granulated sugar – Added to the dough for a touch of sweetness and to enhance the flavor.
Pastry Dough Additions
- All-purpose Flour:2 cups all-purpose flour – This is used as the base ingredient for making the pastry dough, providing structure and texture.
- Egg:1 large egg – Adds moisture and richness to the dough.
Filling Ingredients
The filling is a crucial component of our homemade Pop-Tarts recipe. We will use a combination of ingredients to create a delicious and sweet filling.
Main Filling Ingredients
- Margarine or Unsalted Butter:1/4 cup margarine or unsalted butter, softened – Used as the base ingredient for making the filling.
- Jam or Filling of Choice:A variety of flavors can be used, such as strawberry, blueberry, or apricot jam. You can also use chocolate chips or other sweet fillings of your choice.
Optional Ingredients (For Added Flavor and Texture)
- Cinnamon:A pinch of cinnamon powder can be added to the dough for a warm, spicy flavor.
- Vanilla Extract:A few drops of vanilla extract can be added to the filling or dough for an extra layer of flavor.
These ingredients will provide a delicious and sweet homemade version of Pop-Tarts. You can adjust the recipe as needed to suit your taste preferences.
Filling
Homemade Strawberry Jam
Filling, Homemade Strawberry Jam, is a crucial component of our popular Pop-Tarts recipe. This sweet and tangy jam serves as the flavorful filling for these tasty pastries.
To make this delicious homemade strawberry jam, you will need 2 cups of sliced strawberries, 1 cup of granulated sugar, 2 tablespoons of water, and 2 tablespoons of freshly squeezed lemon juice.
Begin by combining the sliced strawberries and granulated sugar in a large saucepan. The high sugar content helps to bring out the natural sweetness of the strawberries as well as serving as a preserving agent.
Next, add the water and lemon juice to the saucepan with the strawberry and sugar mixture. Stir gently to combine.
Cook the mixture over medium heat, stirring occasionally, until the berries have broken down and the mixture has thickened into a jam-like consistency.
This process should take around 20-25 minutes, during which time you will need to stir the mixture every few minutes to prevent it from burning or sticking to the bottom of the saucepan.
Once the jam has reached your desired consistency, remove it from the heat and let it cool slightly before transferring it to an airtight container for storage in the refrigerator.
This homemade strawberry jam is now ready to be used as the filling for our delicious Pop-Tarts recipe. Simply fill each pastry with a generous amount of this tasty jam and bake until golden brown.
2 cups sliced strawberries
To begin filling our Pop-Tarts recipe with strawberries, we first need to prepare 2 cups of fresh or frozen sliced strawberries.
Begin by thawing out any frozen strawberries if using, and pat them dry with paper towels to remove excess moisture.
Rinse the strawberries under cold water to ensure they’re clean, then gently pat them dry again to prevent any excess moisture from affecting the filling’s texture or flavor.
Next, in a medium-sized bowl, whisk together 1/4 cup granulated sugar and 2 tablespoons of cornstarch until well combined.
Add the sliced strawberries to the bowl with the sugar mixture, stirring gently to ensure they’re evenly coated.
Mix in an additional 1-2 tablespoons of sugar depending on your desired level of sweetness for the filling, then stir in 1 tablespoon of vanilla extract or to taste.
Allow the strawberry mixture to sit at room temperature for about 15-30 minutes, allowing it to macerate and release its natural juices.
After this time has passed, you can proceed with using the strawberry filling within your Pop-Tarts recipe, following the rest of the instructions as outlined to create a delicious homemade version of this popular treat.
1/4 cup granulated sugar
To fill the toaster pastry with sweet and gooey goodness, we’re going to focus on filling it with a generous helping of granulated sugar. Specifically, we need to measure out 1/4 cup of granulated sugar.
Granulated sugar is a type of white sugar that has been crystallized into small, transparent crystals. It’s a staple ingredient in baking and cooking, and is often used as a sweetener in desserts like cakes, cookies, and pastries.
To measure out 1/4 cup of granulated sugar, we can use a dry measuring cup or a digital kitchen scale. If using a dry measuring cup, simply scoop the sugar into the cup until it reaches the top mark for 1/4 cup. Then, level off the sugar with a straight edge or knife to ensure that it’s even.
If using a digital kitchen scale, simply place the bowl or container on the scale and zero out any weight by pressing the “tare” button. Then, add the granulated sugar until you reach 60 grams – which is equivalent to 1/4 cup of sugar.
Once we have our measured-out granulated sugar, we can proceed with filling our Pop-Tarts according to the recipe. We’ll mix the sugar with other ingredients like cinnamon and nutmeg to create a delicious and sweet filling that will be baked to perfection inside the toaster pastry.
In this particular Pop-Tarts recipe, we’re using 1/4 cup of granulated sugar as just one ingredient in our filling mixture. The other ingredients include brown sugar, ground cinnamon, ground nutmeg, and unsalted butter – all of which come together to create a mouthwatering sweet treat that’s perfect for breakfast or snacking.
With the 1/4 cup of granulated sugar now measured out and ready to go, we can confidently move forward with filling our Pop-Tarts according to the recipe. This is an essential step in bringing our delicious homemade Pop-Tarts to life, and we’re excited to see the finished product!
2 tablespoons cornstarch
In this step of our Pop-Tarts
recipe, we’ll be adding a key ingredient to help achieve the perfect pastry texture: _cornstarch_.
First, you’ll need to measure out 2 tablespoons of cornstarch. It’s essential to use a measuring spoon to ensure accuracy and get the right amount.
Cornstarch is a type of carbohydrate that serves as a thickening agent in baking. When added to our dough, it will help absorb excess moisture and prevent our Pop-Tarts from becoming too soggy or soft.
To incorporate the cornstarch into our dough, you can simply mix it with the other dry ingredients, such as flour, sugar, and any other seasonings we’re using. Make sure to blend well so that everything is evenly distributed.
The addition of cornstarch may seem like a small detail, but trust us – it makes a huge difference in the final texture and taste of our Pop-Tarts. And who doesn’t love a delicious, crunchy pastry
?
2 tablespoons lemon juice
To fill our homemade Pop-Tarts with delicious strawberry jam and a hint of citrus, we’ll be using a combination of sweet and tangy ingredients.
For this filling, we recommend mixing together 1 cup of strawberry jam or preserves with 2 tablespoons of freshly squeezed lemon juice.
The acidity in the lemon juice will help to balance out the sweetness of the jam and add a nice brightness to the flavor.
This lemon-lemon juice also helps to bring out the natural flavors of the strawberries, making them shine in our homemade Pop-Tarts.
Now that we’ve combined the strawberry jam with the lemon juice, it’s time to get creative with our filling.
We can add some chopped fresh strawberries or raspberry to give our filling a pop of color and texture.
We can also mix in some granulated sugar or honey to balance out the flavor and add a touch of sweetness.
Or, we can get adventurous and add a pinch of salt or a drizzle of balsamic glaze to create a salty-sweet combination that will take our homemade Pop-Tarts to the next level!
The possibilities are endless when it comes to customizing your filling for your homemade Pop-Tarts.
Alternative Filling Options
The filling plays a crucial role in the taste and overall experience of a Pop-Tarts pastry. The classic strawberry filling used in traditional Pop-Tarts recipes is a sweet and tart jam-like spread made from strawberries, sugar, and pectin.
However, for those looking to explore alternative options or create their own unique flavors, there are numerous alternatives that can be used as fillings in a Pop-Tarts recipe. Here are some ideas:
Jam Alternatives:
- Currant Jam: Made with currants and sugar, this filling provides a sweet and slightly tangy taste.
- Raspberry Jam: Similar to strawberry jam but made with raspberries instead.
- Apricot Jam: Sweet and slightly tangy apricot jam is an excellent alternative to strawberry.
Fruit-based Fillings:
- Apple Filling: Made with sautéed apples, cinnamon, and sugar, this filling adds a warm and comforting touch to Pop-Tarts.
- Lemon Curd: A tangy and sweet lemon curd is an excellent addition to the classic strawberry filling.
Cream Cheese Fillings:
- Cream Cheese and Jam Filling: Mixing cream cheese with jam provides a creamy texture and sweet taste.
- Lemon Cream Cheese Filling: Add some zest to the classic cream cheese filling by incorporating lemon juice or zest.
Peanut Butter and Nut-based Fillings:
- Peanut Butter Filling: Classic peanut butter is an excellent base for Pop-Tarts fillings, especially when paired with chocolate or jam.
- Pecan Praline Filling: Made with ground pecans, sugar, and melted butter, this filling provides a rich and nutty taste.
Cinnamon Sugar Fillings:
- Cinnamon Sugar Apple Filling: Sautéed apples mixed with cinnamon sugar creates a delicious filling that pairs perfectly with the warm spices in Pop-Tarts pastry.
The possibilities for fillings are endless, and experimenting with different combinations can lead to unique and exciting flavors. Feel free to get creative and come up with your own custom fillings!
Raspberry jam: Replace strawberries with 2 cups of fresh raspberries and adjust sugar to taste.
To make a delicious raspberry version of the classic Pop-Tarts, you’ll need to replace the strawberries with 2 cups of fresh raspberries and adjust the sugar to taste.
Here’s the step-by-step guide:
- Mash 1/4 cup of the raspberries in a bowl to release their juice. This will help to create a jam-like consistency.
- In a separate bowl, mix together the remaining 1 3/4 cups of raspberries and the granulated sugar until well combined.
- Add the mashed raspberries and their juice to the bowl with the other raspberries and sugar. Mix until smooth and adjust the sugar to taste.
Continue with the original Pop-Tarts recipe, using the raspberry jam in place of the strawberry jam:
- Pull out your trusty pastry dough (make sure it’s chilled and ready to roll out).
- Roll out the dough on a lightly floured surface until it’s about 1/4-inch thick.
- Use a cookie cutter or the rim of a glass to cut out circles of dough. You should be able to get about 12-15 circles.
- Spoon a small amount of raspberry jam onto one half of each dough circle, leaving a 1/2-inch border around the edges.
- Fold the other half of the dough over the filling and press the edges together to seal. Use a fork to crimp the edges and create a decorative border.
Brush the tops with a beaten egg and bake in a preheated oven at 375°F (190°C) for 20-25 minutes, or until golden brown.
And that’s it! Your delicious raspberry Pop-Tarts are now ready to be enjoyed.
Blueberry jam: Use 2 cups of fresh blueberries and increase sugar by 1 tablespoon.
To make a delicious homemade filling for our Pop-Tarts, we’ll be preparing a scrumptious Blueberry jam. This recipe will use fresh blueberries to give it that authentic flavor and texture.
We start by gathering 2 cups of fresh or frozen blueberries. If using frozen, make sure to thaw them first and pat dry with paper towels to remove excess moisture.
In a medium saucepan, combine the 2 cups of blueberries and 1 cup of granulated sugar. You’ll also be adding an extra tablespoon of sugar for this batch, so add that in as well.
Next, we’ll add 2 tablespoons of water to the mixture. This will help the blueberries break down and create a smooth consistency for our jam.
Place the saucepan over medium heat and stir occasionally until the mixture starts to boil. Then, reduce the heat to low and simmer for about 20-25 minutes or until the jam has thickened up nicely.
You’ll know it’s ready when the blueberry mixture has turned into a rich, syrupy texture and the flavors have melded together perfectly.
Once our Blueberry jam is prepared, we can fill our homemade Pop-Tarts with this delicious filling. Simply place a spoonful of the warm jam onto one half of the dough circle, followed by another dough circle on top to create a sandwich-like structure.
Cooking the Pop-Tarts
Assembly
To cook the Pop-Tarts, you will need to start by preheating a non-stick skillet or griddle over medium heat. This will allow for even cooking and prevent the Pop-Tarts from burning.
Next, place the desired number of Pop-Tarts in the skillet or on the griddle, leaving about an inch of space between each one to allow for proper ventilation and cooking. You can cook multiple at once, but be sure not to overcrowd the skillet as this may cause them to stick together.
Cook the Pop-Tarts for 2-3 minutes on the first side, or until they start to develop a golden-brown color. Flip each one over and continue cooking for an additional 1-2 minutes, or until both sides are equally cooked through.
It’s essential to keep an eye on the temperature of your skillet or griddle to ensure it remains at a moderate heat. If it gets too hot, the Pop-Tarts may burn on the outside before they’re fully cooked through.
To achieve a crispy texture and caramelized flavor, you can cook the Pop-Tarts with a small amount of butter or non-stick cooking spray in the skillet. This will also help prevent them from sticking to the surface.
Once the Pop-Tarts are cooked, remove them from the skillet and place on a serving plate or tray. You can serve them hot with your favorite toppings, such as syrup, honey, whipped cream, or fresh fruit.
Remember that cooking time may vary depending on the type of Pop-Tarts you’re using and the desired level of crispiness. Always keep an eye on their progress to ensure they don’t burn or overcook.
Now that you have cooked your Pop-Tarts, enjoy them hot and fresh from the skillet! They make a delicious breakfast, snack, or even dessert option for any occasion.
Roll out puff pastry on a lightly floured surface, about 1/8 inch thick
To cook the Pop-Tarts, start by preheating your oven to 375°F (190°C). This will ensure that it reaches the optimal temperature for cooking.
While waiting for the oven to heat up, let’s begin preparing the puff pastry dough. You can use store-bought or homemade puff pastry for this recipe. If using store-bought, follow the package instructions for thawing and rolling out.
If you’re working with a block of frozen puff pastry, allow it to thaw overnight in the refrigerator. Then, let it sit at room temperature for about 30 minutes to an hour before rolling it out.
To roll out the puff pastry on a lightly floured surface, start by placing the dough on one half of the floured surface. If you’re using a block of frozen puff pastry, divide it in half and work with one piece at a time.
Roll the dough into a rectangle shape, about 1/8 inch thick. Make sure to maintain even pressure as you roll out the dough, keeping it smooth and flat.
You can use a rolling pin or your hands to roll out the puff pastry. If using a rolling pin, start from one end of the dough and work your way down. Use gentle pressure, applying more force if needed to achieve the desired thickness.
Once you’ve achieved a 1/8 inch thickness, you’ll have a large rectangle of puff pastry ready for cutting into individual Pop-Tarts.
For a classic Pop-Tarts design, cut the dough into rectangles that are approximately 3-4 inches wide and 6-8 inches long. You can use a pastry cutter or a sharp knife to achieve clean cuts.
Now that you have your puff pastry strips ready, it’s time to assemble the Pop-Tarts. Spread a small amount of your chosen filling down the center of each strip, leaving about 1/2 inch at either end unfilled. This will help you seal the Pop-Tart when you fold it over.
Next, place another piece of puff pastry on top of the filled dough, pressing the edges together to seal the Pop-Tart. Use a fork to crimp the edges and create a decorative border around each Pop-Tart.
Place the assembled Pop-Tarts on a baking sheet lined with parchment paper, leaving about 1 inch of space between each tart for even cooking.
Bake the Pop-Tarts in the preheated oven at 375°F (190°C) for 20-25 minutes, or until they’re golden brown and cooked through. Keep an eye on them after the first 15 minutes to ensure that they don’t overcook.
Spread strawberry jam or alternative filling over one half of the dough, leaving a 1inch border
To cook the _Pop-Tarts_ , preheat the toaster oven to 375°F (190°C). If you don’t have a toaster oven, you can use a conventional oven at the same temperature.
Place the dough on a baking sheet lined with parchment paper. Make sure it’s not overlapping or too close together, as this can cause them to stick together during baking.
Sprinkle a small amount of water over one half of the dough. This will help create a seal when you fold the other half of the dough over the filling.
Spread strawberry jam
or alternative filling, such as Nutella or peanut butter, over one half of the dough, leaving a 1-inch border around the edges.
The goal is to create a seal when you fold the other half of the dough over the filling. This will prevent the filling from spilling out during baking.
Carefully fold the other half of the dough over the filling, making sure to press the edges together to seal the Pop-Tart.
Brush the tops with a little bit of milk or egg wash
for a golden brown color and an extra crispy crust.
Bake in the preheated oven for 15-20 minutes, or until golden brown.
Keep an eye on them to ensure they don’t overcook. You want them to be lightly toasted, not burnt.
Once cooked, remove from the oven and let cool on a wire rack before serving.
Fold the other half of the dough over the filling and press edges to seal
To begin cooking the Pop-Tarts, preheat a non-stick pan or griddle over medium heat. It’s essential to use a non-stick surface to prevent the Pop-Tarts from sticking and to make them easier to flip.
Next, roll out the remaining dough on a floured surface to a thickness of about 1/4 inch. This will ensure that the dough is thin enough to cook evenly but not so thin that it tears.
Using a pastry cutter or a knife, cut out rectangles of dough that are slightly larger than the filling pieces. You should end up with two long rectangles for each Pop-Tart.
Place one half of the dough rectangle on top of the filling, pressing gently to adhere. Make sure to leave a small border around the edges without any filling.
Fold the other half of the dough over the filling and press the edges to seal in the filling. Use a fork to crimp the edges, making sure they are secure and even.
Use a pastry brush to apply a small amount of water or egg wash along the edges of the Pop-Tarts to help them stick together during cooking.
Carefully place the Pop-Tarts in the preheated pan or griddle, leaving about 1 inch of space between each Pop-Tart. Cook for 2-3 minutes on each side, or until golden brown and crispy.
Remove the Pop-Tarts from the heat and let them cool on a wire rack for a few minutes before serving. You can dust them with powdered sugar or enjoy them as is.
Brushing with Egg Wash
Cooking the Pop-Tarts requires precision and care to achieve a perfectly golden-brown crust. Begin by preheating your oven to 375°F (190°C). Line a baking sheet with parchment paper or a silicone mat to ensure easy cleanup.
Place the Pop-Tarts on the prepared baking sheet, leaving about an inch of space between each pastry for even cooking. Brush the tops of the Pop-Tarts with an egg wash made by beating one large egg with a pinch of salt and water until smooth.
The egg wash will help create a rich, golden-brown color and add a subtle sheen to the finished product. Be sure to brush the edges of the pastry as well, where the filling is exposed, for an evenly coated appearance.
Once the egg wash has been applied, pop the baking sheet into the preheated oven. Bake for 10-12 minutes or until the Pop-Tarts are golden brown and the crust is crispy. Keep a close eye on them during this time to prevent overcooking.
To achieve an even more professional finish, rotate the baking sheet halfway through the cooking time. This ensures that the Pop-Tarts cook evenly and prevents hotspots from developing.
When the Pop-Tarts are done, remove them from the oven and let cool on a wire rack for at least 5 minutes. This allows the filling to set and makes the pastries easier to handle and store.
After the cooling period, your homemade Pop-Tarts are ready to be served! Enjoy as is or get creative with toppings and fillings to make them truly unique and special.
Beat 1 egg in a small bowl
In a small bowl, _beat_ one fresh egg until it becomes light and fluffy.
This step is crucial in ensuring that your Pop-Tarts have a rich, moist, and golden-brown flavor.
To do this, simply crack the egg into a small bowl and use an electric mixer or a whisk to beat it for about 30 seconds to 1 minute.
Alternatively, if you’re using a hand mixer, just place the beaters in the egg and whip away until the desired consistency is achieved.
The egg will start to lighten in color and become frothy – that’s when you know it’s ready for use!
Now your egg is all beaten up and ready to be incorporated into your Pop-Tarts dough.
Get back to the fun part – shaping those tasty pastries!
Brush top of PopTarts with egg wash for a golden glaze
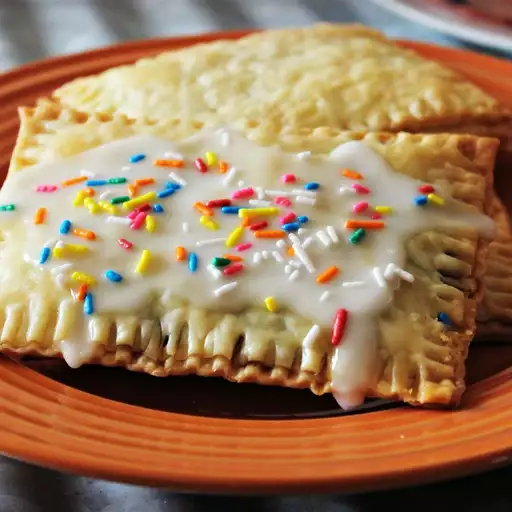
To take this classic breakfast pastry to the next level, we will be adding a golden glaze to the top of our freshly baked Pop-Tarts.
The process begins with preparing an egg wash by whisking together one egg and a splash of water in a small bowl.
Beat the mixture until it’s well combined, then set it aside for later use.
To begin cooking our Pop-Tarts, preheat the oven to 375°F (190°C) and line a baking sheet with parchment paper.
This will help prevent the Pastry from sticking to the surface and make cleanup easier.
Place your desired number of Pop-Tarts on the prepared baking sheet, leaving about a 1-inch gap between each pastry.
Next, brush the top of each Pop-Tart with the egg wash, making sure to cover the entire surface evenly.
This egg wash will create a rich, golden glaze on top of our baked Pop-Tarts when they come out of the oven.
Once the Pop-Tarts are all coated in the egg wash, bake them for 10-12 minutes or until golden brown.
This extra step adds a level of sophistication to our classic breakfast pastry and makes it perfect for a special occasion or a weekend brunch treat.
The combination of the flaky Pastry, sweet filling, and rich egg glaze will make your taste buds do the happy dance!
- Best LeadsGorilla Alternatives for 2025 - April 22, 2025
- Best Leadzai Alternatives for 2025 - April 22, 2025
- Best LeadSwift Alternatives for 2025 - April 21, 2025

