
Ingredients
Hot Peppers
The world of hot peppers is vast and varied, encompassing numerous species, cultivars, and hybrids that add depth and heat to a wide range of dishes. In the context of the hot pepper jelly recipe, understanding the key ingredients involved is crucial for achieving the desired balance of flavor and heat.
Hot peppers belong to the Capsicum family and are characterized by their fleshy, seed-filled pods, which come in an array of colors and Scoville heat units (SHU). The most commonly used hot peppers include jalapeño, serrano, habanero, Anaheim pepper, and Cayenne pepper.
Jalapeños, for instance, have a moderate level of heat (2,500-8,000 SHU) and are widely cultivated. They add a bright green or red color to the jelly and a moderate amount of heat. Serrano peppers, on the other hand, pack more punch with their 10,000-23,000 SHU rating and a more intense flavor.
Habaneros are known for their fiery heat (100,000-350,000 SHU) and are often used sparingly due to their intense flavor. They add a deep orange or red color and a rich, slightly sweet taste when cooked down. Anaheim peppers have a milder heat level (500-1,000 SHU) but contribute a sweet, earthy flavor.
Cayenne peppers bring an intense heat with their 30,000-50,000 SHU rating but are commonly used in small amounts due to their concentrated flavor. The choice of hot pepper depends on personal taste and the level of heat desired in the final jelly.
2 cups of sliced hot peppers (such as jalapeños, serranos or cayennes)
The ingredients required for this recipe are quite straightforward, but it’s essential to understand the characteristics and properties of the key component – the sliced hot peppers.
Hot peppers add an incredible depth of flavor and heat to the jelly, making them a crucial ingredient in this recipe. The most commonly used types of hot peppers include jalapeños, serranos, and cayennes. Each variety has its unique characteristics that can impact the final taste and texture of the jelly.
Jalapeños are one of the mildest hot peppers, offering a moderate level of heat that is generally appealing to most people. Their bright green color adds a nice contrast to the jelly, and their slightly sweet flavor balances out the spiciness. They have a relatively thick flesh, which helps to create a firm but spreadable texture in the finished jelly.
Serrano peppers are another popular choice for hot pepper jelly, known for their intense heat and bright green color. They have a thinner skin than jalapeños, making them easier to slice and dice into fine pieces. Their flavor is often described as more complex and slightly sweet, which adds depth to the jelly.
Cayenne peppers are one of the hottest types of hot peppers, offering an intense burning sensation that’s not for the faint of heart. They have a thin skin and a long, slender shape, making them ideal for slicing into fine strips or powdering for use in other recipes. Their flavor is often described as pungent and slightly smoky, which adds a unique twist to the jelly.
When selecting hot peppers for this recipe, it’s essential to choose fresh and ripe ones. Avoid using wilted or bruised peppers, as they may be more bitter than desired. It’s also crucial to handle the peppers carefully, as their oils can cause skin irritation and burning sensations.
Two cups of sliced hot peppers are required for this recipe, which is roughly equivalent to 12-16 ounces (340-450g) of chopped peppers. This amount will give you a good balance of flavor and heat in your finished jelly.
Sugar and Acid
In order to create a delicious and balanced hot pepper jelly recipe, it’s essential to have an understanding of three primary ingredients: sugar, acid, and spices.
Sugar plays a crucial role in this recipe as it not only adds flavor but also helps to preserve the jelly by balancing out the acidity. There are several types of sugar that can be used, including granulated sugar, honey, or agave nectar. However, granulated sugar is the most common choice due to its neutral flavor and ability to dissolve easily.
Acid is also vital in hot pepper jelly as it helps to preserve the fruit and gives the jelly a tangy taste. The most commonly used acid in this recipe is lemon juice or vinegar. Lemon juice provides a bright, citrusy flavor while vinegar adds a slightly more bitter taste.
When combining sugar and acid, it’s essential to find the right balance between the two. If there’s too much sugar, the jelly will be overly sweet, but if there’s not enough sugar, the acidity can become overpowering. A general rule of thumb is to use a ratio of 2 parts sugar to 1 part water when creating the syrup.
When it comes to spices and seasonings, they can add an extra layer of flavor to your hot pepper jelly recipe. Common additions include garlic, onion, mustard seeds, or red pepper flakes. Be cautious not to overdo it with the spices as they can quickly overpower the other ingredients.
Another essential ingredient in hot pepper jelly is the hot peppers themselves. The type and amount of hot peppers used will greatly affect the heat level of your jelly. Popular options include jalapeño, serrano, or cayenne peppers. You can use either fresh or dried hot peppers, but be sure to adjust the quantity accordingly.
In addition to these main ingredients, you’ll also need some water and pectin to help thicken the jelly. Pectin is a natural occurring substance found in fruits that acts as a gelling agent when heated. If you’re using fresh hot peppers, you may not need to add any additional pectin.
When preparing your ingredients, be sure to wear gloves and work in a well-ventilated area to avoid exposure to the spicy oils released from the hot peppers.
In conclusion, a well-balanced hot pepper jelly recipe requires a delicate mix of sugar, acid, spices, and hot peppers. By paying close attention to these ingredients and their proportions, you’ll be able to create a delicious and unique condiment for any meal or occasion.
1 cup granulated sugar
When it comes to making hot pepper jelly, one of the essential ingredients is granulated sugar. The amount required for this recipe is 1 cup, which might seem like a lot at first glance, but trust us – it’s necessary.
The type of sugar used in this recipe is granulated sugar, also known as white table sugar. This is the most common form of sugar and is easily available in most supermarkets. It has a fine texture and dissolves easily in hot water or other liquids.
Granulated sugar serves several purposes in the hot pepper jelly recipe. Firstly, it adds sweetness to balance out the heat from the peppers. Hot peppers can be quite spicy, so a bit of sugar helps to counteract that and create a more balanced flavor profile.
The sugar also acts as a preservative to some extent, helping to extend the shelf life of the jelly by preventing the growth of bacteria and other microorganisms. This is especially important when making homemade jam or jelly, as the risk of contamination is higher than with commercial products.
One thing to note about using granulated sugar in this recipe is that it will caramelize slightly during the cooking process. This can create a rich, deep flavor and a slightly sticky texture. To get the most out of the sugar’s flavor and texture, be sure to cook the jelly mixture slowly and patiently, stirring frequently to prevent scorching.
In summary, granulated sugar is an essential ingredient in hot pepper jelly recipes like this one. Its sweetness balances out the heat from the peppers, and its preservative properties help extend the shelf life of the final product.
1/4 cup white vinegar
The hot pepper jelly recipe relies on a variety of ingredients to achieve its signature balance of sweet and spicy flavors. One of the key components is white vinegar.
White vinegar plays a crucial role in preserving the jelly and providing a tangy flavor that complements the peppers. The acidity of the vinegar helps to inhibit the growth of bacteria and other microorganisms, ensuring the jelly remains fresh for an extended period.
The use of white vinegar also helps to balance out the sweetness from the sugar and the heat from the hot peppers. It adds a subtle depth to the flavor profile of the jelly, making it more complex and interesting to taste.
When using white vinegar in cooking, especially when making preserves like the hot pepper jelly recipe, it’s essential to note that not all types of vinegar are suitable for preserving food. White vinegar is typically preferred due to its high acidity level, which makes it an excellent choice for this application.
Incorporating 1/4 cup of white vinegar into the recipe will not only enhance the flavor but also contribute to the jelly’s stability and shelf life. By balancing out the sweetness and heat from the peppers, the vinegar helps to create a harmonious and well-rounded taste experience that is characteristic of the hot pepper jelly.
When working with hot peppers, it’s essential to handle them carefully and use gloves or other protective equipment to avoid skin irritation. The pungency and heat from the peppers can be intense, so it’s crucial to wear protective gear when handling and chopping them.
Other Essentials
Canning requires specific ingredients to ensure the quality and safety of the final product. For this hot pepper jelly recipe, you will need:
Pectin
This natural gelling agent can be found in most grocery stores or online. Pectin is derived from fruit, typically citrus fruits like apples, quinces, or lemons.
Granulated sugar
White granulated sugar is the most commonly used sweetener in hot pepper jelly recipes. Its high sucrose content helps to balance out the heat and flavor of the peppers.
Pure maple syrup (optional)
Some recipes use a small amount of pure maple syrup for its distinct flavor and slightly caramel-like taste, which complements the sweetness and spiciness of the peppers.
Red wine vinegar
A mild red wine vinegar helps to balance out the flavors in the jelly and adds a slightly acidic note. White vinegar or apple cider vinegar can also be used as substitutes.
Water
The amount of water added will depend on personal preference for the desired consistency of the jelly.
Cayenne pepper or hot sauce (optional)
If you prefer a milder or spicier version, adjust the cayenne pepper or hot sauce quantity to taste. For this recipe, we suggest adding a small amount of heat to balance out the sweetness and flavor.
Crushed red peppers
Fresh or dried crushed red peppers add their distinctive flavor and heat to the jelly. Use gloves when handling crushed red peppers as they can be very spicy.
Jelly jars, lids, rings, and utensils for canning: These essential supplies are necessary to properly preserve and store your homemade hot pepper jelly. Make sure to choose food-grade materials for safe use in home canning projects.
1 tablespoon pectin
Pectin is an essential ingredient in the Hot Pepper Jelly Recipe, and it serves as a natural _preservative_ and thickening agent.
The most common type of pectin used in canning and jam-making is citrus pectin, which is derived from citrus fruits such as lemons or limes.
However, for this recipe, we will be using _high-methoxy pectin_, which is a more commonly available and widely used type of pectin.
This type of pectin works by forming a gel-like network with the sugar and acid in the jelly, resulting in a firm and spreadable consistency.
The _pectin content_ of the ingredient will determine how much of it you need to use. Most commercial pectin products contain around 2-4% _methyl esterified_ pectin, but be sure to check the label for the exact percentage.
In this recipe, we are using only a single tablespoon of pectin, which is sufficient for 4 cups of jelly. This small amount of pectin will allow the natural flavors of the hot peppers and other ingredients to shine through while still providing a nice texture.
Pickling Process
Step 1: Prepare the Peppers and Sugar Mixture
Pickling is an essential process involved in creating a delicious hot pepper jelly, and it starts with preparing the peppers and sugar mixture.
To begin the pickling process for making hot pepper jelly, you will need to start by preparing your peppers. This typically involves chopping or slicing fresh hot peppers into desired pieces or leaving them whole, depending on their size and your preference.
The type of hot peppers used can greatly impact the flavor and heat level of your final product. Some popular choices for making hot pepper jelly include jalapeños, serrano peppers, habaneros, or a combination of different varieties to achieve the desired balance of flavors.
Next, prepare the sugar mixture by combining granulated sugar with water in a saucepan. The ratio of sugar to water will depend on your specific recipe and personal taste preferences, but a common starting point is using 2 cups of sugar for every cup of water.
Mix the sugar and water together until the sugar is completely dissolved, then bring the mixture to a boil over medium-high heat, stirring occasionally to prevent scorching. This initial boiling stage is crucial in creating a syrupy texture that will thicken as it cools and cook down during subsequent processing steps.
As you monitor the sugar mixture’s temperature with a candy thermometer, keep an eye on its color and consistency. The ideal temperature for starting the pickling process typically ranges from 215°F to 220°F (102°C to 104°C), at which point it should have thickened slightly but still be pourable.
Combine sliced hot peppers, granulated sugar, and water in a saucepan
The pickling process for creating the Hot Pepper Jelly starts with preparing the ingredients. Begin by slicing the hot peppers into thin pieces, removing any seeds or excess membranes to achieve a more manageable heat level and a clearer appearance in the final jelly.
Next, combine these sliced hot peppers with granulated sugar and water in a saucepan. The general ratio for this mixture is about 1 cup of hot peppers, 1 cup of sugar, and 2 cups of water. However, you can adjust the quantities to suit your taste preferences for sweetness and heat.
Ensure that the saucepan is large enough to accommodate all the ingredients without overcrowding it. This allows for proper mixing and dissolving of the sugar in the water, which helps to create a smooth jelly texture.
Place the saucepan over medium-high heat, bringing the mixture to a boil. Stir occasionally as it heats up, taking care not to let the hot peppers stick to the bottom of the pan or form any lumps. Once boiling, reduce the heat to a simmer and allow the mixture to cook for about 10-15 minutes.
As the jelly cooks down and thickens, it will start to turn into a syrupy consistency due to the reduction in water content. Monitor its texture by gently lifting some of the mixture with a spoon; when it holds its shape but still drips slightly back into the pan, you can remove it from heat.
After the jelly has finished cooking, let it cool down for at least 10-15 minutes before straining out any solids. You can either discard these or use them in other recipes as desired.
For a clear and transparent appearance, strain the hot pepper jelly through a cheesecloth or a fine-mesh sieve into clean glass jars. Discard any remaining solids from this step. Let the jelly cool completely to room temperature before storing it in the refrigerator for up to 2 weeks. If you prefer a longer shelf life, consider using a water bath canning process.
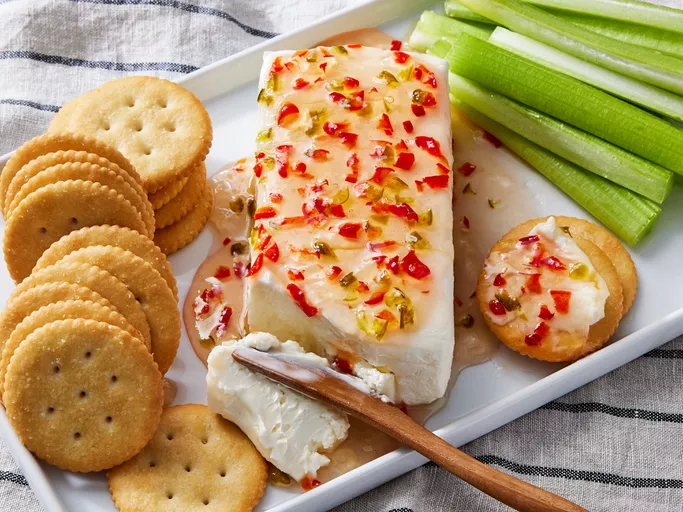
Finally, once the Hot Pepper Jelly is cooled and stored in its sealed jar, give it a try by spreading some on crackers or bread. Enjoy the spicy sweetness of your homemade creation!
Step 2: Bring to Boil and Reduce Heat
- The second step in the pickling process for making hot pepper jelly involves bringing the mixture to a boil and then reducing the heat.
- This step is crucial as it helps to kill off any bacteria that may be present in the ingredients, ensuring that the jelly is safe to eat and extends its shelf life.
- To bring the mixture to a boil, place the pot over high heat on your stovetop.
- Monitor the temperature closely using a candy thermometer, as it’s essential to reach 212°F (100°C) for boiling point.
- Once the mixture reaches a boil, you will start to see steam rising from the surface and bubbles forming rapidly throughout the liquid.
- Continue boiling for about 5 minutes or until the jelly has reached the desired consistency and setness. You can check by placing a small amount on a chilled plate.
- To reduce the heat, turn it down to medium-low once the mixture is at a gentle boil.
- This will help prevent the jelly from cooking too quickly and developing an unpleasant flavor or texture.
- Reduce the temperature gradually, allowing the jelly to simmer for another 10-15 minutes to develop its flavor and consistency.
- This step may vary depending on your personal preference for the level of spiciness, sweetness, and thickness in your hot pepper jelly.
- The ideal consistency should be slightly firmer than honey, making it suitable for spreading or using as a glaze.
Bring mixture to a boil, then reduce heat to mediumlow
The pickling process involves several steps that are essential for creating a delicious and tangy hot pepper jelly. The first step is to create a mixture of peppers, vinegar, sugar, and spices. This mixture can be made with a variety of ingredients, including fresh or jarred peppers, apple cider vinegar, granulated sugar, salt, and other spices such as garlic powder and cayenne pepper.
To begin the pickling process, combine the peppers, vinegar, sugar, and spices in a saucepan and bring to a boil over high heat. This step is crucial for dissolving the sugar and salt, as well as extracting the flavors from the peppers.
Once the mixture reaches a rolling boil, reduce the heat to medium-low and allow it to simmer for about 10-15 minutes. This will help to thicken the jelly and bring out the full flavor of the peppers.
Key Steps in the Pickling Process
- Bring mixture to a boil, then reduce heat to medium-low
- Simmer for 10-15 minutes or until desired consistency is reached
- Remove from heat and let cool slightly before transferring to a glass jar with a tight-fitting lid
It’s essential to note that the pickling process can be modified depending on personal preference for the level of sweetness or spiciness. You can adjust the amount of sugar, vinegar, or spices to suit your taste buds.
Tips and Variations
- Use fresh peppers for a more vibrant flavor
- Experiment with different types of vinegar, such as white wine vinegar or balsamic vinegar
- Add other spices, like dried oregano or crushed red pepper flakes, to enhance the flavor
In conclusion, the pickling process for hot pepper jelly is a relatively simple process that requires some patience and attention to detail. By following these steps and adjusting the recipe to suit your taste preferences, you can create a delicious and unique condiment for any occasion.
Step 3: Add Pectin and Vinegar
Add pectin and vinegar to the mixture of sliced hot peppers, sugar, salt, and water at this stage to help thicken the jelly.
Pectin is a natural occurring substance found in the cell walls of plants, particularly in fruits like apples and citrus fruits, as well as in some vegetables such as carrots and potatoes.
It acts as a gelling agent when heated with sugar, resulting in a thick and gelatinous consistency.
The addition of pectin to the hot pepper mixture will begin to break down the cell walls of the peppers, releasing their natural flavor compounds and helping them combine with the other ingredients.
Next, add white vinegar, which serves not only as an acid but also helps in balancing the flavors, enhances the color and clarity of the jelly and prevents spoilage.
The acidity level should be around 5-10% to achieve a good balance for canning.
Using a candy thermometer will allow you to check the temperature of the mixture; it’s essential to reach the gel point which is typically between 220°F (104°C) and 225°F (107°C)
Stir in pectin and white vinegar
The pickling process for hot peppers used in a hot pepper jelly recipe typically begins with preparing the peppers for preservation. This involves cleaning and cutting them into small pieces or slices, depending on the desired texture and flavor.
Next, the chopped hot peppers are packed tightly into a clean glass jar, leaving about 1/4 inch of space at the top. The peppers can be mixed with other ingredients like garlic, onions, or spices to create unique flavors and aromas.
To prepare the pickling liquid, combine water, white vinegar, sugar, and salt in a saucepan. The ratio of water to vinegar is often around 1:1, but this can be adjusted based on personal preference and the type of peppers being used.
The pickling liquid is then brought to a boil, stirring occasionally to prevent scorching or burning. This process typically takes around 10-15 minutes, depending on the stove and saucepan being used.
Once the pickling liquid has reached its boiling point, it’s removed from the heat source and allowed to cool slightly before being poured over the chopped hot peppers in the jar.
The pectin, a natural gelling agent derived from citrus fruits or apples, is then added to the pickling liquid. Pectin helps to thicken the jelly and give it a firmer texture.
Finally, the jar is sealed and refrigerated to allow the flavors to meld together and the pectin to set. The hot pepper jelly can be stored in the refrigerator for several months or frozen for longer-term preservation.
Canning and Storage
Canning Hot Pepper Jelly
Canning hot pepper jelly is a great way to preserve this flavorful condiment and enjoy it throughout the year. The process involves creating a batch of hot pepper jelly, which can be made with either a water bath canner or a pressure canner.
The key to successful canning is understanding the acidity level of the recipe, as well as following safe canning practices to ensure that the jars are properly sterilized and sealed. Acidic Ingredients, such as lemon juice or vinegar, help to create an environment that is unfavorable for bacterial growth, which is essential for preventing spoilage.
Here’s a basic hot pepper jelly recipe:
Ingredients:
- 1 cup _water_
- 1 cup granulated sugar
- 1/4 cup _white vinegar_
- 1-3 _hot peppers_, finely chopped (depending on desired level of heat)
- 1 tablespoon _pectin powder_
- Food coloring (optional)
To begin, combine the water and sugar in a saucepan and bring to a boil over medium-high heat. Reduce the heat to low and add the chopped hot peppers and vinegar. Continue to cook for about 5 minutes or until the peppers have softened.
Next, stir in the pectin powder and continue cooking for another minute or two until it’s fully incorporated. If desired, add a few drops of food coloring to achieve the desired color of the jelly.
The hot pepper jelly is now ready to be filled into clean, sterilized jars using a canning funnel. Be sure to leave about 1/4 inch of headspace and process the jars in a boiling water bath for 10 minutes or more depending on your altitude and equipment.
Once the canning time has elapsed, remove the jars from the canner and let them cool before checking the seals. If the seal is good, store the jar in a cool, dark place for up to one year. Enjoy!
• Process jars using a water bath canner according to university guidelines
The process of canning and storage is a crucial step in preserving hot pepper jelly, as it allows you to enjoy this delicious condiment throughout the year while maintaining its safety and quality.
According to university guidelines, here’s a step-by-step guide on how to process jars using a water bath canner for your hot pepper jelly:
Preparing the Water Bath Canner
Before you start processing your hot pepper jelly, make sure you have a large pot or water bath canner that is at least 3-4 quarts in size. This will provide enough water to cover the jars by at least an inch.
- Select a clean and sanitized canner: Wash the canner with soap and hot water, then sanitize it in boiling water for 10 minutes before use.
- Prepare the rack or steamer basket: Place a rack or steamer basket at the bottom of the canner to hold the jars above the water level.
Loading the Canner and Processing Jars
Now, let’s proceed with loading the canner and processing your hot pepper jelly jars:
- Pack the jars: Carefully place the hot pepper jelly jars into the canner rack or steamer basket, leaving about 1 inch of space between each jar.
- Add water: Fill the canner with enough cold water to cover the jars by at least an inch. The water level should be above the tops of the jars.
- Bring to a boil: Place the lid on the canner and bring the water to a rolling boil, then reduce the heat to a simmer.
- Process the jars: Process the jars for 5-10 minutes from the time the water returns to a boil. This is usually around 20-30 minutes total processing time, depending on your altitude and specific canner instructions.
Cooling and Sealing Jars
After processing the jars, allow them to cool in the canner for 5 minutes before removing them. Next:
- Remove jars from the canner: Use a clean canning tool or tongs to carefully lift the hot pepper jelly jars out of the canner.
- Cool and seal the lids: Place the jars on a towel or clean surface, away from drafts. Allow them to cool, undisturbed, for 12-24 hours before checking the seals. If the lids are concave (curved inward), they have sealed properly. Store the jars in a cool, dark place.
(e.g. from Cornell University’s Food Safety website)
Canning and storage are crucial steps in preserving the hot pepper jelly recipe for later use. It involves sterilizing the jars, filling them with the jelly mixture, and then sealing them to prevent spoilage.
The USDA recommends using a water bath canner to process the filled jars of jelly. This ensures that the jars reach a minimum temperature of 212°F (100°C) to kill off any bacteria or other microorganisms that may be present in the jelly.
According to Cornell University’s Food Safety website, it is essential to follow safe canning practices to avoid foodborne illness. This includes using a pressure canner for high-acid foods like the hot pepper jelly recipe, as they require a higher temperature to ensure safety.
The jars should be processed in the water bath canner for 5-10 minutes after reaching a boil. It is also essential to check the seal of the jars before storing them by pressing on the top of the lid; if the lid does not move and the seal is tight, it is safe to store.
Canned goods should be stored in a cool, dark place, away from direct sunlight and heat sources. The hot pepper jelly recipe should be consumed within 12 months for optimal flavor and quality.
Storage Tips
Canning is an excellent way to preserve hot pepper jelly for later use, but proper storage is also crucial to maintaining its flavor and texture. Here are some tips on canning and storing your hot pepper jelly:
First, ensure that your hot pepper jelly is properly canned according to safe canning practices. This involves filling sterilized jars with the jelly mixture, leaving a specific amount of headspace, and then sealing the jars with new lids and rings.
The ideal storage conditions for hot pepper jelly are cool, dark places with consistent temperatures between 50°F to 70°F (10°C to 21°C). Avoid storing your canned goods in areas exposed to direct sunlight or near heat sources.
It’s essential to store your sealed jars on a shelf, away from the floor and other surfaces that may be prone to moisture. This will help prevent any potential spoilage or contamination.
When choosing a storage location for your canned hot pepper jelly, consider the following factors: proximity to heat sources (e.g., ovens, stoves), direct sunlight, moisture levels (e.g., near sinks or dishwashers), and pest infestations (e.g., rodents, insects).
Avoid stacking jars on top of each other, as this can cause pressure on the lids and potentially lead to spoilage. Instead, place them upright on a shelf, allowing for easy access and minimizing the risk of damage.
Additionally, label your stored jars with their contents (hot pepper jelly), date they were canned, and any relevant storage instructions or notes. This will help you keep track of how long each jar has been in storage.
When it’s time to consume your hot pepper jelly, always inspect the jars for signs of spoilage before opening them. If the lids are rusty, swollen, or exhibit other signs of deterioration, do not use that particular jar and discard it instead.
By following these storage tips and maintaining a clean, dry environment, you can enjoy your homemade hot pepper jelly for months to come while ensuring its quality and shelf life remain intact.
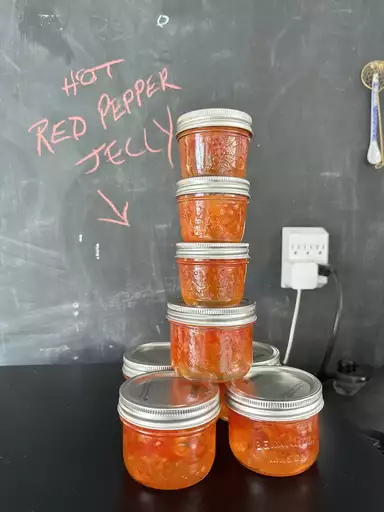
Store canned jelly in cool, dark place for up to one year
To ensure the quality and longevity of your homemade _canned jelly_, it’s essential to store it properly. For the Hot Pepper Jelly Recipe, follow these storage guidelines:
The ideal storage condition for canned jelly is a cool, dark place. This environment helps maintain the jelly’s flavor and texture.
Avoid storing canned jelly in direct sunlight or near heat sources, as this can cause the contents to degrade rapidly. High temperatures, especially above 75°F (24°C), can lead to spoilage or the growth of unwanted bacteria.
Store the canned jelly at a consistent refrigerator temperature below 40°F (4°C). If you prefer not to store it in the fridge, it’s also acceptable to keep it in an unheated area with low humidity. A pantry or cupboard is ideal for this purpose.
As long as your canned jelly has been processed and sealed correctly, following proper canning procedures and guidelines, you should be able to enjoy the contents safely up to one year after preparation. Always check the canned jelly for signs of spoilage before consuming it, such as unusual odors or mold growth.
To extend the shelf life further beyond a year, consider freezing your homemade jelly instead of canning it. However, this method is not suitable for all types of jelly and requires careful attention to packaging and storage techniques to prevent freezer burn or contamination.

- Best LeadsGorilla Alternatives for 2025 - April 22, 2025
- Best Leadzai Alternatives for 2025 - April 22, 2025
- Best LeadSwift Alternatives for 2025 - April 21, 2025
