
Ingredients
Natural Sweeteners
In this article, we’ll explore the world of natural sweeteners and their uses in baking, particularly for our easy creamy banana pudding recipe.
Natural sweeteners are alternatives to refined sugars like white sugar or high-fructose corn syrup. They can add unique flavors and textures to your baked goods while reducing the amount of added sugar.
Here are some popular natural sweeteners:
- Maple Syrup
- Honey
- Coconut Sugar
- Molasses
- Date Sugar
Now, let’s take a closer look at each of these sweeteners:
Maple Syrup
Honey
Honey is a natural sweetener that’s been used for centuries. It has antibacterial properties and can add moisture to baked goods.
Coconut Sugar
Coconut sugar is made from the sap of coconut trees. It contains less fructose than regular sugar and can be used 1:1 in recipes.
Molasses
Molasses is a thick, dark liquid that’s often used to add depth to baked goods. It has a rich, slightly bitter flavor.
Date Sugar
- Date sugar is made from dried dates and can be used as a 1:1 substitute for refined sugar in many recipes.
- In our easy creamy banana pudding recipe, we’ll use honey to sweeten the pudding. Here’s why:
- Honey adds moisture to baked goods without making them too wet or soggy.
- Its antibacterial properties can help preserve the pudding and prevent mold from growing.
- The flavor of honey complements the bananas perfectly, creating a delicious combination.
- Of course, you can use other natural sweeteners in this recipe – just be sure to adjust the amount based on the sweetness level of each sweetener.
1 ripe banana
A ripe banana is a crucial ingredient in many recipes, including the easy creamy banana pudding recipe we will be discussing.
In this case, 1 ripe banana refers to one banana that has reached its peak ripeness.
- Look for bananas with a few brown spots or a slight yellow tint on their skin
- The banana should yield to pressure when gently pressed with your fingers
- A ripe banana will have a sweet and slightly tangy aroma
- The texture of the banana will be soft but still hold its shape
At this stage, the banana is ready to be used in various recipes, including desserts like our easy creamy banana pudding recipe.
When selecting a ripe banana for your recipe, choose one that has no bruises or soft spots, as these can make the banana unusable in certain recipes.
Remember, using an unripe banana may not provide the desired flavor and texture in your dessert, so it’s essential to pick the right banana at the correct stage of ripeness.
1 cup heavy cream
Heavy cream, also known as whipping cream, is a dairy product that plays a vital role in creating rich and creamy textures in various desserts, including banana pudding.
In the context of this recipe, 1 cup of heavy cream serves multiple purposes:
Secondly, it provides an intense, creamy flavor and texture that complements the sweetness of bananas and other dessert ingredients.
The high fat content in heavy cream (approximately 36% fat) also contributes to its rich, velvety mouthfeel. This characteristic is especially important for banana pudding, which relies on a smooth and creamy texture to enhance its overall appeal.
When using 1 cup of heavy cream in the Easy Creamy Banana Pudding Recipe, it’s essential to note that this ingredient should not be replaced with other types of milk or cream. This is because heavy cream has a distinct flavor profile and consistency that can’t be replicated by other dairy products.
To get the best results, ensure that you use high-quality, fresh heavy cream. Avoid using low-fat or non-dairy alternatives, as they may compromise the texture and flavor of your banana pudding.
1/4 cup granulated sugar (or to taste)
The ingredient list for our Easy Creamy Banana Pudding Recipe includes a variety of components that work together to create a rich and creamy dessert.
One of these key ingredients is granulated sugar, which serves as a sweetening agent to balance out the flavors in the pudding. The amount of sugar called for in this recipe is 1/4 cup, but it’s worth noting that you can adjust this quantity to suit your personal taste preferences.
For some people, a smaller amount of sugar may be sufficient, while others may prefer a sweeter dessert and therefore use the full 1/4 cup or even more. This flexibility in recipe design is one of the hallmarks of home cooking, allowing you to tailor your dishes to your individual tastes.
It’s also worth noting that granulated sugar is often used as a bulking agent in recipes like this one, where it helps to thicken and enrich the texture of the pudding. This is especially important when working with creamy desserts like banana pudding, which can be prone to separation or a grainy consistency if not enough stabilizers are present.
Overall, the 1/4 cup of granulated sugar in our Easy Creamy Banana Pudding Recipe serves multiple purposes: it adds sweetness, helps to thicken and enrich the texture, and balances out the flavors in the dessert. When combined with other ingredients like milk, vanilla extract, and sliced bananas, this sugar helps to create a truly indulgent and satisfying treat.
Dairy and Eggs
The key to making a delicious and creamy banana pudding is to use high-quality ingredients, particularly when it comes to dairy products and eggs.
Dairy Ingredients:
- Milk: For this recipe, you will need 2 cups of whole milk or low-fat milk. Using whole milk will result in a richer and creamier pudding, while low-fat milk is a better option for those who want a slightly lighter dessert.
- Heavy Cream: Add 1/2 cup of heavy cream to give your banana pudding an extra layer of richness and creaminess. Heavy cream contains high levels of saturated fats, which makes it perfect for cooking and baking.
- Sugar: You will need 1/4 cup of granulated sugar to balance out the flavors in your banana pudding. Granulated sugar dissolves easily and won’t leave a grainy texture.
Eggs:
- Large Egg Yolks: For this recipe, you will need 3 large egg yolks to help thicken the pudding and give it an intense yellow color. Make sure to separate your egg yolks from the whites before using them in cooking or baking.
Others Ingredients:
- Sliced Bananas: Use 4 ripe bananas and slice them into round pieces for a classic banana pudding look. You can also use fresh or frozen berries to give your dessert an extra flavor boost.
- Pudding Mix: If you want a simpler version of the recipe, you can use 1 box of instant vanilla pudding mix as a substitute for some of the ingredients listed above.
2 large egg yolks
When it comes to making the Easy Creamy Banana Pudding Recipe, we’ll be focusing on the key ingredient that brings it all together – 2 large egg yolks.
Egg yolks are a crucial component in many desserts, particularly those requiring a rich and creamy texture. They serve as an emulsifier, binding ingredients like milk or cream with sugar, flavorings, and other essential elements to create a smooth and velvety consistency.
So what exactly do egg yolks bring to the table? Here are some of the key contributions they make:
- Richness: Egg yolks add depth and richness to desserts, contributing a subtle but unmistakable flavor that’s hard to replicate with other ingredients.
- Emulsification: As mentioned earlier, egg yolks act as emulsifiers, allowing oil-based ingredients like butter or cream to mix harmoniously with water-based elements like sugar and milk.
- Stabilization: Egg yolks help stabilize the texture of desserts, preventing them from becoming too runny or separated. This ensures that your banana pudding remains creamy and consistent throughout.
When working with egg yolks in the Easy Creamy Banana Pudding Recipe, be sure to use room-temperature eggs for optimal results. This allows the egg yolks to mix more smoothly with other ingredients and prevents them from scrambling when heated.
Incorporating egg yolks into your dessert recipes can elevate the texture, flavor, and overall appeal of your creations. By understanding their role in emulsifying ingredients and stabilizing textures, you’ll be able to craft desserts that are not only delicious but also visually stunning.
1 teaspoon vanilla extract
Vanilla extract is a common ingredient used in many baked goods and desserts, including our easy creamy banana pudding recipe. It’s an essential component that adds depth and warmth to the flavor profile.
When selecting vanilla extract for this recipe, it’s best to choose one that’s pure and of high quality. You can find vanilla extract in various forms, such as liquid or paste, but we recommend using a liquid extract for its ease of use and flexibility in measurement.
The 1 teaspoon amount specified in our recipe is relatively standard for most banana pudding recipes. It provides the right balance between sweetness and flavor without overpowering the other ingredients. However, feel free to adjust this amount based on your personal preference or if you’re using a specific type of vanilla extract that has a stronger flavor profile.
It’s worth noting that some people may prefer using vanilla beans instead of vanilla extract for added authenticity and flavor. If you’re one of them, you can substitute the 1 teaspoon vanilla extract with 1/2 vanilla bean, split lengthwise, and use it in place of the extract. Keep in mind that this will also add a slightly different texture to your pudding.
For this recipe, we recommend using a high-quality vanilla extract from a reputable brand or manufacturer. This ensures that you get the best flavor possible without any unwanted additives or artificial ingredients. When in doubt, choose an organic or locally sourced option for added peace of mind and taste.
Instructions
Making the Pudding Base
In making the pudding base for this easy creamy banana pudding recipe, we will follow a series of steps that are essential to create a smooth and rich dessert. First, let’s start with the preparation of our ingredients.
We need to gather a medium saucepan, a whisk, a fine-mesh strainer, and a 9×13 inch baking dish. The baking dish is for chilling the pudding later, while the saucepan and whisk will come in handy as we cook and mix the ingredients. The fine-mesh strainer is used for filtering the mixture to remove any lumps.
Next, we will combine one cup of granulated sugar, two tablespoons of cornstarch, and 1/2 teaspoon of salt in a medium bowl. Mixing these dry ingredients together is crucial as it ensures they are evenly distributed throughout the pudding base.
In another bowl, whisk together one-half cup of unsalted butter, softened to room temperature, and 2 large egg yolks until smooth. This mixture will help thicken the pudding by creating a rich emulsion. Make sure you whisk these ingredients thoroughly to avoid any lumps from forming.
Gradually add in half-and-half (or heavy cream), one cup at a time, while continuously whisking the mixture until it becomes silky and smooth. The addition of dairy will enhance the creamy texture of our pudding base.
In a separate bowl or measuring cup, gently whip 1/2 cup of unsalted butter, softened to room temperature, with an electric mixer until light and fluffy. This extra step of whipping the butter adds air and contributes to a smooth consistency in our final product.
Add this whipped butter mixture into the half-and-half-egg yolk mixture, whisking until well combined. It’s essential not to over-whisk at this stage as it could cause the mixture to become too thin or even curdle. Once these two mixtures are incorporated, add them back into the saucepan containing our dry ingredients.
Whisk everything together and cook on medium heat for about 5-7 minutes, stirring constantly with a wooden spoon until the pudding thickens and reaches your desired consistency. You may notice it slightly thicken in the first few minutes, but this should be enough to create a smooth base that’s not too runny or too firm.
Remove the saucepan from heat and let cool for about 1-2 minutes before straining the pudding mixture through our fine-mesh strainer into the prepared baking dish. Pressing plastic wrap directly onto the surface of the pudding to prevent a crust from forming is crucial at this stage.
Cover with aluminum foil or plastic wrap, depending on preference, and refrigerate for at least 4 hours, allowing it to chill completely in the refrigerator before serving. It’s essential to give our pudding enough time to set and chill properly so that you can enjoy its full flavors.
With these precise steps in mind, you will end up with a smooth and delicious pudding base that’s perfect for our easy creamy banana pudding recipe. Make sure to follow every step carefully for the best results, but most importantly, remember that patience is key when it comes to creating an ideal texture and flavor.
Once your pudding base has chilled completely, you can proceed with adding sliced bananas, whipped cream, or a combination of both to create a mouth-watering dessert. Follow our recipe to combine these toppings and indulge in the delicious world of creamy banana puddings!
Combine heavy cream, granulated sugar, and vanilla extract in a saucepan.
The art of following instructions lies in the meticulous attention to detail and clarity of language used to convey them. A well-crafted instruction is essential in guiding individuals through a process, whether it’s baking a cake or operating complex machinery. In the context of cooking, as seen in an Easy Creamy Banana Pudding Recipe, instructions play a critical role in ensuring that every step is carried out correctly.
When examining the given instruction ‘Combine heavy cream, granulated sugar, and vanilla extract in a saucepan,’ several aspects come into focus. First, it specifies the ingredients involved – heavy cream, granulated sugar, and vanilla extract – each playing a crucial role in the final product of creamy banana pudding.
The second aspect is the method of combination; it instructs the user to combine these ingredients within a saucepan. This suggests that a medium-sized heat-proof pan or pot is necessary for this step. The use of the term ‘saucepan’ indicates that the mixture will likely be heated later in the process, making the selection of the right type of equipment essential.
Furthermore, the instruction assumes a certain level of culinary knowledge or access to information regarding the standard preparation and handling of ingredients like heavy cream. For instance, it might not explicitly mention needing to have the ingredients at room temperature for easier mixing. However, for a recipe that aims to be “easy,” such details should ideally be covered.
The language used is direct and straightforward, aiming to leave as little confusion as possible regarding what actions to take. The absence of any specific quantities or temperatures in this single instruction suggests that more detailed information will follow, possibly including these specifics.
In the context of an Easy Creamy Banana Pudding Recipe, following instructions like these becomes crucial for achieving a consistent and desirable outcome. The ease with which one can prepare such recipes depends on how clear and comprehensive the guidelines are. Therefore, incorporating precise steps that cover every necessary detail is key to making any recipe accessible to a wide range of users.
Ultimately, instructions in cooking recipes serve as more than just guides; they represent a bridge between theory (the desired outcome) and practice (the actual process of preparing it). A well-crafted instruction set the stage for success and helps to ensure that the end result meets or even exceeds expectations. In this case, combining heavy cream, granulated sugar, and vanilla extract in a saucepan is an initial step towards crafting delicious banana pudding, highlighting the importance of careful planning and precise execution.
Cook over medium heat, stirring occasionally, until the mixture simmers.
The instructions provided for cooking the mixture to a simmer are crucial in creating a rich and creamy banana pudding.
First, it’s essential to understand the concept of simmering. Simmering occurs when a liquid is heated to a temperature that creates small bubbles rising to the surface. This process helps to break down the ingredients and infuse them with flavors.
To achieve a simmer, you need to heat the mixture over medium heat. The ideal temperature for this process is between 140°F and 190°F (60°C and 88°C). Be cautious not to exceed these temperatures, as it can lead to scalding, which can spoil the dish.
Moderate stirring is also necessary when cooking the mixture. This ensures that all ingredients are well combined and heated evenly. Avoid over-stirring, as it can break down the starches in the pudding and result in an unappetizing texture.
During the simmering process, you may observe the bubbles rising to the surface more frequently. This is a sign that the mixture is approaching the perfect consistency for your banana pudding.
Once the mixture has reached the desired temperature and bubble formation, remove it from heat immediately to prevent overcooking. The creamy texture and flavor of the pudding will be ready for you to assemble and serve with sliced bananas, Nilla wafers, and a sprinkle of nutmeg.
Remove from heat and let it steep for 5 minutes to allow flavors to meld.
When it comes to creating a delicious and creamy banana pudding, following proper instructions is crucial for achieving the perfect flavor and texture. One key step in this process is removing the pudding mixture from heat and allowing it to steep for 5 minutes.
This step serves several purposes. Firstly, it allows the flavors to meld together, resulting in a richer and more complex taste experience. By giving the ingredients time to steep, the sweetness of the bananas, the creaminess of the heavy cream, and the subtle flavor of the vanilla extract can all come together harmoniously.
Secondly, steeping the pudding mixture helps to infuse the flavors into the creamy base. This is especially important when using fresh or high-quality ingredients, as the natural flavors will be more pronounced and require a bit longer to meld with the cream.
In terms of specific guidance on how to implement this step, here are some key points to keep in mind:
- Timing is everything: Allow the pudding mixture to steep for exactly 5 minutes. This will provide enough time for the flavors to meld without allowing the pudding to become too cold or separated.
- Maintain temperature control: Keep an eye on the temperature of the pudding mixture while it’s steeping, as it may cool down faster than expected. You can place the bowl over a pan of hot water or use a thermometer to monitor the temperature.
- Be patient and let it set: Steeping time is crucial in allowing the flavors to meld together. Resist the temptation to rush through this step, as the end result will be worth the wait.
By following these instructions and taking the time to allow your banana pudding mixture to steep for 5 minutes, you’ll be rewarded with a rich, creamy, and indulgent dessert that’s sure to impress family and friends alike!
Assembly and Serving
Treating with Fresh Bananas
The process of assembling and serving creamy banana pudding involves several steps, including treating with fresh bananas. When it comes to preparing this dessert, the quality and freshness of the ingredients play a crucial role in achieving the desired flavor and texture.
Fresh Bananas: The first step is to select ripe but firm bananas, which are typically yellow in color. For the best results, use high-quality bananas with no visible signs of bruising or blemishes. This will ensure that they have the optimal sweetness and creamy texture.
Preparing the Bananas: To prepare the bananas for the recipe, peel them carefully to avoid damaging the fruit. You can then cut them into bite-sized pieces or slice them depending on your preference. It’s essential to handle the bananas gently to prevent bruising and spoilage.
- Washing the Bananas: Rinse the banana pieces under cold running water to remove any dirt, bacteria, or other contaminants. This step is crucial in maintaining food safety and preventing the spread of diseases.
Treating with Fresh Bananas: Once you have prepared the bananas, it’s time to incorporate them into your creamy banana pudding recipe. Here are a few ways to treat with fresh bananas:
- Sliced Bananas: Slice the bananas thinly and layer them on top of the pudding for added flavor and texture.
- Creamy Banana Pudding Filling: Fold in the sliced or diced bananas into the creamy pudding filling to create a smooth, velvety texture.
- Whipped Cream Topping: Use sliced bananas as a topping for whipped cream, adding an extra layer of flavor and presentation.
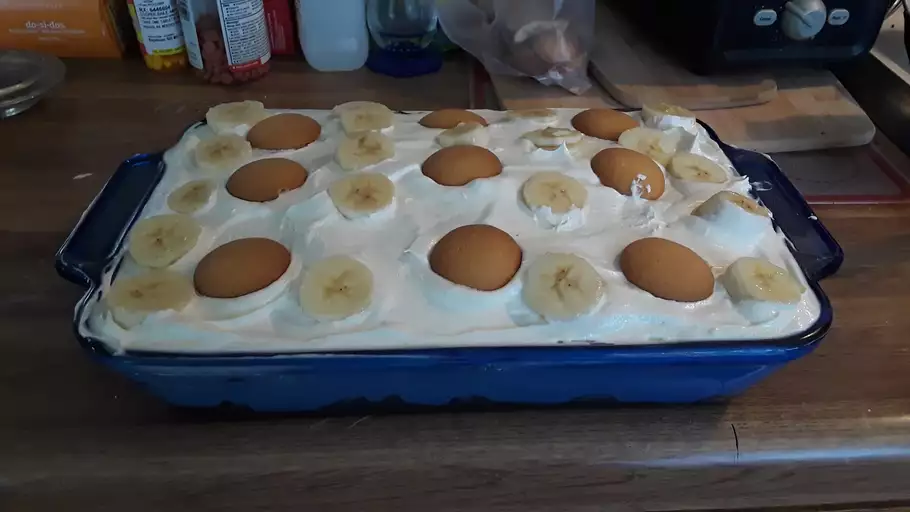
Assembly and Serving: To assemble the creamy banana pudding, you can use various techniques to create visually appealing layers. Here’s one way to do it:
- Nilla Wafers or Graham Crackers: Crumb the Nilla wafers or graham crackers and layer them on the bottom of a serving dish.
- Pudding Filling: Pour the creamy banana pudding filling over the crumbled cookies or crackers.
- Layered Sliced Bananas: Alternate layers of sliced bananas with whipped cream and Nilla wafers or graham crackers to create a visually appealing dessert.
In summary, treating with fresh bananas is an essential step in creating creamy banana pudding. By selecting high-quality bananas, preparing them carefully, and incorporating them into your recipe in creative ways, you can achieve the perfect balance of flavor, texture, and presentation for this beloved dessert.
Slice 2 ripe bananas and layer them in a serving dish or individual cups.
In this task, assembly and serving are crucial steps that require attention to detail to ensure a visually appealing and delicious dessert. The first step involves slicing 2 ripe bananas and layering them in a serving dish or individual cups. It’s essential to use ripe bananas as they will be sweeter and easier to digest. Slice the bananas into thin rounds, making sure each slice is approximately the same thickness for even layering.
Next, place one or two slices of banana at the bottom of each cup, depending on their size. This initial layer serves as a foundation for the other ingredients that will be added subsequently. Make sure to leave enough space at the top of the cup for the remaining layers, which will include the creamy pudding and whipped cream.
After adding the sliced bananas, you can proceed with the assembly of the Creamy Banana Pudding Recipe. This typically involves mixing a combination of vanilla wafers, sugar, eggs, and heavy cream to create a smooth and creamy mixture. You may also add flavorings like vanilla extract or nutmeg for extra depth.
To assemble the individual cups or serving dish, start with a layer of sliced bananas followed by a layer of creamy pudding. Repeat this process until you have used up all the ingredients, finishing with a layer of whipped cream on top. You can also sprinkle additional sliced bananas and vanilla wafers for added texture and visual appeal.
The presentation is equally important as the taste. To create an elegant look, arrange the slices of banana in a circular pattern at the base of each cup or serving dish. This will create a visually appealing centerpiece that showcases the ingredients and adds to the overall aesthetic appeal of the dessert.
Spoon the cooled pudding over the bananas, creating a smooth and creamy surface.
The final step in assembling and serving this decadent dessert is where the magic happens, bringing together all the elements to create a stunning and delicious presentation.
First, let’s talk about the importance of temperature control when it comes to assembling our creamy banana pudding. After chilling the mixture in the refrigerator, the pudding will have set to a firm yet still creamy consistency. This is crucial for creating a smooth surface that will hold its shape and provide a delightful textural contrast with the sliced bananas.
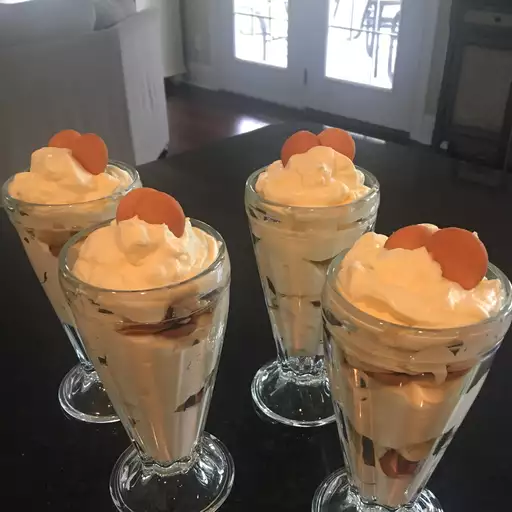
Now, let’s get started on plating our masterpiece! Begin by placing a few slices of fresh banana at the bottom of your serving dish or individual cups. You can arrange them in a pattern or simply create a loose circular shape – it’s up to you and your personal style.
Spoon the cooled pudding over the bananas, creating a smooth and creamy surface that will set the tone for this indulgent treat. Be sure to spread it evenly, making sure there are no bare spots where the banana peeks through. This is also a great time to get creative with toppings – sliced almonds, whipped cream, or even caramel sauce can add an extra layer of flavor and texture to each serving.
Finally, top your banana pudding off with additional sliced bananas, if desired. This adds a pop of color and a nice visual contrast to the creamy dessert below. You can also sprinkle some powdered sugar on top for added sweetness and flair.
Now that our assembly is complete, it’s time to dig in! Slice into this delightful dessert and let the creaminess of the pudding, combined with the natural sweetness of the bananas, melt in your mouth. Enjoy every bite, knowing you’ve created a treat that’s sure to impress even the most discerning palates.
For an added touch of elegance, consider serving this banana pudding in individual glasses or parfait dishes. This makes it easy for guests to serve themselves and adds a charming presentation to any gathering or special occasion.

- Best Datanyze Alternatives for 2025 - April 24, 2025
- Best Hunter.io Alternatives for 2025 - April 22, 2025
- Best Lead411 Alternatives for 2025 - April 22, 2025
