
Ingredients
Rings of Onion
The Blooming Onion recipe features a key ingredient that adds flavor and texture to this popular appetizer: Rings of Onion. These onion rings are typically made from thinly sliced yellow or white onions, which provide a sweet and crunchy base for the dish.
Here’s a list of the ingredients needed to make Rings of Onion:
- Onions: Yellow or white onions work well for this recipe. Choose onions that are firm, with no signs of sprouting or mold.
- Flour: All-purpose flour is commonly used to coat the onion rings, but you can also use a gluten-free flour blend if needed.
- Granulated Sugar: A small amount of sugar helps balance out the acidity in the onions and adds a touch of sweetness.
- Paprika: Smoked or sweet paprika adds depth and smokiness to the onion rings.
- Cayenne Pepper (optional): A pinch of cayenne pepper adds heat to the onion rings, but feel free to omit if you prefer them mild.
- Salt: Use a flaky sea salt or kosher salt to add flavor and texture to the onion rings.
- Water: You’ll need water for the batter mixture. Choose filtered water to prevent any impurities from affecting the taste of your onion rings.
- Vegetable Oil: For frying, use a neutral-tasting oil with a high smoke point, such as canola or peanut oil.
In addition to these ingredients, you’ll also need some basic pantry staples like baking powder and lemon juice. Make sure you have a large bowl for mixing the batter and a heavy-bottomed pot or deep fryer for frying the onion rings.
The blooming onion recipe typically involves several key ingredients to achieve its signature flavor and presentation.
The main ingredient in a blooming onion is the onion itself, which should be a large Vidalia or yellow onion.
For the breading mixture, you will need:
- All-purpose flour, about 1 cup
- Panko breadcrumbs, about 1/2 cup
- Granulated sugar, about 2 tablespoons
- Paprika, about 1 teaspoon
- Salt and pepper, to taste
- Cayenne pepper or red pepper flakes, optional, about 1/4 teaspoon (for some heat)
For the buttermilk mixture:
- Buttermilk, about 1 cup
- Honey or sugar, about 2 tablespoons (to balance the acidity of the buttermilk)
Other ingredients to consider:
- Vegetable oil for frying
- Optional garnishes: chopped scallions, chives, or parsley for added flavor and visual appeal
- Celery sticks and ranch dressing, if desired, to serve on the side with dipping sauce (this is a common accompaniment to blooming onion)

1 large onion, separated into rings
The core ingredient for the Blooming Onion recipe is a single, large onion.
To prepare it, you will need to separate the onion into individual rings, taking care not to cut or bruise any of the delicate layers in the process.
Here’s a step-by-step guide on how to do this:
- Pull each ring away from the rest of the onion and gently separate it into its individual components.
- You can use a paring knife or your fingers to carefully pull apart the layers, taking care not to apply too much pressure that might cause them to break or tear.
- Once you have separated all of the rings, set them aside and continue with the recipe as instructed.
The use of a large onion is crucial for achieving the desired presentation of the Blooming Onion, as it will allow the outer layers to curl up slightly when cooked, creating a visually appealing dish that’s sure to impress your guests.
- The ingredients for a classic Blooming Onion recipe are quite straightforward and can be easily found in most grocery stores.
- To start, you’ll need 1 large onion, preferably a sweet onion such as Vidalia or Maui, which will add a depth of flavor to the dish.
- In addition to the onion, you’ll also require 1 cup all-purpose flour, which will serve as the coating for the onion once it’s been breaded.
- The breading mixture is made up of 1/2 cup panko breadcrumbs and 1/4 cup grated Parmesan cheese, both of which provide a crunchy texture to the dish.
- For added flavor, you’ll also want to include 1 teaspoon paprika, 1/2 teaspoon garlic powder, and 1/2 teaspoon salt in the breading mixture.
- To help bind the ingredients together, 1 egg is cracked and beaten, which will serve as a key component in the breading process.
- Finally, to add a bit of spice to the dish, you can include an optional 1/4 teaspoon cayenne pepper in the breading mixture.
- With these ingredients, you’re well on your way to creating a delicious and mouthwatering Blooming Onion recipe that’s sure to impress!
Mix of Breading
The key to a delicious Blooming Onion lies not only in its crispy exterior but also in its crunchy breading, which plays a crucial role in elevating this appetizer to new heights. The mix of breading typically consists of a combination of ingredients that work together harmoniously to provide the perfect texture and flavor.
One of the primary components of a classic breading mixture is all-purpose flour. This serves as the base ingredient, providing structure and allowing the other ingredients to adhere evenly. You can use regular all-purpose flour or a gluten-free version depending on your dietary needs and preferences.
The next essential element in creating an effective mix of breading is cornstarch. This helps to add a light and airy texture to the onion rings while also providing a hint of sweetness that complements the savory flavors. Cornstarch serves as a great thickener, ensuring the coating adheres evenly without becoming too dense.
Another significant component in most breading mixes is panko breadcrumbs. Panko, which means “bread crumb” in Japanese, is made from crustless white bread that has been ground into fine crumbs. This ingredient provides an exceptional crunch and texture to the onion rings while minimizing grease absorption during cooking.
Spices are another vital element in creating a mouth-watering breading mix for your Blooming Onion Recipe. The most commonly used spices include salt, black pepper, paprika, garlic powder, onion powder, dried parsley, and cayenne pepper (optional). These not only add depth to the flavor but also bring out the natural sweetness of the onions.
A pinch of sugar may seem an unusual addition to a breading mix, yet it helps counterbalance acidity from any added herbs or spices. It also contributes to the overall balance of flavors in your Blooming Onion Recipe. Make sure not to add too much sugar, as this can quickly become overpowering.
When combining these ingredients, you should maintain the right ratio to avoid a breading mix that’s either too wet or too dry. A general guideline is to use two parts flour, one part cornstarch, and one part panko breadcrumbs along with your choice of spices and seasonings. Adjust this proportion according to your preferences and the type of onions you’re using.
Remember, the breading mix should be smooth and evenly coated when combined with the egg wash (beaten eggs mixed with a splash of water). If it feels too crumbly or uneven, consider adjusting the ratio of ingredients or adding more cornstarch to achieve the desired texture. This ensures your Blooming Onion turns out perfectly crunchy on the outside and tender on the inside.
The art of crafting an effective breading mix lies in mastering the right proportions and combination of ingredients. Experiment with different ratios, add new spices, and explore unique flavor combinations to create a signature taste that complements your Blooming Onion Recipe. As you experiment and perfect your breading technique, your creations will only improve with practice, taking your onion rings to unparalleled heights!
To make a delicious Blooming Onion, you’ll need the following ingredients:
- Peeled and sliced yellow onions (about 1 large onion)
- Vegetable oil for frying
- All-purpose flour
- Salt
- Cayenne pepper or red pepper flakes (optional, for some heat)
- Celery seeds
- Paprika
- Garlic powder
- Onion powder
- Buttermilk or milk
- Beaten eggs (for egg wash)
- Breadcrumbs or panko breadcrumbs
- Parmesan cheese (optional, for extra flavor)
Note: You may also want to have some lemon wedges and a plate lined with paper towels on hand to serve the Blooming Onion.
1 cup allpurpose flour
All-purpose flour is a fundamental ingredient in many recipes, including the beloved Blooming Onion dish.
When it comes to using all-purpose flour in cooking and baking, understanding its characteristics and benefits can help you get the most out of your ingredients.
The basic composition of all-purpose flour includes:
- Carbohydrates: All-purpose flour is primarily made up of carbohydrates, which are broken down into simple sugars during digestion. The main types of carbohydrates found in wheat flour are starch and fiber.
- Protein: Wheat flour contains a significant amount of protein, including glutenin and gliadin. Glutenin provides elasticity to dough, while gliadin contributes to the strength and structure of baked goods.
- Fat: Small amounts of fat are naturally present in wheat flour, primarily in the form of lipids.
When measuring 1 cup of all-purpose flour for your Blooming Onion recipe, keep the following tips in mind:
- Weigh or measure accurately: To ensure consistent results, use a digital kitchen scale or measuring cups to accurately measure out the required amount of flour.
- Don’t over-sift: Avoid over-sifting all-purpose flour, as this can lead to compacted flour that doesn’t mix well with other ingredients. Sift only what’s necessary for the recipe.
- Use fresh flour: Freshly opened bags of all-purpose flour will perform better in recipes than older or stale flour.
- Consider the type of all-purpose flour: There are different types of all-purpose flour, such as bread flour and cake flour. For Blooming Onion, regular all-purpose flour is usually sufficient.
1 teaspoon paprika
- The ingredient that adds a smoky depth of flavor to the Blooming Onion Recipe is the paprika.
- Paprika is a spice made from the ground fruit of the sweet or bell pepper plant, and it comes in various colors including red, yellow, brown, white, black, and smoked paprika.
- The most commonly used type for cooking is the sweet paprika which has a mild flavor and is often used to add color and depth to dishes without adding heat.
- In this recipe, 1 teaspoon of paprika is added to give the onion its signature red color and smoky taste that complements the savory flavors of the blooming onion.
- The paprika can be found in most supermarkets in the spice aisle or online, and it’s an essential ingredient for adding a Mediterranean flair to many recipes.
1/2 teaspoon garlic powder
- The Blooming Onion Recipe requires a combination of ingredients to create a delicious and savory side dish.
- In terms of spices, garlic powder plays a crucial role in adding flavor to the Blooming Onion. The recipe calls for 1/2 teaspoon of garlic powder, which is an essential component that enhances the overall taste.
Here are the key characteristics of garlic powder:
- Powdered form
- Dried garlic that has been ground into a fine powder
- Has a pungent, savory flavor with a hint of sweetness
- Often used to add depth and complexity to various dishes
- Moderate intensity, not as strong as fresh garlic but still potent
- Can be stored for a long time due to its dried nature
The 1/2 teaspoon of garlic powder is an essential component in the Blooming Onion Recipe. It’s recommended to use a high-quality garlic powder that has not been mixed with other spices or preservatives.
1/2 teaspoon salt
The key to achieving the perfect flavor and texture for the Blooming Onion Recipe lies in selecting the right ingredients, particularly when it comes to salt.
Salt serves as a fundamental seasoning in many recipes, enhancing flavors, balancing sweetness, and even affecting the texture of ingredients by controlling moisture levels. When using 1/2 teaspoon of salt in the context of the Blooming Onion Recipe, its role is multifaceted.
Firstly, salt is crucial for bringing out the natural flavors of other ingredients. In the case of a blooming onion, which typically consists of onions and sometimes additional vegetables or seafood, salt helps to release their inherent sweetness and depth.
Secondly, salt acts as a preservative. When properly used in cooking, especially at the beginning stages before heat is applied, it can help prevent bacterial growth and food poisoning by creating an environment that inhibits harmful microbial activity.
The specific use of 1/2 teaspoon salt is significant because it represents a moderate amount of seasoning that doesn’t overpower the other flavors but instead complements them effectively. The balance achieved with this amount of salt allows the unique taste profiles of individual ingredients to shine through.
When using 1/2 teaspoon salt in recipes, consider its texture and how it blends into the mixture. Finer grains dissolve quickly in sauces or batter, while coarser textures remain noticeable even after cooking.
The choice between different types of salt also matters. For example, kosher salt or sea salt often have coarser crystals than table salt but yield a cleaner, less metallic flavor when used in cooking. This is particularly important in the context of delicate dishes like the Blooming Onion Recipe where subtle flavors are key to achieving perfection.
1/4 teaspoon black pepper
The Blooming Onion Recipe requires a specific list of ingredients to achieve the perfect flavor and texture. Among these, 1/4 teaspoon black pepper plays a crucial role in enhancing the overall taste experience.
Black pepper is a fundamental spice used in various culinary dishes worldwide, including the Blooming Onion Recipe. Its distinct pungency adds depth and complexity to the onion’s natural sweetness, creating a harmonious balance of flavors.
The precise measurement of 1/4 teaspoon black pepper may seem insignificant, but it contributes significantly to the dish’s overall character. This moderate amount of pepper allows the onion’s sweetness to shine without overpowering other ingredients or masking their subtle nuances.
In the context of the Blooming Onion Recipe, the 1/4 teaspoon black pepper complements other seasonings such as paprika, garlic powder, and salt, creating an aromatic blend that elevates the dish to a new level of sophistication.
When using black pepper in this recipe, it’s essential to note that freshly ground pepper will yield better results than pre-ground varieties. This ensures that the pepper retains its potency and contributes to the dish’s optimal flavor profile.
The choice of high-quality black peppercorns also impacts the overall taste experience. Selecting peppercorns with a rich, slightly sweet aroma will enhance the onion’s natural sweetness, resulting in a more well-rounded flavor.
1 cup buttermilk
The key to making a delicious Blooming Onion Recipe lies not only in its unique presentation but also in the quality and quantity of its ingredients. One crucial component that sets this dish apart from other appetizers or side dishes is 1 cup of buttermilk. But what exactly does that mean, and why is buttermilk so essential to this recipe?
Buttermilk is a type of cultured milk product that has been around for centuries, with its origins dating back to the early days of dairy farming. It’s made by adding bacterial cultures to regular low-fat or full-fat milk, which causes it to ferment and thicken. The resulting liquid is high in acidity and contains lactic acid bacteria, giving it a tangy flavor.
So why do we need 1 cup of buttermilk for the Blooming Onion Recipe? In this case, the buttermilk serves two purposes: tenderization and breading. The acidity in the buttermilk helps to break down the connective tissue in the onions, making them more palatable and easier to bite into. At the same time, when we use the buttermilk as a marinade for the onion rings, it acts as an adhesive, helping the flour mixture cling to the onions evenly.
Now, let’s talk about how to incorporate 1 cup of buttermilk into your Blooming Onion Recipe. Here are some tips to keep in mind:
- Always choose a high-quality buttermilk that is rich and creamy. You can find this type of buttermilk at most grocery stores or make it yourself by adding bacterial cultures to regular milk.
- When using the buttermilk as a marinade, make sure to coat the onion rings evenly and let them sit for at least 30 minutes before frying.
- Be gentle when handling the onion rings after they’ve been marinated. You want to maintain their texture and prevent them from becoming too fragile or falling apart.
- Experiment with different seasonings and spices in your buttermilk mixture to give your Blooming Onion Recipe a unique flavor profile that suits your taste preferences.
Vegetable oil for frying
Vegetable oil for frying is an essential ingredient in many recipes, including the popular Blooming Onion dish. The right type and quality of vegetable oil can make a significant difference in the outcome of your cooking.
The key characteristic of good vegetable oil for frying is its high smoke point, which is the temperature at which the oil starts to break down and smoke. This is crucial because when you’re frying food, the oil is heated to a very high temperature, often above 350°F (180°C). If the oil has a low smoke point, it can start to break down and produce unhealthy compounds that can affect the flavor and texture of your food.
Some popular types of vegetable oils for frying include peanut oil, corn oil, and soybean oil. However, these oils have different characteristics and uses in the kitchen.
Peanut oil has a mild nutty flavor and is often used in Asian cuisine. It has a high smoke point of around 450°F (230°C), making it ideal for frying delicate foods like french fries or tempura.
Corn oil, on the other hand, has a milder flavor than peanut oil and is often used for general-purpose cooking. It has a moderate smoke point of around 400°F (200°C) and is suitable for frying a wide range of foods, including fried chicken or onion rings.
Soybean oil is another popular choice for frying, with a mild nutty flavor and a high smoke point of around 460°F (240°C). However, it can be prone to oxidation when heated, which can affect its flavor and texture over time.
For the Blooming Onion recipe specifically, you’ll want to use a neutral-tasting oil that can withstand the high temperatures involved in frying. Peanut oil or soybean oil would both be good choices for this recipe, but avoid using corn oil as it may impart an unpleasant flavor to the onions.
When choosing vegetable oil for frying, look for a high-quality product that is certified by a reputable third-party organization such as the USDA Organic seal or the Non-GMO Project Verified logo. This ensures that the oil is made from pure ingredients and has not been contaminated with pesticides or other chemicals.
The Blooming Onion recipe typically calls for a combination of ingredients that are readily available in most supermarkets.
Here is a detailed list of the required ingredients:
- Cut up yellow onion
- All-purpose flour
- Egg, beaten
- Milk, buttermilk or regular milk with a tablespoon of white vinegar or lemon juice mixed in
- Vegetable oil for frying
- Paprika, garlic powder and salt, used to season the onion petals before cooking
- Cayenne pepper (optional), for added spice
- Remoulade sauce, prepared according to a specific recipe or store-bought variety (usually contains mayonnaise, ketchup, and herbs)
The Blooming Onion is typically made with the following main ingredients:
- Yellow onion – It serves as the base ingredient for the recipe and gives it a pungent flavor.
- Paprika – This is used in addition to salt, garlic powder and cayenne pepper to add flavor to the onions before they are deep-fried.
The following ingredients can be used for remoulade sauce:
- Mayonnaise (as the main base ingredient)
- Ketchup, adding a sweet and tangy flavor to the mixture.
- Chopped herbs – Dill, parsley or tarragon can be used to provide a fresh flavor component in remoulade sauce.
The preparation of Blooming Onion involves separating onion into individual rings, dipping them in a mixture of flour and seasonings, then deep-frying until crispy.
Pickling Liquid
Cooking the perfect Blooming Onion recipe involves not only mastering the technique of deep-frying but also creating a tangy and flavorful dipping sauce, which is where the pickling liquid comes in.
For the pickling liquid, you will need a combination of ingredients that provide acidity, sweetness, and spice to balance out the flavors.
The main ingredients for the pickling liquid are vinegar (such as white wine or apple cider), water, salt, granulated sugar, garlic powder, onion powder, dried parsley, dried dill weed, black pepper, and red pepper flakes.
Start by mixing together 1 cup of vinegar with ½ cup of water in a saucepan. Add in 1 tablespoon of salt and 2 tablespoons of granulated sugar, stirring until the sugar has dissolved.
Add in 1 teaspoon of garlic powder and 1/2 teaspoon of onion powder to give it a savory flavor, along with 1/4 teaspoon of dried parsley and 1/4 teaspoon of dried dill weed for added depth.
Finally, add in 1/8 teaspoon of black pepper and 1/8 teaspoon of red pepper flakes to give it a spicy kick.
Bring the mixture to a boil over medium-high heat, then reduce the heat to low and simmer for about 5 minutes or until it has thickened slightly.
This pickling liquid is the perfect accompaniment to your Blooming Onion recipe, adding a tangy and flavorful punch to each bite.
The Blooming Onion recipe is a popular appetizer dish that originated from the Outback Steakhouse restaurant chain.
In order to make this delicious dish, you will need some essential ingredients. Here are the key components:
- 1 large onion, preferably sweet or Vidalia variety
- 1 cup all-purpose flour
- 1 teaspoon paprika
- 1/2 teaspoon garlic powder
- 1/2 teaspoon salt
- 1/4 teaspoon black pepper
- 1 cup buttermilk
- Vegetable oil for frying (about 2-3 inches deep in a pot)
In addition to the main ingredients, you will also need some optional items to enhance the flavor and presentation of your Blooming Onion.
- Cajun seasoning or red pepper flakes for added heat (optional)
- Chopped fresh parsley or chives for garnish (optional)
The blooming onion is typically served with a dipping sauce made from a combination of mayonnaise, ketchup, and spices. Here are the ingredients for the sauce:
- 1/2 cup mayonnaise
- 1/4 cup ketchup
- 1 tablespoon Worcestershire sauce
- 1 teaspoon hot sauce (optional)
- Salt and pepper to taste
1 cup white vinegar
Vinegar plays a crucial role in the Blooming Onion recipe as it helps to tenderize the onion and add a tangy flavor.
The recommended amount of white vinegar for this recipe is 1 cup, which might seem like an excessive amount but trust us, it’s essential for achieving that perfect balance of flavors.
White vinegar, also known as distilled vinegar or spirit vinegar, is a clear liquid with a pungent smell and taste. It’s commonly used in cooking to add flavor and acidity to dishes.
In the context of the Blooming Onion recipe, the white vinegar helps to break down the onion’s cell walls, making it tender and easier to cook. The acid in the vinegar also helps to balance out the sweetness of the onion and other ingredients, creating a harmonious flavor profile.
It’s worth noting that you can use other types of vinegar, such as apple cider or balsamic vinegar, but white vinegar is the traditional choice for this recipe. White vinegar has a sharp, tangy taste that complements the savory flavors in the onion and other ingredients.
To prepare the Blooming Onion recipe, start by cutting the onion into rings or petals. Then, mix together the flour, cornstarch, paprika, garlic powder, and salt in a shallow dish. In a separate bowl, whisk together the white vinegar and water until well combined.
Dip each onion ring into the vinegar mixture, coating both sides evenly. Then, place the coated onion ring into the flour mixture, pressing gently to ensure it adheres. Repeat this process for all the onion rings, making sure they’re evenly coated with the vinegar and flour mixture.
Heat about 1/2 inch of oil in a skillet over medium-high heat until it reaches around 375°F (190°C). Carefully place the coated onion rings into the hot oil, being careful not to overcrowd the skillet. Fry the onions for about 3-4 minutes on each side or until they’re golden brown and crispy.
Remove the Blooming Onion from the oil with a slotted spoon and drain off any excess grease on paper towels. Serve immediately and enjoy!
1 tablespoon Worcestershire sauce
The inclusion of one tablespoon of Worcestershire sauce in the Blooming Onion recipe serves to elevate the overall flavor profile of the dish. This condiment is a fermented liquid made from a combination of ingredients such as tamarind extract, soy sauce, molasses, sugar, vinegar, onion, garlic, salt, cloves, and other spices.
The flavor components found in Worcestershire sauce are diverse and complex, allowing it to complement the natural flavors present in various foods. In the context of the Blooming Onion recipe, the addition of this sauce is intended to enhance the savory characteristics of the onion rings, as well as balance their sweetness.
Worcestershire sauce is also a common ingredient in many cuisines, including traditional British and American cooking. Its use in various recipes has become widespread due to its versatility in adding depth and umami flavor to dishes. In the Blooming Onion recipe specifically, the Worcestershire sauce serves as a key component that helps to create a harmonious balance of flavors.
When using Worcestershire sauce in the Blooming Onion recipe, it is essential to note that a small amount should be added to avoid overpowering the other ingredients. One tablespoon is typically sufficient for this purpose, allowing the flavors present in the onion rings to remain prominent while still benefiting from the addition of the Worcestershire sauce.
2 cloves garlic, minced
- The first ingredient we will be using for our Blooming Onion recipe is 2 cloves garlic, minced.
- When it comes to mincing garlic, it’s essential to use fresh and high-quality cloves. This means selecting firm, white, or pale yellow garlic bulbs with no signs of sprouting or mold.
- To mince the garlic, peel each clove using a gentle rock or a specialized garlic peeler tool.
- Next, place the peeled garlic clove on a cutting board and hold it firmly in place with one hand.
- Using a sharp knife, slice the garlic clove into thin, fine slices. To do this, position the tip of the blade at a 45-degree angle over the garlic and carefully rock the knife back and forth to create even, delicate cuts.
- Continue slicing until you have obtained the desired amount of minced garlic for your recipe – in our case, two cloves.
- Minced garlic is highly aromatic and has an intense flavor, so a little goes a long way. Be sure to use it sparingly and adjust the quantity according to taste when mixing it with other ingredients.
- When using 2 cloves of minced garlic in your Blooming Onion recipe, you can expect a rich, savory flavor profile that complements the crispy onion petals perfectly.
- The key to a great Blooming Onion recipe lies in its ingredients, which should be fresh and of high quality. For this classic appetizer, you’ll need:
- 1 large onion, preferably a sweet onion variety such as Vidalia or Maui
- Vegetable oil for frying (about 2-3 cups)
- Blooming Onion seasoning mix, which typically includes paprika, garlic powder, salt, and other spices (you can make your own blend or use store-bought)
- Celery sticks and dipping sauce (such as ranch dressing or a homemade variation) for serving
- Optional ingredients that can enhance the flavor and texture of the Blooming Onion include:
- Buttermilk for marinating the onion before frying
- Sliced almonds or breadcrumbs for added crunch
- Garlic powder or minced garlic for extra flavor
- Dried herbs like thyme or rosemary for a unique twist
The type and quality of onion you choose will significantly impact the taste and texture of your Blooming Onion. Sweet onions are naturally sweeter and less acidic than yellow or white onions, making them ideal for this recipe.
When selecting an onion, look for one with a firm, compact shape and no signs of sprouting or blemishes. Avoid using onions that are too large or have a strong smell, as they may be more bitter or overpowering.
Vegetable oil is the best choice for frying your Blooming Onion, as it has a high smoke point (the temperature at which it starts to break down) and can handle the high heat required for frying. You’ll need about 2-3 cups of oil to deep-fry the onion, depending on its size.
The seasoning mix is where you can get creative and make your Blooming Onion truly unique. You can use store-bought mixes or make your own blend using a combination of spices like paprika, garlic powder, salt, and other seasonings. Some people like to add a pinch of cayenne pepper or red pepper flakes for an extra kick.
The celery sticks and dipping sauce are essential components of the Blooming Onion experience. You can serve the onion with a side of ranch dressing, blue cheese dressing, or even make your own homemade variation using sour cream, mayonnaise, and herbs.
Treatment and Preparation
Soaking the Onion Rings
To prepare onion rings that are crispy on the outside and tender on the inside, it’s essential to treat them with a combination of soaking and marinating steps.
The first step in treating your onion rings is to soak them in cold water for at least 30 minutes. This will help remove excess sugar from the onions and make them less likely to become bitter during cooking.
Here’s a step-by-step guide to soaking and preparing onion rings:
- Cut one large red or yellow onion into 1/2-inch thick rings, separating them carefully so they don’t break apart. Place the onion rings in a bowl or container with enough cold water to cover them.
- Soak the onion rings for at least 30 minutes to allow excess sugar to leach out and help prevent bitterness during cooking.
- After soaking, drain the onion rings thoroughly using a fine-mesh sieve or strainer. Shake off as much water from the onions as possible to remove excess moisture.
Once you’ve drained the onion rings, it’s time for the marinating step. In a separate bowl or container, combine:
- 1 cup of buttermilk (or plain yogurt)
- 2 tablespoons of hot sauce (optional)
- Salt and pepper to taste
Pour the marinade over the onion rings in a large bowl or container. Toss gently to ensure the onions are fully coated with the buttermilk mixture.
Refrigerate the onion rings for at least 2 hours or overnight (up to 24 hours). This will allow them to absorb flavors and become extra crispy when cooked.
Before cooking, remove the onion rings from the refrigerator and pat them dry with a paper towel to remove excess moisture. This step is crucial in achieving crispy onion rings that don’t fall apart during cooking.
Separate the onion rings into 1inch pieces and submerge them in buttermilk to remove excess sulfur.
To achieve a crispy exterior and fluffy interior, it’s essential to properly treat and prepare the onion rings for cooking. Here are the steps involved in preparing your blooming onion:
Treatment: Removing Excess Sulfur
- Separate the onion into individual rings, making sure to keep them intact.
- Submerge each ring in a container filled with buttermilk. This will help remove excess sulfur from the onion.
- Let the onions sit in the buttermilk for at least 30 minutes to an hour. This step is crucial in removing excess sulfur, which can make your blooming onion smell pungent and unpleasant.
Preparation: Creating a Crunchy Exterior
- After the onions have soaked in buttermilk for at least 30 minutes, remove them from the liquid using a slotted spoon or tongs.
- Dry each onion ring thoroughly with paper towels to remove excess moisture. This will help create a crunchy exterior when cooked.
- In a separate container, mix together a combination of flour, paprika, garlic powder, and any other desired seasonings for your blooming onion.
Cooking the Blooming Onion
- Heat about 1/2-inch (1 cm) of oil in a large skillet over medium-high heat. Once hot, add the onion rings in batches and fry until golden brown.
- Using tongs or a slotted spoon, carefully remove the fried onion rings from the skillet and place them on paper towels to drain excess oil.
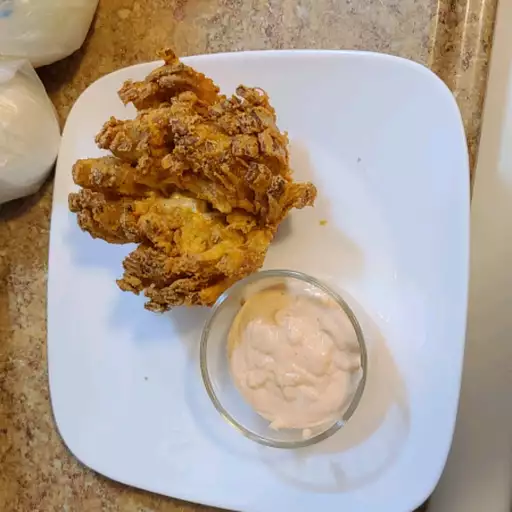
Serving the Blooming Onion
- To assemble your blooming onion, arrange the fried onion rings in a circular pattern on top of each other. You can use a wooden skewer or toothpick to hold them together.
- Drizzle with your favorite dipping sauce and serve immediately.
This is just one way to prepare and cook your blooming onion recipe, feel free to experiment with different seasonings and toppings to create a unique flavor combination that suits your taste buds.
Mixing Breading Ingredients
The preparation and treatment of ingredients for the breading mixture are crucial steps in creating a crispy and flavorful coating for the blooming onion.
To prepare the ingredients, it’s essential to have the following items readily available:
- 1 cup all-purpose flour: This will serve as the foundation of the breading mixture.
- 2 teaspoons paprika: A mild, sweet spice that adds depth and complexity to the breading.
- 1 teaspoon garlic powder: Provides a savory flavor and aroma to the breading.
- 1 teaspoon onion powder: As mentioned earlier, this will enhance the onion’s natural flavor.
- 1/2 teaspoon salt: Used to season the breading and bring out the flavors of other ingredients.
- 1/4 teaspoon black pepper: Adds a subtle kick and helps balance the flavors in the breading mixture.
- 1 cup cornstarch: A key ingredient for creating a crunchy coating on the blooming onion.
- Vegetable oil for frying: Used to fry the blooming onion and create its signature crispy exterior.
Now, let’s move on to the treatment of ingredients:
Creamy buttermilk mixture
- Mix 1 cup buttermilk and 1 tablespoon hot sauce (if using) in a bowl.
- Whisk the mixture until it’s well combined and the buttermilk has lost its thick texture.
Panko breading mixture
- In a separate bowl, whisk together flour, paprika, garlic powder, onion powder, salt, and black pepper until well combined.
- Add cornstarch to the bowl and mix until it’s evenly distributed throughout the dry ingredients.
Now that the breading mixture is ready, you can proceed with coating the blooming onion. Dip each onion ring into the buttermilk mixture, followed by a generous coating of the Panko breading mixture, shaking off any excess.
In a separate bowl, combine flour, paprika, garlic powder, salt, and black pepper. Dip onion rings in breading mix, shaking off any excess.
The treatment and preparation of onion rings for the Blooming Onion recipe involves several steps to ensure that they are crispy on the outside and tender on the inside.
To begin, separate the onion into individual rings by cutting it in half lengthwise and then slicing each half into 1-inch wide rings. Place the onion rings in a shallow dish or tray and set them aside for later use.
In a separate bowl, combine flour, paprika, garlic powder, salt, and black pepper. This breading mix will be used to coat the onion rings, giving them flavor and texture.
Dip each onion ring into the breading mixture, pressing the crumbs gently onto the ring to ensure they stick. This will help create a crunchy coating that complements the tender onion inside.
After dipping an onion ring in the breading mix, place it back onto the plate or tray with the other rings. Repeat this process for each onion ring, making sure not to overcrowd the dish.
Once all of the onion rings have been breaded, heat about 1/2 inch (1 cm) of vegetable oil in a large skillet over medium-high heat. When the oil is hot and shimmering, add a few onion rings to the pan, being careful not to overcrowd it.
Fry the onion rings for about 2-3 minutes on each side, or until they are golden brown and crispy. Repeat with the remaining onion rings, adjusting the heat as needed to prevent burning.
Remove the fried onion rings from the oil with a slotted spoon and place them on a paper towel-lined plate to drain excess oil. Serve immediately and enjoy!
Frying the Onion Rings
Treatment and Preparation for Frying the Onion Rings:
To prepare the onion rings for frying, it’s essential to separate them from the rest of the onions in the Blooming Onion. The onion ring portion consists of the outer layers of the onion, which are typically thicker and more crunchy than the inner layers.
Here are the steps involved:
- Fryer Oil Preparation: Prepare a deep frying pan or a fryer basket by filling it with approximately 1-2 inches of vegetable oil (preferably peanut oil) and heating it to around 350°F (175°C). It’s crucial to have the correct temperature for frying, as both too high or too low temperatures can result in undercooked or overcooked onion rings.
- Onion Ring Separation: Carefully remove the desired amount of onions from the Blooming Onion and separate them into individual layers. It’s essential to maintain their shape and size so that they don’t break apart while frying.
- Dredging: Once the onion rings are ready, dredge them in flour or a seasoned breading mixture, making sure they’re evenly coated on both sides. This step will help create a crispy exterior and a tender interior when fried.
- Frying: Gently place the breaded onion rings into the preheated oil in batches, if necessary. Fry them for around 2-3 minutes or until they turn golden brown and crispy. Repeat this process for any remaining onion rings.
- Drain Excess Oil: Remove the fried onion rings from the oil with a slotted spoon or a skimmer and place them on a paper towel-lined plate to drain excess oil.
For an extra crispy coating, you can try using a double-frying method. First, fry the onion rings at 325°F (165°C) for 2-3 minutes to partially cook them. Then, increase the temperature to 375°F (190°C) and fry them again until they’re golden brown.
The key to achieving perfect Blooming Onion Rings is maintaining a precise temperature during frying. Remember that oil temperature can fluctuate depending on the ambient environment and the number of batches being cooked, so adjust the heat accordingly to achieve the ideal results.
Fry onion rings in vegetable oil until golden brown, about 23 minutes per side.
The key to achieving crispy and flavorful onion rings lies in proper treatment and preparation before frying them in vegetable oil.
First, select a sweet and mild onion variety such as Vidalia or Maui onions for this recipe, as they will yield a better flavor and texture compared to other types of onions.
To begin with, separate the onion into individual rings and carefully place them on paper towels to remove excess moisture. This step is crucial in preventing onion rings from sticking together during frying.
Next, mix a buttermilk-based marinade (usually 1 cup of buttermilk for every 2 cups of onion rings) with salt and your desired seasonings or spices. You may add garlic powder, paprika, or other herbs to give the onion rings extra depth of flavor.
Submerge each onion ring in the marinade mixture, ensuring they are completely coated before refrigerating them for about 30 minutes to an hour. This step helps to tenderize the onions and allows the flavors to penetrate deeper into the layers.
After marinating, remove the onion rings from the refrigerator and gently coat them with a dry breading mixture (all-purpose flour or cornstarch work well) in small batches to avoid overcrowding. Be sure to press the excess breading off each ring for even cooking.
In a separate pot or deep fryer, heat 2-3 inches of vegetable oil to the ideal frying temperature of approximately 350°F (175°C). You may use either peanut or avocado oil as they have high smoke points and produce minimal flavor transfer during the frying process.
Once the oil reaches the desired temperature, carefully place a batch of onion rings into the hot oil using a slotted spoon. Fry the first side for around 2-3 minutes or until golden brown, then flip them over to cook for an additional 2-3 minutes on the other side. Repeat this process with all remaining batches.
After frying and removing the onion rings from the pot, place them directly onto a paper towel-lined plate to drain excess oil before serving immediately.
Pickling the Fried Onion Rings
To achieve the perfect crispy and flavorful pickled fried onion rings, also known as blooming onions, several steps are involved in treatment and preparation.
The first step begins with slicing the onion into 3/4-inch thick rounds, ensuring that each round remains intact at the bottom.
Next, separate each ring of onion from the others, carefully creating the signature shape of a blooming onion.
After preparing the onions, they are dredged in all-purpose flour to coat evenly, followed by dipping them in a mixture of egg and water for additional moisture and adhesion.
The onions are then coated with a seasoned flour mixture that includes ingredients such as paprika, garlic powder, salt, and pepper.
This process not only adds flavor but also provides the onion rings with an extra layer of texture and crunch.
Heat about 1/2-inch deep of oil in a large skillet over medium-high heat until it reaches approximately 375°F (190°C). Carefully place as many onion rings into the hot oil without overcrowding them, allowing for even cooking and browning on both sides.
Once cooked to golden brown perfection, remove the onion rings from the oil with a slotted spoon or skimmer, draining excess oil before transferring them to a paper towel-lined plate to cool slightly.
Prepare the pickling solution by combining vinegar, water, granulated sugar, salt, and other desired spices in a saucepan, then bringing the mixture to a simmer over medium heat until it has thickened slightly.
After preparing both the onion rings and pickling solution, the final step involves submerging the cooked onion rings into the cooled pickling liquid, allowing them to steep for at least 30 minutes before serving.
This lengthy process allows for a perfect blend of flavors and textures, creating an irresistible treat that can be enjoyed as a snack or appetizer.
Combine white vinegar, Worcestershire sauce, and minced garlic for a pickling liquid. Place fried onion rings in a shallow dish, cover with the pickling mixture, and refrigerate before serving.
To create a delicious and tangy accompaniment to your Blooming Onion dish, it’s essential to prepare and treat the onion rings appropriately. The process involves combining three key ingredients – white vinegar, Worcestershire sauce, and minced garlic – to create a flavorful pickling liquid.
The preparation begins by making the pickling mixture, which is the essence of the tangy taste in the Blooming Onion Recipe. To make this mixture, combine 1/2 cup of white vinegar with 1 tablespoon of Worcestershire sauce and 1 minced garlic clove in a small bowl. Mix these ingredients well until they are fully incorporated.
Next, prepare the onion rings for pickling by placing them in a shallow dish or container that is large enough to hold all the onions in a single layer. Pour the pickling mixture over the onion rings, making sure each piece of onion is coated with the liquid. Cover the dish with plastic wrap or a lid and refrigerate for at least 30 minutes before serving.
The combination of the tangy vinegar and Worcestershire sauce with the savory garlic will infuse into the onions as they chill in the refrigerator, allowing the flavors to meld together and intensify. Once chilled, serve the onion rings along with your Blooming Onion dish for a delightful combination of crunchy texture and flavorful taste.

- Best Datanyze Alternatives for 2025 - April 24, 2025
- Best Hunter.io Alternatives for 2025 - April 22, 2025
- Best Lead411 Alternatives for 2025 - April 22, 2025
