Ingredients
Russian Honey Cake Recipe Essentials
The ingredients for a traditional Russian Honey Cake recipe are essential to its authentic taste and texture.
One of the primary components of this dessert is honey, which provides sweetness and flavor. The type of honey used can vary, but it’s often recommended to use a high-quality, pure honey that’s free from additives or preservatives.
Another crucial ingredient in Russian Honey Cake is wheat flour, which serves as the foundation for the cake’s texture and structure. Unbleached all-purpose flour is commonly used, although some recipes may specify bread flour for added density.
Eggs are also a vital component of this dessert, providing richness, moisture, and leavening power. Whole eggs or egg yolks can be used, depending on the desired consistency and flavor.
Butter or oil is often used in Russian Honey Cake recipes to add moisture and tenderness to the cake. The type of fat used may vary, with some recipes preferring vegetable oil for a lighter texture.
Salt is an essential seasoning that balances out the sweetness of the honey and other ingredients. Fine sea salt or kosher salt are good options for this purpose.
Vanilla extract is another flavor component commonly found in Russian Honey Cake recipes, adding a subtle but distinctive note to the dessert’s overall taste.
Cinnamon and nutmeg may also be used as spices to add depth and warmth to the cake. However, these ingredients can be omitted or adjusted according to personal preference.
Milk or other dairy products like sour cream or heavy cream may be used in some recipes to enhance the cake’s moisture and tenderness.
1 cup (200g) honey
Honey is a fundamental ingredient in many traditional recipes around the world, including the iconic Russian Honey Cake recipe. In this context, we’re using 1 cup or 200 grams of honey to sweeten and add moisture to the cake.
The quality and characteristics of the honey can greatly impact the final result of the Russian Honey Cake. For instance, a high-quality dark or golden honey will add a rich flavor profile and darker color to the cake compared to lighter-colored honeys like clover or acacia honey.
It’s worth noting that some types of honey may have stronger flavors or aromas than others. If you’re using a particularly strong-tasting honey, such as buckwheat or wildflower, you might consider reducing the amount used in the recipe to avoid overpowering the other ingredients.
In terms of measurement, 1 cup or 200 grams of honey is equivalent to approximately 16 tablespoons or 8 ounces by weight. This volume of honey will provide a strong sweetness and contribute to the characteristic flavor of the Russian Honey Cake.
When using honey in baking, it’s also important to keep in mind that different types of honeys have varying levels of water content. A darker honey, for example, may contain more water than a lighter-colored variety. This can impact the overall texture and consistency of the final cake.
To ensure the best results, it’s a good idea to use high-quality honey that is fresh and free of additives or preservatives. You should also be aware of any potential allergens or sensitivities associated with honey consumption, particularly for those with bee stings or allergies.
1 cup (200g) sugar
Sugar is an essential ingredient in many baked goods, including the classic Russian Honey Cake Recipe. When it comes to measuring sugar for this recipe, a standard unit used is cups, with 1 cup being equivalent to 200g or grams.
To clarify, 1 cup of sugar refers to the volume measurement that can vary slightly depending on how it’s packed or scooped into a cup. In contrast, weighing 200g ensures accuracy in measuring out exactly the right amount of sugar for your cake.
The importance of precise measurements in baking is well-known. Getting the proportions of ingredients just right makes all the difference between a tasty yet imperfect cake and one that rises beautifully and has perfect texture.
Now, when you’re preparing to make this Russian Honey Cake Recipe, remember that using 1 cup (200g) sugar will play an important role in achieving its characteristic sweetness. This is crucial because traditional cakes of this sort rely heavily on honey for flavor but also on sugar to provide balance and a sweet finish.
It’s not only the taste that’s affected by how much sugar you use; over or under-sugar can lead to structural issues with your cake, such as it becoming too dense or hard. That’s why using accurate measurements is vital for any baking project, especially when you’re working on something traditional like this honey cake.
2 large eggs
Eggs are one of the essential ingredients in traditional Russian cooking, and they play a crucial role in the classic Russian Honey Cake recipe.
In this specific recipe, two large eggs are required to achieve the right balance of moisture and richness in the cake.
The eggs contribute to the overall structure and texture of the cake, helping to bind the ingredients together and creating a tender crumb.
When using eggs in baking, it’s essential to choose high-quality ones that are fresh and have a good egg yolk-to-white ratio.
In the case of this Russian Honey Cake recipe, the two large eggs are likely used as a replacement for other leavening agents, providing a gentle lift to the cake without adding extra ingredients or flavorings.
The size of the eggs also matters, as large eggs typically contain more volume and moisture than smaller ones, which can affect the final texture and consistency of the cake.
When measuring out the eggs for this recipe, it’s best to crack them gently into a separate bowl or measuring cup before adding them to the main mixing bowl.
This helps prevent any potential shell fragments from getting mixed in with the other ingredients and ensures that the eggs are well incorporated throughout the batter.
2 teaspoons baking powder
Baking powder is a crucial ingredient in many baked goods, including traditional Russian honey cake recipes. The recommended amount of baking powder in this recipe is 2 teaspoons.
Baking powder is a leavening agent that helps to release carbon dioxide gas bubbles in the dough or batter, causing it to rise and giving the finished product a light and airy texture.
The role of baking powder in the Russian honey cake recipe is multifaceted. Firstly, it contributes to the overall structure and texture of the cake, allowing it to hold its shape and providing a tender crumb.
Secondly, baking powder helps to enhance the flavors present in the cake, particularly the sweetness of the honey and the richness of the spices.
In terms of chemistry, baking powder is typically a mixture of baking soda (sodium bicarbonate) and an acid, such as cream of tartar. The acid reacts with the sodium bicarbonate when it comes into contact with liquid ingredients in the recipe to produce carbon dioxide gas bubbles.
When using 2 teaspoons of baking powder in this Russian honey cake recipe, it’s essential to ensure that the other ingredients are balanced and proportioned correctly. This includes using high-quality honey and a suitable combination of spices, such as cinnamon, nutmeg, and cardamom.
To achieve optimal results with baking powder, bakers should also pay attention to factors such as temperature, humidity, and mixing times. Overmixing can cause the leavening agents to break down and lose their effectiveness, leading to a dense or flat cake.
1/4 teaspoon ground cinnamon
The success of a traditional Russian Honey Cake recipe relies heavily on the selection and balance of its ingredients.
Key Ingredients
- Honey: The main sweetener in this cake, which gives it a distinct flavor and aroma. Use high-quality honey, such as buckwheat or wildflower, for the best results.
- Butter: Unsalted butter is necessary to create a moist and tender crumb. Make sure to use room temperature butter for easier mixing.
- Eggs: Large eggs are ideal for this recipe, providing structure and richness to the cake.
- All-purpose flour: This type of flour is essential for creating a delicate and even crumb. Make sure to sift it before using.
- Baking soda: A small amount of baking soda helps react with acidic ingredients, resulting in a light and fluffy texture.
- Salt: A pinch of salt enhances the overall flavor and balances out the sweetness of the honey.
Now let’s focus on one ingredient in particular: ground cinnamon. The amount of cinnamon needed is minimal, as it adds a warm and subtle spice to the cake without overpowering its delicate flavors.
The Importance of Ground Cinnamon
- In traditional Russian cuisine, ground cinnamon is commonly used to add depth and warmth to desserts like cakes, pastries, and cookies.
- Cinnamon’s distinct flavor complements the sweetness of honey perfectly, creating a balanced taste experience.
- Use high-quality ground cinnamon for the best results. Freshly ground spices always yield better flavor than pre-ground ones.
Remember that only a small amount is needed, so it won’t overpower the delicate flavors of the Russian Honey Cake recipe. In fact, it’s just one-fourth teaspoon of ground cinnamon that makes all the difference!
The Role of 1/4 Teaspoon Ground Cinnamon
- Add a pinch of warmth to the cake without overpowering its delicate flavors.
- Enhance the overall flavor and aroma of the Russian Honey Cake recipe.
The perfect balance between honey, spices, and other ingredients is essential in creating an authentic Russian Honey Cake. With high-quality ingredients like ground cinnamon, you can rest assured that your cake will be nothing short of delicious!
1/4 teaspoon ground nutmeg
The ingredient measurements for the Russian Honey Cake recipe are as follows:
Ground nutmeg: 1/4 teaspoon
This is a crucial spice in the traditional Russian Honey Cake recipe, adding warmth and depth to the cake’s flavor profile.
Nutmeg has a distinctive, slightly sweet and nutty aroma that pairs well with the sweetness of honey and the richness of other spices commonly found in Russian baking.
The use of ground nutmeg also helps to balance out the flavors in the recipe, preventing it from becoming too overpowering or one-dimensional.
To ensure optimal flavor, it’s essential to grind the whole nutmeg seeds into a fine powder just before using them in the recipe. This ensures that the spice is as fresh and potent as possible.
1/2 cup (120ml) vegetable oil
The ingredient list for a traditional Russian Honey Cake recipe often features common pantry staples, but one key item stands out – 1/2 cup (120ml) vegetable oil.
This specific quantity of vegetable oil is typically used in conjunction with other ingredients such as honey, sugar, and eggs to create the rich and moist texture that is characteristic of a traditional Russian Honey Cake.
The choice of vegetable oil may seem unremarkable at first glance, but it serves an important purpose in balancing the sweetness and moisture levels within the cake. When combined with the honey and sugar, the vegetable oil helps to create a smooth and even crumb.
Vegetable oil is often preferred over other types of oils, such as butter or coconut oil, due to its neutral flavor and high smoke point. This allows it to cook evenly without imparting any off-flavors or aromas that might be distracting from the natural sweetness of the honey and sugar.
In addition, the use of vegetable oil helps to enhance the texture of the cake by preventing it from becoming too dense or heavy. By incorporating air pockets throughout the batter, the finished cake becomes light and airy with a delicate crumb that is pleasing to the palate.
It’s worth noting that the type of vegetable oil used can have an impact on the flavor and texture of the final product. Some options, such as canola or grapeseed oil, may impart a slightly neutral flavor, while others like sunflower or safflower oil might add a subtle nutty or fruity undertone.
When selecting a vegetable oil for this recipe, it’s best to choose a high-quality option that is free from additives and artificial preservatives. This will help to ensure the best possible results and create a traditional Russian Honey Cake that is both delicious and authentic.
2 cups (250g) allpurpose flour
All-purpose flour is a staple ingredient in many baked goods, including the traditional Russian honey cake recipe.
In this recipe, 2 cups (250g) of all-purpose flour will be used as the base for the cake’s structure and texture.
Characteristics of All-Purpose Flour
- Protein content: 9-12% – This is a relatively standard protein level, which will contribute to the cake’s tenderness and help it hold its shape.
- Gluten strength:Moderate – The gluten in all-purpose flour provides elasticity and structure to the dough, but not so strong that it becomes chewy or tough.
Using All-Purpose Flour in Baking
All-purpose flour is a versatile ingredient that works well in a wide range of baked goods, from sweet treats like cakes and pastries to savory items like breads and rolls.
- Combination with other ingredients:All-purpose flour can be combined with other dry ingredients, such as sugar, leavening agents, and spices, to create a variety of flavors and textures.
Cake-Specific Considerations
When using all-purpose flour in a cake recipe, it’s essential to note that the type and quality of flour can affect the final product. In this case, we’re using a standard all-purpose flour with no special characteristics or additives.
- Sifting:Before measuring out the flour, it’s a good idea to sift it to ensure that it’s evenly aerated and to remove any lumps or debris.
In summary, all-purpose flour is an essential ingredient in the Russian honey cake recipe, providing structure, texture, and flavor. Its moderate gluten strength and standard protein content make it an ideal choice for this traditional dessert.
Additional Ingredients and Notes
For the traditional Russian Honey Cake, also known as “Medovik,” a combination of ingredients is required to create its distinctive taste and texture.
The main ingredients are:
- 1 cup (200g) granulated sugar
- 1/2 cup (115g) unsalted butter, softened
- 4 large eggs
- 1 teaspoon vanilla extract
- 2 cups (250g) all-purpose flour
- 1 teaspoon baking soda
- 1/2 teaspoon salt
- 1 cup (240ml) sour cream, at room temperature
- 1 cup (240ml) honey or to taste
- Confectioners’ sugar for dusting (optional)
For the assembly and additional sweetness of the cake, the following ingredients are used:
- 2 cups (250g) confectioners’ sugar
- 2 tablespoons unsalted butter, softened
- 2-3 tablespoons milk or heavy cream
- Caramel sauce for drizzling (optional)
Some notes on making the perfect Russian Honey Cake are:
- The honey used should be of good quality and preferably a light color to avoid darkening the cake.
- It’s essential to use room-temperature ingredients for accurate mixing, especially with the butter and sour cream.
- Don’t overmix the dough, as it can lead to a dense cake.
- The assembly of the cake is delicate; make sure each layer is evenly aligned before spreading the next portion of filling or whipped cream.
- If using caramel sauce for drizzling, heat it gently before using to maintain its flowable consistency.
1 cup (240ml) buttermilk or plain yogurt, for soaking cake layers
The use of 1 cup (240ml) of buttermilk or plain yogurt for soaking cake layers in a traditional Russian Honey Cake recipe serves several purposes.
Buttermilk and plain yogurt share similar properties that make them suitable alternatives for one another, particularly when it comes to their acidity and moisture content.
These ingredients play a crucial role in enhancing the overall flavor and texture of the cake by introducing an acidic element that helps to balance out the sweetness of the honey used in the recipe.
The high water content in buttermilk or plain yogurt also contributes to keeping the cake layers moist, which is essential in a dense and rich dessert like the Russian Honey Cake.
When soaking the cake layers in this mixture, it’s common for bakers to adjust the amount according to their personal preference, as well as the specific needs of their recipe.
The buttermilk or plain yogurt can be mixed with additional ingredients, such as honey or sugar, to create a flavorful syrup that complements the cake’s natural sweetness and enhances its texture.
It’s worth noting that substituting buttermilk with plain yogurt may require some adjustments in terms of the overall liquid content of the recipe, as plain yogurt can be slightly thicker than buttermilk.
In any case, using buttermilk or plain yogurt for soaking cake layers is an excellent way to create a tender and flavorful Russian Honey Cake that’s sure to impress even the most discerning palates.
Confectioners’ sugar, for dusting
Confectioners’ sugar, also known as powdered sugar or icing sugar, plays a vital role in the preparation and presentation of traditional Russian honey cake recipes.
The primary function of confectioners’ sugar is to dust the finished cake with a fine layer of sweetness, creating a visually appealing texture and flavor profile that complements the rich, caramel-like taste of the honey.
High-quality confectioners’ sugar should be used for dusting as it dissolves easily and provides an even coating without leaving any visible powder or texture on the cake surface.
The best type of confectioners’ sugar to use is superfine or ultra-fine granulated sugar, which has been ground into an extremely fine powder. This will ensure that the sugar dissolves quickly and evenly when applied to the cake.
When selecting a confectioners’ sugar, check its packaging for any added ingredients such as cornstarch, silicon dioxide, or other anti-caking agents. These additives can affect the texture and flavor of the finished cake, so it’s best to opt for an unflavored, unsweetened confectioners’ sugar.
To dust a traditional Russian honey cake with confectioners’ sugar, place a small sifter or fine-mesh sieve over the top of the cake. Carefully pour in a thin layer of confectioners’ sugar, allowing it to fall evenly onto the cake surface.
Gently tilt and rotate the cake while dusting to ensure an even coverage. Avoid applying too much pressure as this can cause the confectioners’ sugar to clump or become unevenly distributed on the cake.
Instructions
Mixing the Cake Batter
To ensure that you end up with a smooth and even cake batter for the traditional Russian Honey Cake, follow these detailed instructions:
Mixing the Cake Batter
Before proceeding to mix the cake batter, make sure you have all the ingredients within arm’s reach.
This includes 1 cup of vegetable oil, 1/2 cup of granulated sugar, 4 large eggs, 2 teaspoons of vanilla extract, and 2 cups of honey.
Step 1: Combine Wet Ingredients
- In a large mixing bowl, whisk together the vegetable oil, granulated sugar, and vanilla extract until well combined.
- Add the eggs one at a time, beating each egg thoroughly before adding the next.
Step 2: Add Honey and Mix Until Smooth
Slowly pour in the honey while continuously whisking the mixture until it is smooth and well incorporated. Be patient as this step may take some time.
Step 3: Finalize the Batter
- Stop the mixer and scrape down the sides of the bowl to ensure that all ingredients are well mixed.
- Resume mixing on low speed for another minute or until the batter is smooth and even in texture.
At this point, the cake batter should be ready to proceed with shaping into small cakes called ‘pirog’. Proceed with making the pirog according to your recipe’s instructions.
Preheat oven to 350°F (175°C). Grease and flour two 9inch (23cm) round cake pans.
When it comes to baking a classic Russian Honey Cake, also known as “Ptichye Moloko” or “Bird’s Milk,” instructions are essential to achieve perfection. Here are some critical steps to follow:
Step 1: Preheat the oven
To start, preheat your oven to 350°F (175°C). This temperature is crucial for ensuring that your cake bakes evenly and at the right pace.
Step 2: Prepare the cake pans
Next, grease and flour two 9-inch (23cm) round cake pans. This will prevent the cakes from sticking to the pans during baking and make them easier to remove once they’re done.
Step 3: Mix the batter
Now, it’s time to mix together the ingredients for your Russian Honey Cake. The typical ingredients include:
- 1 cup of honey
- 1/2 cup of sugar
- 4 large eggs
- 2 teaspoons of baking powder
- 1 teaspoon of salt
- 1 1/2 cups of all-purpose flour
- 1 cup of unsalted butter, softened
- Vanilla extract (optional)
Step 4: Pour the batter into the prepared pans
Once you’ve mixed the batter, pour equal amounts into each prepared cake pan.
Step 5: Bake the cakes
Bake the cakes for about 35-40 minutes, or until they’re golden brown and a toothpick inserted into the center of each cake comes out clean.
Step 6: Allow the cakes to cool
Let the cakes cool in the pans for 5-10 minutes before transferring them to a wire rack to cool completely.
Now that you’ve followed these instructions, you’re ready to enjoy your delicious Russian Honey Cake!
In a large mixing bowl, whisk together honey, sugar, eggs, baking powder, cinnamon, and nutmeg until well combined.
Instructions for creating a traditional Russian Honey Cake recipe are often a series of step-by-step guidelines that help to guide individuals through the process of preparing this sweet dessert. In many cases, these instructions may be written in a clear and concise manner, utilizing everyday language to convey the necessary information.
One common type of instruction found in recipes such as Russian Honey Cake is a listing of ingredients followed by a series of steps detailing how each ingredient should be prepared or combined with others. For instance, a recipe for Russian Honey Cake may begin with an instruction that reads “In a large mixing bowl, whisk together honey, sugar, eggs, baking powder, cinnamon, and nutmeg until well combined.”
Such instructions serve several purposes, including providing clarity on the order in which ingredients should be combined. By specifying the exact sequence of events required to prepare the dish, individuals are able to follow along with ease, even if they have little or no prior experience with cooking.
Another function of instructions found in recipes such as Russian Honey Cake is that they often provide detailed descriptions of techniques used to combine ingredients. In some cases, these descriptions may include specific tools or equipment necessary for completing a particular task. For example, an instruction may specify the use of “an electric mixer” when creaming butter and sugar together.
In addition to guiding individuals through the preparation of a dish like Russian Honey Cake, instructions found in recipes also often serve as a means of standardization. By following established procedures and techniques outlined in a recipe, home cooks can produce results that are similar or identical to those achieved by professional chefs or experienced cooks.
Furthermore, many recipes include instructional language aimed at helping individuals troubleshoot common issues that may arise during the cooking process. For instance, an instruction might suggest what to do if a cake fails to rise as expected, providing additional guidance and support for home cooks who encounter difficulties while preparing Russian Honey Cake or other recipes.
In order to effectively utilize instructions found in recipes such as Russian Honey Cake, individuals should carefully read each step before beginning the cooking process. This allows them to familiarize themselves with the procedures outlined in the recipe and avoid potential mistakes that may arise due to confusion about a particular instruction.
When following a recipe, it is also essential to pay close attention to measurement units used when quantifying ingredients. Failure to accurately measure ingredients can lead to adverse outcomes, such as an overly sweet or salty Russian Honey Cake. Therefore, individuals should double-check their measurements to ensure that they are using the correct quantities of each ingredient.
Add oil, then gradually add flour, stirring until just combined.
To prepare this traditional Russian Honey Cake recipe, it’s essential to follow a series of steps that ensure the perfect balance of flavors and textures. The process begins with the addition of a vital ingredient.
The first step involves adding oil to the mixture, which serves as the foundation for the cake’s structure. It is crucial to note that the type of oil used can significantly impact the final result. For this recipe, we recommend using high-quality vegetable oil to ensure the best flavor and texture.
Once the oil has been added, it is time to introduce the key component that gives Russian Honey Cake its distinctive taste: flour. Gradually adding flour to the mixture while stirring continuously is essential to avoid lumps and achieve a smooth consistency.
The process of gradually adding flour can be quite delicate, as overmixing can lead to a dense cake. Therefore, it’s crucial to stop stirring once just combined. This ensures that the ingredients are well incorporated without developing the gluten in the flour, which would result in a tough cake.
By following this precise sequence of steps and being mindful of the ratio of oil to flour, you can create a Russian Honey Cake that is moist, flavorful, and has a delicate crumb. The end result will be a delightful treat that showcases the perfect balance of ingredients and technique.
Divide batter evenly between prepared pans.
To execute this task, one must first understand the importance of dividing the batter evenly between prepared pans. In the context of a traditional Russian honey cake recipe, the batter is typically divided into 3-4 layers, depending on the desired height and texture of the finished cake.
The key to successful layering lies in achieving uniformity in thickness across each layer. To do this, one must calibrate their pouring technique to ensure that each pan receives an identical amount of batter.
This process begins by identifying the optimal serving size for each cake layer. A general rule of thumb is to allocate 1/3 to 1/4 of the total batter to each pan, depending on the specific requirements of the recipe and the desired height of the finished cake.
With the correct portion sizes determined, it’s time to portion out the batter into individual pans. This is typically done using a combination of pouring and spreading techniques to ensure even coverage and minimize waste.
To facilitate smooth batter distribution, some bakers choose to grease their pans lightly before adding the batter. This can help prevent the cake from sticking and make it easier to remove from the pan once baked.
Regardless of whether or not you choose to grease your pans, one crucial step remains the same: ensuring that each layer is evenly coated with the batter. A well-balanced pour will help create a harmonious texture and flavor profile throughout the finished cake.
The entire process should be completed within a controlled environment, free from drafts or temperature fluctuations that could compromise the delicate chemistry of the batter. With patience, attention to detail, and a willingness to perfect your technique, you’ll be well on your way to creating a truly exceptional Russian honey cake recipe.
Assembly and Serving
Assembling the Cake
The final step in preparing the traditional Russian Honey Cake recipe involves assembling and serving the cake. This process requires patience, precision, and a keen sense of presentation.
Assembly: To assemble the cake, start by placing one of the cooled honey-soaked layers on a large serving plate or cake stand. You can use a cake turntable to make it easier to rotate and decorate the cake.
Spread a thin layer of honey glaze over the top of the first layer, using an offset spatula or a spreader. This will help hold the layers together and prevent them from falling apart when sliced.
Next, place another layer on top of the first one, making sure to align it properly. Repeat this process until all the layers are stacked on top of each other, finishing with a crowned layer.
Once the cake is assembled, refrigerate it for at least 30 minutes to allow the flavors to meld together and the glaze to set. This will make it easier to slice and serve.
Serving: To serve, use a sharp knife to cut the cake into thin slices. Traditionally, Russian Honey Cake is served at room temperature, so remove it from the refrigerator about 30 minutes before serving.
Arrange the sliced cake on individual plates or a large serving platter, garnished with fresh berries or whipped cream, if desired. You can also drizzle additional honey glaze over the top of each slice for extra flavor and presentation.
When serving, be sure to handle the cake gently, as it can be delicate due to its honey-soaked layers. Also, keep in mind that Russian Honey Cake is best consumed within a few days of assembly, so try to finish it off within that timeframe.
Let cooled cakes sit for 1015 minutes to allow them to firm up slightly.
The process of Assembly and Serving for the Russian Honey Cake recipe is a crucial step that requires attention to detail and care. After cooling the cakes completely, it’s essential to allow them to sit for 10-15 minutes to enable them to firm up slightly.
This short waiting period allows the cake to become more stable and less prone to crumbling when assembling the final dessert. It also gives the flavors a chance to meld together, making each bite even more delicious.
During this time, you can prepare the Whipped Cream Frosting, which is an essential component of the Russian Honey Cake. This sweet and creamy frosting will add an extra layer of flavor and texture to the dessert.
To assemble the cake, place one of the cooled cakes on a serving plate or cake stand. You can use a spreading knife to apply a thin layer of Whipped Cream Frosting on top of the cake. This will help hold the layers together and provide a smooth surface for decoration.
Next, place the second cooled cake on top of the first one, pressing gently to secure it in place. Repeat the process with the remaining cakes, creating a tower effect that is both visually stunning and delicious.
Once the final layer is in place, use a generous amount of Whipped Cream Frosting to cover the entire surface of the cake. You can also add some extra decorations, such as chopped nuts or dried fruit, to give it a more festive look.
Slice the Russian Honey Cake into wedges and serve immediately. This classic dessert is perfect for special occasions and will surely be a hit with family and friends.
Using a serrated knife or cake saw, split each cake in half horizontally to create two layers.
To successfully assemble and serve the traditional Russian Honey Cake, also known as “Medovik”, it’s essential to understand the steps involved in its construction.
Step 1: Preparing the Cakes
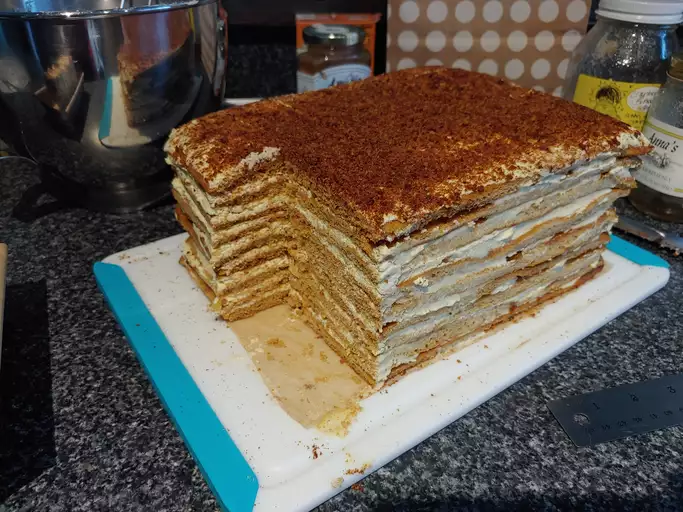
The first step is to bake and cool each layer of the honey cake. This recipe typically yields six thin layers of cake, which will be stacked together using a sweet honey syrup and cream cheese frosting.
Step 2: Splitting the Cakes
To create two even layers from each individual cake, you’ll need to split them in half horizontally.
METHOD
- Using a serrated knife or cake saw: This is the most common method used to split cakes. A sharp serrated knife or a specialized cake saw will make clean cuts through the dense layers of cake.
- Place each cake on a flat surface and locate the center of the cake.
- Hold the knife at a 45-degree angle to the cake and carefully cut through it, applying gentle pressure.
Step 3: Assembling the Cake
Once all the cakes are split in half, you’ll begin assembling the Medovik. This process involves layering the two halves together using a combination of honey syrup and cream cheese frosting to secure each level.
The assembled cake will be composed of six layers: three pairs of halved cakes, separated by thin layers of honey syrup and cream cheese frosting. The honey syrup is applied to the bottom half of each cake layer, creating a bond between the two halves before adding more layers on top. This ensures that each bite captures the perfect balance of moist cake, creamy filling, and sweet honey flavor.
The final step in assembling the Medovik involves applying a thin layer of cream cheese frosting to the outside of the assembled cake. This acts as an additional barrier between the honey syrup and the cream cheese frosting on the inside layers, preventing them from mixing together during transportation or serving.
Place one layer on a serving plate or cake stand, then brush with buttermilk or yogurt to prevent drying out.
When it comes to assembling and serving a traditional Russian Honey Cake, also known as “Medovik”, there are several key steps to follow to ensure that your cake looks its best and stays moist. Here’s how you can assemble and serve this delicious dessert.
First, make sure you have all the necessary components ready. This typically includes multiple layers of honey-soaked sponge cake, a filling made from ground nuts and sugar, and some additional ingredients such as butter or oil to grease the pan and prevent sticking.
To begin assembling the cake, place one layer on a serving plate or cake stand. It’s essential to use a sturdy base that can support the weight of multiple layers. You may also want to consider using a cake stand with a non-slip bottom to prevent it from sliding around.
Brush each layer lightly with butter, oil, or buttermilk/yogurt. This will help to create a moist and tender crumb in the cake, as well as preventing it from drying out. Be sure not to overdo it, as this can make the cake too greasy.
Next, fill each layer with a mixture of ground nuts (such as walnuts or hazelnuts) and sugar. This filling is a key component of the Medovik recipe and adds texture and flavor to the cake. You may want to consider using a food processor or blender to grind the nuts into a fine consistency.
Continue building the layers, brushing each one with buttermilk or yogurt as you go. This will help to keep the cake moist and prevent it from drying out. Be sure to leave about 1 inch (2.5 cm) of space between each layer, as this will allow for even spreading of the filling.
Once all the layers are assembled, use a basting brush or spatula to spread a thin layer of honey on top of each layer. This will help to bind the layers together and create a sweet, sticky glaze. Be sure not to overdo it, as this can make the cake too sweet.
Finally, decorate your Medovik with some fresh fruit or nuts, if desired. You may also want to consider drizzling the top of the cake with a bit more honey for extra flavor and texture.
Tips and Variations:
- Use a variety of ground nuts (such as almonds, hazelnuts, and pistachios) to create a unique flavor profile.
- Add a splash of vanilla extract or almond extract to the filling for extra depth of flavor.
- Top your Medovik with fresh fruit (such as strawberries or blueberries) for added color and texture.
By following these steps, you can create a beautiful and delicious Russian Honey Cake that’s sure to impress your family and friends. Happy baking!
Repeat process with remaining cake layer.
To assemble and serve the Russian Honey Cake, follow these steps:
- First, ensure that all three layers of the cake are completely cool.
- Place one layer of the cake on a serving plate or cake stand.
- To assemble the cake, you will need to use a generous amount of Buttercream or Cream Cheese Frosting. This will not only hold the layers together but also add flavor and moisture.
- Place a dollop of frosting on top of the first layer and then spread it evenly to the edges.
- This is called “crumb-coating” and will help prevent crumbs from getting into the finished frosting. Don’t worry, you’ll be adding more frosting later!
Now, place the second layer of the cake on top of the first one.
Press down gently on the cake to ensure it’s even and the layers are securely attached. Repeat process with remaining cake layer:
Place a dollop of frosting on top of the second layer and then spread it evenly to the edges, just like you did before.
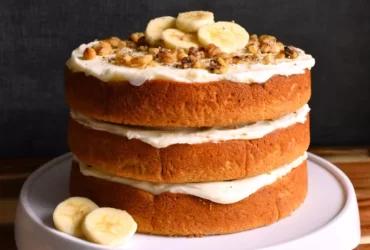
This will help create a smooth surface for decorating and prevent any crumbs from getting into the finished cake. You should now have three layers of cake, stacked on top of each other with generous dollops of frosting in between.
- Best Lusha Alternatives for 2025 - April 22, 2025
- Best Overloop Alternatives for 2025 - April 22, 2025
- Best 6sense Alternatives for 2025 - April 22, 2025


