
Ingredients
For Brine
- The key to making an exceptional buttermilk-brined turkey lies in the quality and balance of ingredients, particularly in the brine mixture.
- To start with, a good buttermilk-brined turkey requires a high ratio of kosher salt to sugar in the brine.
- A common starting point is 1 cup of kosher salt per gallon of water, combined with 2 tablespoons of granulated sugar and 1 tablespoon of black peppercorns.
- Some recipes may also include additional ingredients like 2 sprigs of fresh thyme, 1 bay leaf, 1 teaspoon of whole allspice, and 2 cloves of garlic, minced or crushed to release their flavors into the brine.
- When using buttermilk, it’s crucial to note that 1 cup of regular milk or a non-dairy milk alternative does not have the same acidity level as buttermilk.
- To achieve an authentic result, use cultured buttermilk with live cultures and a pH level around 4.5, which helps break down proteins and tenderize the meat.
- The addition of acid – such as lemon juice or vinegar – can also help to balance out the flavors in the brine, particularly if using a sweeter type of sugar like brown sugar or honey.
- Finally, it’s worth noting that some recipes may also include additional ingredients like 1 teaspoon of cayenne pepper or red chili flakes for added heat or 2 tablespoons of chopped fresh parsley and dill for enhanced freshness.
1 gallon water
The buttermilk-brined turkey recipe requires a few key ingredients, which are listed below.
Essential Ingredients
- 1 gallon water
- 1/2 cup kosher salt
- 1/4 cup brown sugar
- 1/4 cup black peppercorns
- 2 tbsp pink curing salt (optional)
- 2 lemons, quartered
- 2 sprigs of fresh thyme
- 1 buttermilk
- 1 tsp garlic powder
- 1 tsp onion powder
Turkey and Additional Ingredients
- 1 (12-14 lb) whole turkey
- 2 tbsp butter, melted
- 2 tbsp olive oil
- 1 tsp dried sage
Pantry and Miscellaneous Ingredients
- Black pepper, to taste
- Fresh herbs (such as parsley, rosemary, or thyme), for garnish
The use of a gallon of water is crucial in creating the brine solution. It will help to dissolve the salt and sugar, allowing them to evenly distribute throughout the mixture.
1 cup kosher salt
Kosher salt is a type of salt that has been harvested and refined to meet certain standards, resulting in a coarser texture and a milder flavor compared to table salt.
The key characteristics of kosher salt include its large crystal size, which makes it easier to sprinkle over food without caking or dissolving too quickly in liquids.
Kosher salt is often preferred by chefs and cooks for its ability to bring out the natural flavors of ingredients, rather than overpowering them with a strong salty taste.
In the context of the Buttermilk-Brined Turkey Recipe, the kosher salt serves as a key ingredient in creating a flavorful brine that helps to tenderize the turkey while infusing it with a subtle salty flavor.
The high concentration of kosher salt in this recipe, at 1 cup, is likely intended to help create a strong brining solution that will penetrate deep into the meat and contribute to its overall tenderness and flavor.
When working with such a large quantity of kosher salt, it’s essential to note that some recipes may call for rinsing or soaking the turkey after brining to remove excess salt.
1/4 cup brown sugar
Brown sugar is one of the ingredients used in this recipe, specifically called for to be measured out at 1/4 cup.
Brown sugar has a rich, caramel-like flavor and a slightly crunchy texture that adds depth and complexity to the dish. It’s often used as a sweetener in baking, but it also pairs well with savory ingredients like meats and herbs.
The type of brown sugar called for in this recipe is not specified, so it’s likely assumed that either light or dark brown sugar can be used. However, some recipes may call for one or the other depending on the desired flavor profile.
Brown sugar contains a small amount of molasses, which gives it its characteristic flavor and color. Molasses is a thick, dark liquid made from refining sugarcane or sugar beets, and it’s often used as an ingredient in its own right.
The use of brown sugar in this recipe helps to balance out the tangy flavor of the buttermilk brine and adds a touch of sweetness to the turkey. It also helps to caramelize the surface of the meat, creating a rich, golden-brown color that’s perfect for serving at the holiday table.
In addition to its culinary uses, brown sugar has some practical applications in the kitchen. For example, it can be used as a coating for meats or vegetables, helping them to brown more evenly and prevent sticking. It can also be used to thicken sauces and soups, adding body and texture to these liquid dishes.
When using brown sugar in this recipe or any other dish, it’s a good idea to store it properly to maintain its flavor and texture. Brown sugar should be kept in an airtight container at room temperature, away from heat sources and moisture. This will help to prevent clumping and keep the sugar fresh for longer.
1/4 cup white vinegar
When it comes to ingredients for the buttermilk-brined turkey recipe, one crucial component stands out: white vinegar.
White vinegar is used to acidify the brine mixture, which plays a vital role in tenderizing and flavoring the turkey.
The acidity of the vinegar helps break down the proteins on the surface of the meat, creating a more even texture and preventing the formation of unsightly brown patches during cooking.
Additionally, white vinegar contains acetic acid, which enhances the overall flavor profile of the dish by adding a tangy and slightly sweet note to the buttermilk brine.
In this recipe, 1/4 cup of white vinegar is specified as the ideal amount for creating an effective and delicious buttermilk brine.
The acidity level provided by this quantity of vinegar helps maintain a perfect balance between flavor, texture, and safety while cooking the turkey.
It’s worth noting that other types of vinegar may be used as substitutes in some recipes, but white vinegar is specifically chosen for its mild flavor and ability to enhance the overall taste experience without overpowering the other ingredients.
1 tsp black pepper
To prepare a delicious Buttermilk-Brined Turkey, it’s crucial to get the ingredients just right. This includes 1 tsp of black pepper, which plays a significant role in enhancing the flavor and aroma of the dish.
The key to using black pepper effectively is to understand its unique characteristics. Black pepper, also known as piper nigrum, is a popular spice made from the dried fruit of the peppercorn plant. It’s renowned for its pungent and slightly sweet flavor, which makes it an essential ingredient in numerous cuisines around the world.
When using black pepper in your Buttermilk-Brined Turkey recipe, it’s crucial to note that a little goes a long way. Too much black pepper can overpower the other flavors, while too little may not provide enough depth to the dish. Therefore, 1 tsp is an ideal amount to add a hint of black pepper without overwhelming the other ingredients.
To maximize the effectiveness of black pepper in your recipe, it’s best to mix it with other seasonings and spices early on in the cooking process. This allows the flavors to meld together, resulting in a more complex and satisfying taste experience.
2 tbsp chopped fresh thyme
- The use of ingredients in this recipe is crucial for achieving the desired flavors and textures.
- When it comes to fresh thyme, 2 tablespoons of chopped leaves are required to infuse a subtle yet distinct herbaceous flavor into the buttermilk-brined turkey.
- Thyme is a popular herb that belongs to the mint family, known for its fragrant aroma and slightly bitter taste.
- The fresh form of thyme is preferred over dried because it retains more of its natural oils, which are responsible for its potent flavor and fragrance.
- Chopping the thyme leaves ensures an even distribution of their flavors throughout the brine, allowing each bite to be infused with a hint of herbaceous goodness.
- The use of two tablespoons is sufficient to create a well-balanced flavor profile that complements the richness of the buttermilk and the savory taste of the turkey without overpowering them.
- Ultimately, the addition of fresh thyme elevates this recipe from ordinary to extraordinary, making it an essential component of any successful buttermilk-brined turkey dish.
2 tbsp chopped fresh rosemary
The use of chopped fresh rosemary as an ingredient in cooking is a popular choice among chefs and home cooks alike due to its distinctive flavor and aroma. In the context of the Buttermilk-Brined Turkey Recipe, 2 tablespoons of chopped fresh rosemary are called for. This herb is known for its piney, slightly bitter taste, which complements the richness of poultry.
Rosemary has been used in cooking for centuries, particularly in Mediterranean and European cuisine. It pairs well with a variety of ingredients, including meats, vegetables, and grains, making it a versatile addition to many dishes. In the case of the buttermilk-brined turkey, the rosemary adds depth and complexity to the flavor profile.
The freshness of the rosemary is crucial when using it in cooking. Fresh herbs have a more vibrant flavor than dried or frozen herbs, which can become stale and lose their potency over time. When selecting fresh rosemary, look for sprigs with dark green needles that are not wilted or yellowing. The aroma of fresh rosemary should be pungent and herbaceous.
To chop the fresh rosemary, use a sharp knife to cut off the leaves from the stem. Then, chop the leaves finely, taking care not to bruise them. This will help release the oils and flavors in the herb. You can also use a food processor or chopper to quickly chop the rosemary, but be careful not to over-process it.
In terms of where to find fresh rosemary, it is commonly available at most supermarkets and farmers’ markets during the spring and summer months. If you are unable to find fresh rosemary, you can also use dried or frozen rosemary as a substitute. However, keep in mind that the flavor will be different.
Overall, 2 tablespoons of chopped fresh rosemary is a key ingredient in the Buttermilk-Brined Turkey Recipe, adding a unique and aromatic flavor to the dish. Its piney taste pairs well with the richness of the turkey, making it a great addition to this recipe.
2 lemons, quartered
To prepare a buttermilk-brined turkey recipe, you will need two essential ingredients that play a crucial role in achieving the perfect balance of flavors and textures in your dish: lemons.
For this particular recipe, you are required to use 2 lemons, which need to be quartered before being utilized. This means cutting each lemon into four equal parts, either by slicing it through the middle horizontally or vertically depending on your preference.
Quartering the lemons has multiple purposes in the context of this buttermilk-brined turkey recipe. Firstly, it increases the surface area of the lemon that can be used to infuse flavor and moisture into the brine. Secondly, it makes it easier to dissolve or muddle the lemon pieces in the brine mixture without creating an overpowering citrusy taste.
The acidity and juice from the lemons also help to break down the proteins on the turkey’s surface, allowing for even penetration of the buttermilk and seasonings during the marinating process. This step is not only essential for achieving the desired flavor profile but also contributes significantly to the tenderizing effect of the brine.
When using lemons in this recipe, it’s worth noting that fresh ingredients yield better results. Using older or more mature lemons could result in a less vibrant citrus flavor and possibly impact the overall taste experience.
The correct preparation and use of these two quartered lemons are critical to the success of your buttermilk-brined turkey recipe, influencing both the final appearance and flavor profile of the dish.
Instructions
Curing the Turkey
To cure a turkey, it’s essential to understand the process of curing and its benefits. The goal of curing is to draw moisture out of the meat, thereby reducing bacterial growth and creating an environment that’s inhospitable to pathogens like Salmonella.
The buttermilk-brined method involves soaking the turkey in a solution containing buttermilk, salt, and spices for 24 hours prior to cooking. This process not only tenderizes the meat but also adds flavor and helps to keep the bird moist during cooking.
Here are the steps involved in curing the turkey:
- Clean and prepare the turkey: Before brining, make sure the turkey is clean and free of any feathers or loose skin. Pat it dry with paper towels to help prevent bacterial growth.
- Mix the brine solution: In a large container, whisk together 1 gallon buttermilk, 1/2 cup kosher salt, 1/4 cup brown sugar, and your desired spices (e.g., garlic powder, onion powder, dried herbs like thyme or rosemary). Stir until the salt and sugar are dissolved.
- Submerge the turkey: Place the prepared turkey in a large container or zip-top bag, and pour the brine solution over it. Make sure the turkey is fully submerged under the liquid.
- Refrigerate: Cover the container with plastic wrap or place it in a sealed zip-top bag. Refrigerate at 40°F (4°C) or below for 24 hours to allow the cure to take effect.
- Rinse and pat dry: After 24 hours, remove the turkey from the brine solution and rinse it under cold running water to remove excess salt. Pat the turkey dry with paper towels to prevent bacterial growth during cooking.
After curing the turkey, you’ll be left with a deliciously moist and flavorful bird, ready for roasting or grilling.
In a large pot, combine water, kosher salt, brown sugar, vinegar, black pepper, thyme, and rosemary.
Instructions for successfully executing a recipe often require careful attention to detail, precise measurements, and a clear understanding of the cooking process.
In a large pot, combining water, kosher salt, brown sugar, vinegar, black pepper, thyme, and rosemary is an essential step in creating the brine solution for the buttermilk-brined turkey recipe.
When it comes to following instructions, clarity of language is crucial. The use of specific measurements, such as cups or grams, rather than vague terms like “a pinch” or “to taste,” ensures that cooks can replicate the dish with consistency and accuracy.
Familiarity with cooking techniques and terminology is also vital for executing a recipe successfully. For instance, understanding the difference between simmering and boiling water is essential when preparing the brine solution.
Furthermore, instructions often provide valuable tips and warnings that can help prevent common mistakes or accidents in the kitchen. These may include recommendations for equipment, such as using a thermometer to ensure the brine has reached the correct temperature, or advice on handling ingredients with care, like not overcrowding the pot.
Clear instructions also enable cooks to make informed decisions about substitutions and variations, allowing them to adapt recipes to their personal preferences, dietary needs, or ingredient availability. However, this requires a good understanding of the underlying cooking principles and techniques, as well as the ability to think creatively and critically.
In addition to the technical aspects, following instructions can also be influenced by factors such as kitchen environment, equipment quality, and individual experience. For instance, working in a well-ventilated area or having access to high-quality utensils can significantly impact the outcome of a recipe.
Stir until kosher salt and sugar are dissolved.
When it comes to following instructions, whether in a recipe like this Buttermilk-Brined Turkey Recipe or any other task, clarity and precision are crucial. The first instruction, “Stir until kosher salt and sugar are dissolved,” is an excellent example of this.
The key to successfully completing this step lies in understanding what each component means. Kosher salt refers to a type of salt that has a coarser grain size compared to table salt. It’s often used in cooking because it dissolves more slowly, which can be beneficial when trying to achieve an even distribution of flavor or texture. Sugar, on the other hand, adds not just sweetness but also helps to balance out the savory flavors present in many recipes.
The act of stirring until these two components are dissolved is fundamental to ensuring they’re evenly distributed throughout the mixture. This can be a bit tricky, especially if you’re using cold ingredients or if your equipment isn’t designed for efficient mixing. However, it’s worth noting that this step serves several purposes beyond just making the ingredients dissolve.
Firstly, dissolving the salt and sugar helps to prevent any gritty texture from affecting the final product. This is particularly important when cooking for large groups where every detail can make a difference in terms of overall taste and experience.
Secondly, dissolving these solids allows them to bind with other ingredients more effectively, creating a uniform flavor profile throughout your dish. In a recipe like the Buttermilk-Brined Turkey, this is crucial because it impacts not just the turkey itself but also the flavors that will develop during cooking and afterward.
Thirdly, dissolving these components at an early stage in preparation can actually affect how they behave over time. This means their effects can persist throughout the entire cooking process, enhancing the final product’s quality.
In many ways, following instructions to dissolve ingredients before proceeding with a recipe is about understanding cause and effect relationships in culinary processes. It may seem like a small step, but it has profound implications for what you’re trying to achieve through your cooking. Whether you’re making a simple meal or something as complex as a Buttermilk-Brined Turkey Recipe, following these instructions helps ensure the final product meets your expectations.
Add lemon quarters to brine mixture
When it comes to adding flavor and moisture to your buttermilk-brined turkey, incorporating lemon quarters into the brine mixture is a game-changer.
First, let’s understand the role of lemon in this context. Lemons are not only a great source of citrusy flavor, but they also have natural preservative properties that help extend the shelf life of the brined turkey.
To add lemon quarters to your brine mixture, start by slicing 2-3 lemons into quarters depending on their size. You can use any variety of lemon you prefer, but Meyer or Eureka work particularly well in this recipe.
Next, place the lemon quarters at the bottom of a large container or bowl that can fit your turkey breast or whole bird. If using a smaller turkey breast, you can place the lemons directly on the surface where the meat will come into contact with them during brining.
Now, pour the buttermilk-brine mixture over the turkey, making sure that all parts of the meat are submerged under the liquid. You want to aim for a ratio of about 1 part salt to 5 parts water, and don’t forget to adjust this according to your personal taste preferences.
As you add more lemons, be mindful not to overcrowd the container – you want enough space for the turkey to move around freely and absorb the flavors. If necessary, use a large plate or tray to distribute the weight of the lemon quarters evenly.
Avoid placing lemons directly on top of each other, as this can create uneven acidity levels and potentially cause off-flavors in your brined turkey. By spreading them out within the container, you’ll ensure that every piece of meat absorbs the same amount of citrus goodness.
Refrigerate for at least 24 hours
- To prepare the Buttermilk-Brined Turkey, it’s essential to follow proper instructions for refrigeration after brining.
- The first step involves carefully handling the turkey and making sure not to contaminate any surfaces or utensils used during preparation.
- Once the brining process is complete, carefully remove the turkey from the brine solution and rinse it under cold running water to remove excess salt.
- After rinsing, gently pat the surface of the turkey dry with paper towels to prevent moisture from accumulating.
- Next, place the turkey in a shallow dish or pan, making sure that it’s not touching any surfaces that may cause contamination.
- Wrap the turkey tightly with plastic wrap or aluminum foil, ensuring that no air can penetrate the wrapping material.
- The final step is to store the wrapped turkey in the refrigerator at a temperature of 40°F (4°C) or below for at least 24 hours before cooking.
- This refrigeration period allows the turkey’s flavor and texture to meld together, resulting in a more tender and juicy final product.
Cooking the Turkey
The key to successfully cooking a delicious turkey is to follow precise instructions and maintain a clean environment throughout the process.
Preparation
- Thawing
The turkey must be completely thawed before cooking, so plan ahead and allow enough time for it to thaw in the refrigerator or under cold running water.
- Removal of packaging materials
Rinse the turkey inside and out with cold water, then pat dry with paper towels to remove any remaining moisture.
- Cleaning
Mild soap or detergent may be used to gently scrub away any blood or debris from the surface of the meat. Be sure to rinse thoroughly with cool running water.
Brining:
- Create a brine solution
In a large pot, combine 1 gallon water, 1 cup kosher salt, and any other desired seasonings. Stir until the salt dissolves.
- Pour the brine into a container to hold the turkey: A large, heavy-duty plastic bag or a large container with a lid will work well.
- Submerge the turkey in the brine
Make sure it is fully covered by the solution and seal the container. Refrigerate for at least 24 hours and no more than 48 hours.
- Rinse after brining
Carefully remove the turkey from the brine, then pat it dry with paper towels to eliminate excess moisture.
Roasting: A roasting pan or oven-safe skillet should be prepared by lining it with foil or parchment paper and placing the rack inside. The turkey will be placed in this setup during cooking.
- Precise Temperature Control: The ideal temperature is between 325°F (165°C) and 350°F (175°C).
- Initial Cooking Time:Preheat the oven to the desired temperature, then place the turkey inside with the breast side facing upwards. The cooking time will vary based on the weight of the turkey. A general guideline is 20 minutes per pound. For a 10-pound (4.5 kg) bird, this would be approximately 2 hours and 40 minutes.
- Cooking until done: Check for doneness by inserting a meat thermometer into the thickest part of the breast, avoiding any fat or bone. It should read at least 165°F (74°C). Let the turkey rest in a warm place before carving and serving.
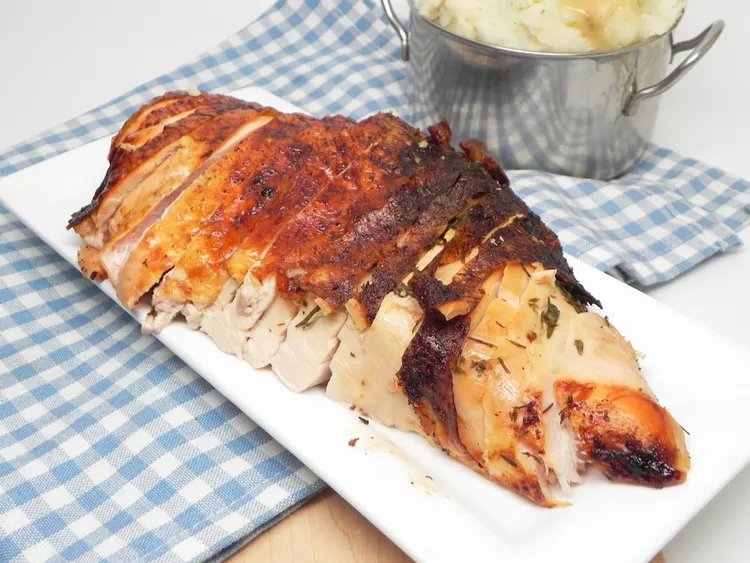
This buttermilk-brined recipe produces an incredibly moist and flavorful turkey, perfect for your next holiday dinner.
Preheat oven to 400°F (200°C).
To begin preparing this mouth-watering Buttermilk-Brined Turkey Recipe, you will first need to preheat your oven to a precise temperature.
The temperature to aim for is 400°F (200°C), which is crucial in ensuring that the turkey cooks evenly and thoroughly. To achieve this temperature, locate your oven’s controls and adjust them accordingly.
Once you have set the oven to 400°F (200°C), proceed with preparing the buttermilk brine solution. This will involve mixing together a combination of ingredients, including buttermilk, salt, sugar, black pepper, and other seasonings.
The brine solution serves several purposes in this recipe: it adds flavor to the turkey, helps to retain moisture, and promotes even cooking. It’s essential to follow the instructions carefully when preparing the brine solution, as any deviations could affect the final result.
Once the oven has reached 400°F (200°C) and the brine solution is prepared, you can proceed with the rest of the recipe. This will involve placing the turkey in a roasting pan, pouring the brine solution over it, and allowing it to cook for an extended period of time.
Throughout this process, keep a close eye on the temperature of your oven and ensure that it remains at 400°F (200°C). This is critical in ensuring that the turkey cooks evenly and thoroughly, resulting in a delicious and moist final product.
Remove turkey from brine, pat dry with paper towels.
The instructions provided are an essential part of the recipe, guiding the cook through the preparation process to achieve a perfectly brined turkey. The first step, “Remove turkey from brine,” indicates that the turkey has been soaking in a brine solution, typically a mixture of water, salt, and other seasonings, designed to enhance the flavor and moisture content of the meat.
This initial step requires care and attention to detail as the cook must gently lift the turkey out of the brine container without causing any damage or leakage. It’s crucial to use a clean utensil, such as tongs or a slotted spoon, to handle the turkey and prevent cross-contamination.
The next instruction, “Pat dry with paper towels,” is crucial in removing excess moisture from the turkey’s surface. This step helps to create a better texture for the final product by preventing steam from building up during cooking and promoting even browning.
When patting the turkey dry, it’s essential to use enough paper towels to ensure that all surfaces are thoroughly covered. However, be cautious not to press too hard, which can cause the meat to tear or become compacted, affecting its texture and appearance.
The goal of this step is to achieve a smooth, even surface on the turkey, allowing the cook to apply additional seasonings or glazes more evenly. It’s also a good opportunity to inspect the turkey for any visible signs of spoilage or contamination before proceeding with cooking.
Season with salt and pepper as desired.
To achieve the perfect flavor balance in this Buttermilk-Brined Turkey Recipe, it’s essential to season the turkey with salt and pepper as desired. Seasoning refers to the process of adding salt and pepper to enhance the natural flavors of the food. In this case, you will be seasoning the buttermilk-brined turkey just before cooking it.
When seasoning the turkey, remember that a little goes a long way. Start by sprinkling a pinch of salt over the entire surface of the meat, making sure to get some under the skin as well. This will help to bring out the natural flavors of the turkey and add depth to its flavor profile.
Next, sprinkle a few grinds of freshly ground black pepper over the top of the turkey, again making sure to get some under the skin. The key here is to use fresh peppercorns, as they will have more intense flavor than pre-ground pepper. You can also use white or green peppercorns for a slightly different flavor profile.
Now, it’s time to add a pinch of salt and pepper to taste. This means that you’ll want to season the turkey in small increments, tasting it as you go and adding more seasoning until it reaches your desired level of flavor. Remember that it’s always easier to add more seasoning than it is to remove excess seasoning, so start with a light hand.
As you’re seasoning the turkey, remember to also take into account any other seasonings or flavors that you’ve added during the brining process. The buttermilk brine will have already contributed a rich, creamy flavor to the turkey, so you’ll want to balance that out with your salt and pepper seasoning.
Finally, when you’re satisfied with the level of seasoning on your turkey, give it one last spritz with cold water to help the seasonings adhere. This will ensure that your turkey comes out of the oven tasting deliciously seasoned and flavorful.
By following these simple steps and seasoning your turkey with salt and pepper as desired, you’ll be able to add depth and complexity to its flavor profile and make it truly unforgettable. Whether you’re serving your buttermilk-brined turkey at a holiday meal or just want to impress your friends and family with a delicious home-cooked meal, this seasoning technique is sure to deliver.
Place in a roasting pan, breast side up.
To successfully execute the Buttermilk-Brined Turkey Recipe, it’s essential to follow the instructions carefully.
The first step in preparing the turkey for roasting involves placing it in a roasting pan, breast side up. This ensures that the juices and brine evenly distribute throughout the meat during cooking.
When positioning the turkey in the roasting pan, make sure it’s secure and won’t shift during cooking. You can use kitchen twine or a trussing kit to tie the legs together for even browning and stability.
The breast side up orientation also allows for better air circulation under the breast, promoting even browning and crisping of the skin. This step is crucial in achieving that perfect golden-brown color on your roasted turkey.
Now, let’s move on to some essential tips and guidelines for preparing the roasting pan:
- Cleanliness: Ensure the roasting pan is clean and free of any debris or food particles. This prevents cross-contamination and ensures even cooking.
- Pan size: Choose a roasting pan that’s large enough to accommodate the turkey with some room for expansion during cooking. A general rule of thumb is to use a pan that’s at least 2-3 inches larger than the turkey.
- Non-stick coating: Consider using a non-stick roasting pan to prevent food from sticking and make cleanup easier.
By following these guidelines and ensuring the turkey is securely positioned in the roasting pan, breast side up, you’ll be well on your way to achieving a deliciously roasted Buttermilk-Brined Turkey that’s sure to impress your guests.
Roast for about 20 minutes per pound, or until internal temperature reaches 165°F (74°C).
When it comes to following instructions, whether in a recipe like the Buttermilk-Brined Turkey Recipe, there are several key aspects to consider.
Understanding the Task
In this case, we’re looking at roasting a turkey for about 20 minutes per pound, or until it reaches an internal temperature of 165°F (74°C).
To achieve this, it’s essential to grasp the task requirements clearly. This means understanding the weight of your turkey and the time it will take to cook, as well as the critical temperature that ensures food safety.
Breaking Down the Process
The process involves several steps:
- Weighing the Turkey: It’s crucial to measure your turkey accurately to ensure you’re following the correct cooking time. This will help prevent under or overcooking, which can have serious consequences on food safety.
- Setting the Oven Temperature: Preheat your oven to the required temperature, which is essential for even cooking and achieving the desired internal temperature.
- Roasting Time Calculation: Based on the turkey’s weight, calculate the roasting time. As a general guideline, roast about 20 minutes per pound of turkey, or until it reaches an internal temperature of 165°F (74°C).
- Monitoring Temperature and Cooking: Use a meat thermometer to monitor the turkey’s internal temperature. Baste the turkey periodically with melted butter or pan juices, if desired.
Following Safety Guidelines
The most critical aspect of cooking is ensuring food safety. Here are some essential guidelines:
- Avoid Overcooking: Cooking your turkey to the correct internal temperature helps prevent bacterial growth and minimizes the risk of foodborne illness.
- Use a Meat Thermometer: A meat thermometer is the most reliable way to ensure you’ve reached the required internal temperature. If you don’t have one, use the “ball park” method: The juices should run clear when cut into the thickest part of the breast.
- Don’t Guess the Temperature: Don’t rely solely on visual cues like the turkey’s color or texture. The only sure way to determine if it’s done is by using a meat thermometer.
Celebrating Success
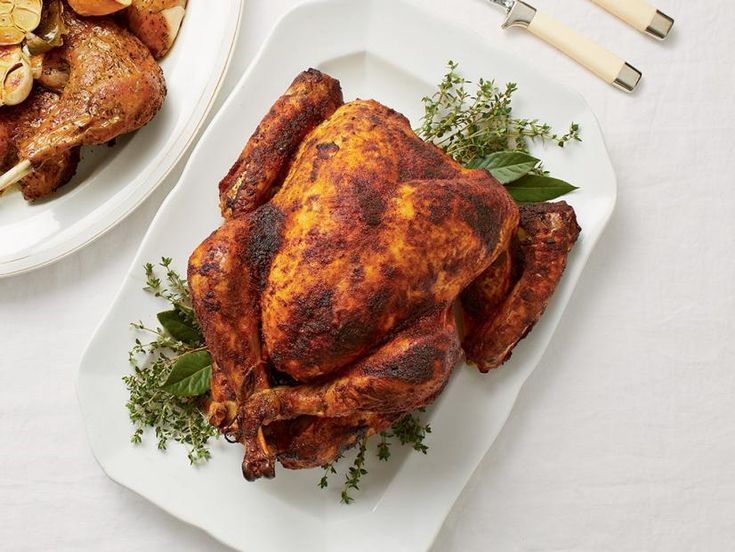
A well-roasted turkey, cooked with care and attention to detail, is a true culinary delight. When you follow these instructions carefully and ensure your turkey reaches the required internal temperature of 165°F (74°C), you’ll be rewarded with a deliciously moist and flavorful dish.
The key to achieving success lies in understanding the task requirements, breaking down the process into manageable steps, and following essential safety guidelines. By doing so, you’ll be able to enjoy your perfectly cooked turkey, knowing that it’s not only delicious but also safe to consume.

- Best Clay Alternatives for 2025 - April 22, 2025
- Best Leadfeeder Alternatives for 2025 - April 22, 2025
- Best Snov.io Alternatives for 2025 - April 21, 2025
