
Ingredients
The Perfect Combination
The key to baking delicious cookies that kids will love for back-to-school season lies in selecting the perfect combination of ingredients.
Here’s a breakdown of what you’ll need:
- Butter: Unsalted, softened to room temperature. This provides moisture and tenderness to the cookies.
- Sugar: A combination of white granulated sugar and brown sugar adds a hint of caramel flavor. Brown sugar also contains molasses, which contributes depth and warmth to the cookies.
- Large Eggs: Fresh eggs provide structure, moisture, and richness to the dough.
- Vanilla Extract: High-quality vanilla extract adds a subtle, sweet flavor that enhances the overall taste of the cookies.
- All-Purpose Flour: This is the backbone of the cookie dough. Make sure it’s fresh and has not been sitting around for too long.
- Baking Soda: A leavening agent that helps the cookies spread and gives them a light, airy texture.
- Salt: A small amount of salt balances out the sweetness of the cookies and enhances their flavor.
- Optional Mix-Ins: Nuts (walnuts or pecans work well), chocolate chips, or dried cranberries can add texture and excitement to the cookies.
The combination of these ingredients creates a balanced flavor profile that is both sweet and savory. The type and amount of each ingredient will impact the final result, so experiment with different combinations to find your perfect match.
1 cup unsalted butter, softened
The key to making delicious Back-to-School Cookies is starting with high-quality ingredients, and one crucial component is unsalted butter.
For this recipe, you will need 1 cup of unsalted butter that has been softened to a perfect spreadable consistency. This step is essential as it ensures the butter mixes smoothly with the other ingredients and contributes to the overall texture of the cookies.
When shopping for unsalted butter, look for sticks or blocks labeled “unsalted” or “sweet butter.” These types of butter have not had any salt added during processing, which makes them ideal for baking.
To soften your 1 cup of unsalted butter, remove it from the refrigerator and let it sit at room temperature for about 30 minutes. You can also try microwaving it in short intervals, checking on it every 10-15 seconds to avoid melting it.
Once your butter is softened, you’re ready to move on to the next step of the recipe: creaming together the butter and sugar until light and fluffy. This will help incorporate air into the mixture, giving your cookies a tender texture and delicate flavor.
In the context of the Back-to-School Cookies Recipe, using 1 cup of softened unsalted butter is crucial for achieving the right balance of flavors and textures. The subtle sweetness of the butter complements the other ingredients perfectly, resulting in a delicious cookie that’s sure to be a hit with kids (and adults!) alike.
¾ cup white granulated sugar
The main ingredient for these delicious Back-to-School Cookies is a combination of sweet and tasty elements, with one of them being white granulated sugar.
In this recipe, we require ¾ cup white granulated sugar, which serves as an essential component that adds the necessary sweetness to our cookies.
The uses of white granulated sugar in baking are numerous. It’s used as a sweetener and a tenderizer, helping to bring together all the ingredients in a cookie dough and creating a smooth texture.
Here are some reasons why we use white granulated sugar:
- It adds sweetness to our cookies.
- Helps to balance the flavors of other ingredients.
- Contributes to the texture of the cookies, making them soft and chewy.
We can use white granulated sugar in various forms while baking. It can be used as:
- A dry ingredient: We measure it accurately according to the recipe and add it to the wet ingredients.
- A liquid sweetener: We dissolve it in a liquid form before adding it to our cookie dough.
Keep in mind that using white granulated sugar can have some drawbacks. Some people may find that it adds too much sweetness to their cookies, and it also contains empty calories.
However, if you’re looking for a traditional sweet flavor in your Back-to-School Cookies, then white granulated sugar is the way to go.
¾ cup packed brown sugar
The first ingredient we’ll be using to make our delicious Back-to-School Cookies is packed brown sugar, and specifically, ¾ cup of it.
Packed brown sugar has a distinct texture and flavor compared to its loose counterpart. When you pack brown sugar into a measuring cup or a container, you’re essentially removing any air pockets that might be present in the sugar. This process compacts the sugar, making it more dense and easier to measure accurately.
The use of packed brown sugar is crucial in baking, especially when it comes to sweet treats like cookies. Brown sugar contains molasses, which gives baked goods a richer flavor and aroma. The packing process also helps to prevent the sugar from becoming too powdery or developing an unpleasant texture during the mixing process.
When using packed brown sugar in our Back-to-School Cookies recipe, it’s essential to ensure that you’re measuring it correctly. To do this, press the brown sugar firmly into a ¾ cup measuring container until it reaches the top. Don’t pack it down too hard, as this can cause the sugar to become compacted unevenly.
The ¾ cup of packed brown sugar in our recipe serves multiple purposes. It adds sweetness and depth to the cookies, while also contributing to their chewy texture. When combined with other ingredients like butter, eggs, and flour, the brown sugar helps create a delicious balance of flavors that will make your Back-to-School Cookies a hit with kids and adults alike.
2 large eggs
Eggs, in particular, are a staple ingredient in many baked goods, including the delicious Back-to-School Cookies. When it comes to using eggs in your baking, there are some key things to consider.
The first thing to note is that eggs serve several purposes in baking. They act as an binder, helping to hold ingredients together and give structure to your final product. Eggs also provide moisture, richness, and a tender crumb to baked goods. Additionally, the lecithin in egg yolks helps to emulsify mixtures of fat and water, creating a smooth and stable texture.
For our Back-to-School Cookies, we need two large eggs. The size of the eggs is important because it affects the amount of liquid and leavening power in your batter. Large eggs will give you more liquid and help to create a lighter, airier cookie. Using smaller eggs would result in a denser cookie.
Now that we have our two large eggs, let’s talk about how to prepare them for use in the recipe. When cracking your eggs into a bowl or measuring cup, be sure to get all of the egg white and yolk out of the shell. You can do this by gently tapping the egg on the counter to loosen any remaining eggshell fragments before cracking it open.
Once you have both eggs cracked into your bowl or measuring cup, whisk them together with a fork until they are well-beaten and smooth. This will help to incorporate air into the eggs and create a lighter texture in your final cookies.
Now that we’ve prepared our two large eggs, let’s move on to the rest of the Back-to-School Cookies recipe and combine all of our ingredients together!
Key Takeaways
- Eggs serve multiple purposes in baking, including binding, moisture, richness, and leavening.
- Large eggs are preferred for most recipes due to their higher liquid content and leavening power.
- When cracking eggs, be sure to get all of the egg white and yolk out of the shell for even mixing and baking results.
Eggs are an essential ingredient in many baked goods, including our delicious Back-to-School Cookies. By understanding how eggs work and using them effectively in your recipe, you can create a more tender, moist, and flavorful final product. Happy baking!
2 teaspoons pure vanilla extract
Pure vanilla extract is an essential ingredient in many recipes, including the Back-to-School Cookies recipe featured in this article.
The recipe calls for 2 teaspoons of pure vanilla extract, which is a relatively small amount compared to other ingredients, but it plays a crucial role in enhancing the flavor and aroma of the cookies.
Pure vanilla extract is typically made from the seeds of the vanilla orchid, specifically the species Vanilla planifolia, which is native to Mexico and Central America.
The process of extracting vanilla oil from the pods involves hand-picking, harvesting, and curing the pods in a controlled environment to develop the distinct flavor and aroma compounds.
Pure vanilla extract is often confused with imitation or artificial vanilla flavorings, but it’s essential to use high-quality pure vanilla extract for optimal flavor and aroma.
The 2 teaspoons of pure vanilla extract called for in this recipe will contribute to a rich, deep flavor profile that complements the other ingredients, such as sugar, butter, eggs, and flour.
When selecting pure vanilla extract, look for products that are labeled as “pure” or “100% pure,” and check the ingredient list to ensure it only contains vanilla extract and not any additives or artificial flavorings.
Keep in mind that high-quality pure vanilla extract can be more expensive than imitation versions, but the difference in flavor and aroma is well worth the extra cost.
In terms of storage and handling, it’s essential to store pure vanilla extract in a cool, dark place, away from direct sunlight and heat sources, which can cause the oil to break down and lose its potency.
2 ¼ cups allpurpose flour
All-purpose flour is a staple ingredient in baking and is used as the base for many recipes, including the Back-to-School Cookies. It provides structure, texture, and helps to bind ingredients together. In this recipe, 2 ¼ cups of all-purpose flour is called for.
The term “all-purpose” refers to the fact that this type of flour can be used in a variety of recipes, from baked goods like cakes and cookies to savory dishes such as pasta and pizza dough. It has a neutral flavor and a fine texture, making it an ideal choice for many baking applications.
When measuring out 2 ¼ cups of all-purpose flour, it’s essential to use a dry measuring cup to ensure accuracy. Scoop the flour into the measuring cup until it is overflowing, then level off the top with a knife or spatula. Do not pack down the flour, as this can result in too much flour being used.
The amount of 2 ¼ cups of all-purpose flour in this recipe serves several purposes. It contributes to the texture and consistency of the cookies, helping them to retain their shape while still being soft and chewy on the inside. Additionally, it provides structure and support for the other ingredients, such as butter and sugar, which can make up a significant portion of the cookie’s weight.
It’s worth noting that all-purpose flour is not the only type of flour available. There are many different types, including bread flour, pastry flour, and cake flour, each with its own unique characteristics and uses in baking. However, for this recipe, all-purpose flour is the best choice due to its versatility and neutral flavor.
In summary, 2 ¼ cups of all-purpose flour is a crucial ingredient in the Back-to-School Cookies Recipe, providing structure, texture, and helping to bind other ingredients together. Its neutral flavor and fine texture make it an ideal choice for many baking applications, and its versatility makes it a staple ingredient in many recipes.
1 teaspoon baking soda
Baking soda, also known as sodium bicarbonate, is an essential ingredient in many baked goods, including back-to-school cookies. It plays a crucial role in balancing flavors and helping to leaven baked products. When combined with acidic ingredients like buttermilk or yogurt, baking soda releases carbon dioxide gas, causing the dough to rise.
In this specific recipe, one teaspoon of baking soda is added to provide structure and texture to the cookies. The sodium bicarbonate helps to neutralize any acidity present in the other ingredients, creating a stable pH level for the cookie to develop properly. This is particularly important when using buttermilk or yogurt, as they contain lactic acid that can react with the baking soda.
It’s worth noting that too much baking soda can result in an unpleasant soapy flavor in the finished cookies. Therefore, it’s essential to use only one teaspoon of baking soda for this recipe to achieve the perfect balance of flavors and textures.
The quality of the baking soda used can also impact the final outcome of the cookies. Look for a pure sodium bicarbonate powder that is free from additives or other contaminants. You can often find high-quality baking soda at local health food stores or online retailers.
When measuring out the one teaspoon of baking soda, be sure to use a level spoon and press the contents gently into the measuring spoon to ensure accurate measurement. This will help you avoid adding too much baking soda to the dough, which can affect its performance in the oven.
Overall, the inclusion of one teaspoon of baking soda is an important aspect of this back-to-school cookies recipe. It helps to create a light and tender crumb, while also contributing to the overall flavor and texture of the finished product.
1 teaspoon salt
The perfect addition to our Back-to-School Cookies Recipe is just one teaspoon of salt. Salt plays a crucial role in balancing the sweetness of the cookies, allowing each flavor component to shine.
This single teaspoon may seem like an insignificant amount, but it packs a punch when it comes to bringing out the natural flavors of the ingredients. Salt enhances the sweetness without overpowering it, creating a delightful harmony that will leave you wanting more.
Salt can also be used as a flavor enhancer in various recipes, especially those featuring sweet ingredients like sugar and butter. In this case, it’s perfect for complementing the rich, buttery flavors in our cookies recipe.
One of the most important things to note about salt is its impact on texture. A pinch of salt can help balance out the sweetness by cutting through richness, making each bite feel lighter and more refined.
The key to using salt effectively is to find that perfect balance between sweet and savory. In this recipe, a single teaspoon of salt strikes just the right chord, allowing you to experience the full depth of flavors without overpowering any particular ingredient.
Instructions
Make-Ahead Magic
The concept of make-ahead magic is a game-changer for anyone who wants to save time and stress in the kitchen, especially during the back-to-school season when schedules can get busy.
Make-ahead magic refers to the ability to prepare a dish or dessert ahead of time, allowing it to be refrigerated, frozen, or baked at a later date. This technique is perfect for school lunches, dinners, and even desserts like cookies that are often in high demand during back-to-school season.
One popular recipe that showcases make-ahead magic is the Back-to-School Cookies Recipe. These soft-baked treats can be made ahead of time and frozen for up to 2 months, making them an ideal option for school lunches or after-school snacks.
To make the most of make-ahead magic in this recipe, start by baking the cookie dough in advance. Scoop out balls of dough onto a baking sheet lined with parchment paper, leaving space between each cookie to allow for even baking. Bake the cookies as instructed and then let them cool completely on the baking sheet.
Once the cookies are cool, place them in an airtight container or freezer bag and store them in the freezer for up to 2 months. When you’re ready to serve, simply thaw the desired number of cookies at room temperature or reheat them in the oven for a few minutes.
The beauty of make-ahead magic lies in its ability to save time and reduce stress during busy periods. With this Back-to-School Cookies Recipe, you can prepare a batch of delicious cookies ahead of time and enjoy them throughout the school year without having to spend hours in the kitchen each week.
Preheat oven to 375°F (190°C).
To prepare the delicious Back-to-School Cookies, follow these step-by-step instructions:
- Preheat oven to 375°F (190°C).
- This initial step ensures that your oven has reached the optimal temperature for baking, allowing for even cooking and a crispy texture in the finished cookies.
- Line a baking sheet with parchment paper or a silicone mat.
- This helps prevent the cookies from sticking to the pan and makes cleanup easier by providing a non-stick surface.
- Whisk together flour, baking powder, salt, and sugar in a medium-sized bowl.
- Mixing dry ingredients first creates a stable base for the dough and eliminates any lumps that could form during later stages of preparation.
- In a separate large bowl, combine butter, eggs, vanilla extract, and chocolate chips (if using).
- Creaming together fats and sweetener is essential for creating a rich, tender crumb in the cookies.
- Gradually add the dry ingredients to the wet mixture and mix until just combined.
- Avoid overmixing at this stage, as it can lead to tough or dense cookies.
- Scoop tablespoon-sized balls of dough onto the prepared baking sheet, leaving about 2 inches of space between each cookie.
- Portion control helps maintain even baking times and prevents cookies from spreading too much during cooking.
- Bake for 10-12 minutes or until edges are lightly golden brown.
- Check for doneness by gently rotating a cookie; it should be firm to the touch and slightly springy in the center.
- Remove the cookies from the oven and let them cool on the baking sheet for 5 minutes before transferring them to a wire rack to cool completely.
- Allowing the cookies to rest on the baking sheet briefly helps prevent breakage during transfer, promoting a more uniform appearance in the finished product.
Line a baking sheet with parchment paper.
To create a clean and efficient baking space, it’s essential to start by preparing the baking sheet. This process involves covering the entire surface with parchment paper, ensuring that every inch is securely covered.
First, locate a high-quality roll of parchment paper in the pantry or cupboard. Ensure that the roll is large enough to cover your baking sheet completely, taking into account any curves or irregularities.
To begin unrolling the parchment paper, start from one edge of the roll and gently pull it away from the center. Continue unwinding the paper until you have a long strip that can be laid flat on the counter.
Measure out your baking sheet to ensure the parchment paper is the correct size. Cut the paper to the desired length using scissors or a sharp knife, leaving about 1-2 inches of extra material at the ends for easy folding and trimming.
Next, place the baking sheet on the counter and align it with the unrolled parchment paper. Starting from one edge, carefully lift the parchment paper over the baking sheet, smoothing out any wrinkles or air pockets as you go.
As the parchment paper is placed over the baking sheet, make sure to tuck in the edges, ensuring they fit snugly into any corners or curves. This step helps prevent the paper from shifting during the baking process.
To secure the parchment paper in place, fold the excess material over the edges of the baking sheet and press it firmly onto the counter. Repeat this process for all four sides, creating a seamless seal that prevents the paper from lifting during baking.
With the parchment paper securely in place, your baking sheet is now ready for use. You can confidently proceed with measuring out ingredients, mixing batter, and loading the cookies onto the prepared surface without worrying about sticking or cleanup issues.
Whisk together dry ingredients (flour, baking soda, and salt) in a medium bowl.
In this step of making our delicious Back-to-School Cookies, we need to focus on combining a few essential dry ingredients. The first step involves whisking together flour, baking soda, and salt in a medium-sized bowl.
The key here is to use the right tool for the job: a whisk! A whisk is an essential utensil that allows us to mix, blend, or even whip ingredients together. In this case, we want to use it to combine these dry ingredients evenly and smoothly.
To whisk, you will need to hold your whisk firmly in one hand, with the wires of the whisk facing downwards towards the bowl. Hold the bowl with your other hand and slowly begin to move your whisk in a circular motion. Make sure to cover all areas of the bowl as you whisk, ensuring that everything is well combined.
The dry ingredients should now be fully incorporated, leaving you with a uniform mixture of flour, baking soda, and salt. This is an important step in our cookie recipe, as it sets the foundation for the rest of our baking process.
Take your time and be thorough when whisking together these dry ingredients. It’s essential to get this right, as it will affect the texture and consistency of our cookies later on.
Beat butter and sugars until light and fluffy, about 2 minutes.
In the process of making delicious back-to-school cookies, a crucial step involves creaming together butter and sugars until they reach a light and fluffy consistency.
This technique is often referred to as “beating” or “creaming,” and it’s essential for incorporating air into the mixture, which contributes to the overall texture and structure of the cookies.
When beating butter and sugars, you want to focus on achieving a smooth and even consistency. This can be achieved by using an electric mixer with a whisk attachment or a stand mixer with a flat beater.
The goal is to create a mixture that’s almost doubled in volume compared to its original size, which typically takes around 2 minutes of constant beating.
During this process, the butter will break down and release its fat molecules, incorporating air into the mixture. This will result in a light and fluffy texture that’s perfect for cookie dough.
As you beat the mixture, keep an eye on it to ensure that it doesn’t become too hot or over-beat. You can test the consistency by lifting some of the mixture off the sides of the bowl with your spatula – if it forms a ribbon-like texture and holds its shape for a few seconds, it’s ready.
Once you’ve achieved the desired consistency, stop beating the mixture immediately to prevent over-processing or developing gluten in the butter.
This step sets the stage for incorporating other ingredients, such as eggs, vanilla extract, and flour, which will eventually be combined to form a cohesive dough that’s ready for baking into delicious back-to-school cookies.
Beat in eggs one at a time, followed by vanilla extract.
To start making this delicious batch of cookies, it’s essential to have all the necessary ingredients at hand. For this particular recipe, we’re focusing on the initial steps of beating the eggs one at a time.
The first step in incorporating the eggs into your mixture is to crack each egg individually onto a flat surface before carefully pouring them into the mixing bowl containing the remaining dry ingredients and wet ingredients that have already been combined. It’s crucial not to skip this step, as it ensures each egg gets beaten properly without any shell fragments making their way into the batter.
Next, using an electric mixer, beat the first egg until its texture becomes light and airy. This process typically takes around 30 seconds to a minute depending on your mixer’s speed setting. Be cautious not to over-beat as this can cause the eggs to become too frothy and affect the overall consistency of your dough.
Once the first egg has been sufficiently beaten, you’re ready to add it into your mixture. Do this by gently pouring or scooping it into the mixing bowl containing the dry ingredients. Be mindful not to spill any egg onto the counter, as this can be a frustrating and wasteful experience.
Proceed with beating in another 1-2 teaspoons of vanilla extract until well combined. The key is to incorporate these extra drops evenly throughout your mixture without creating an over-sweet or overpowering flavor. If you’re using imitation or synthetic vanilla extract, it’s best to follow the recommended dosages specified on the product label to avoid adding too much.
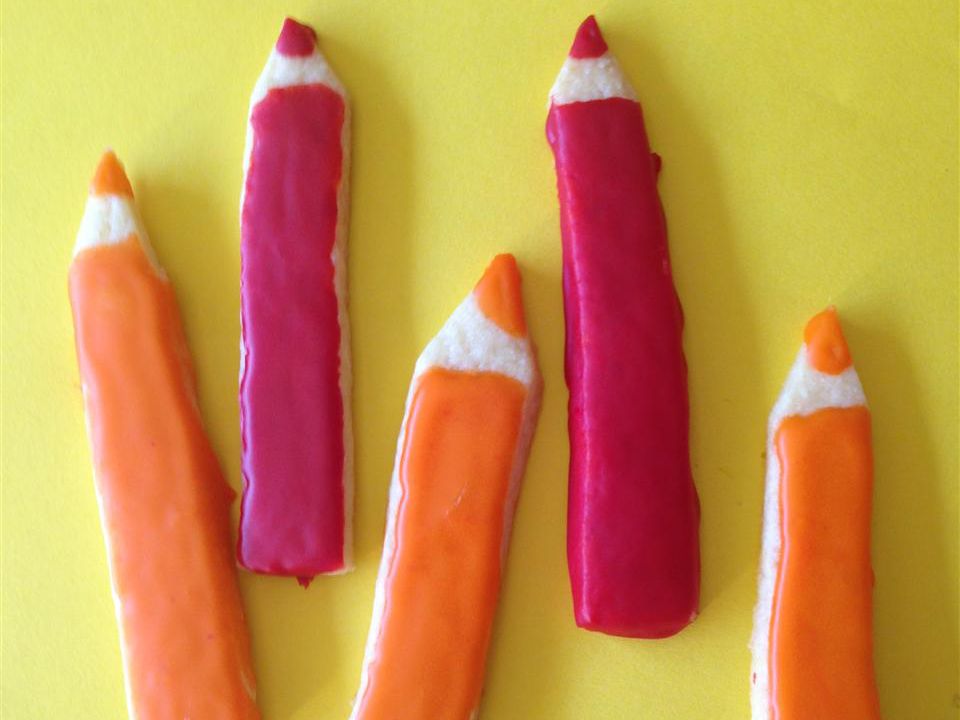
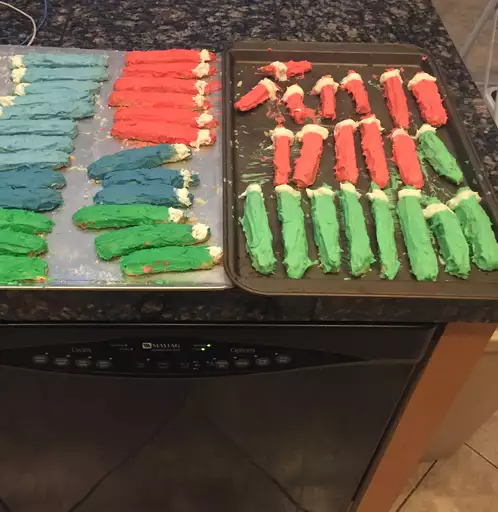
Decorate & Serve
The Finishing Touches
The art of decorating and serving cookies for a back-to-school party requires attention to detail and creativity. The finishing touches can make all the difference in creating an impressive spread that delights both kids and adults.
Here are some ideas for decorating your cookies:
Frosting designs:
- Piped borders, like shells or stars
- Cute shapes, such as hearts or animals
- Colorful patterns, like stripes or polka dots
Edible decorations:
- Candy pieces, such as M&M’s or chopped nuts
- Licorice straps or other small candies
Sandwich cookies:
- Matchbook cookies, where two cookies are stuck together with frosting
- Double-decker sandwiches, where one cookie is on top of another
To serve your decorated cookies:
- Arrange them attractively on a platter or tiered stand
- Set up a topping bar with extra frosting, sprinkles, and edible decorations
- Provide small plates, napkins, and utensils for each guest to decorate their own cookie
- Consider creating a “Cookie Decorating Station” with tables, chairs, and inspiration boards
The finishing touches can include adding a few extra elements to enhance the overall presentation:
- A personalized banner or sign for the party
- A decorative tablecloth, placemats, or plates to match your theme
- Fun and colorful straws or cups for drinks
- A photo booth or backdrops for capturing memories
By incorporating these ideas into your decorating and serving strategy, you’ll create a memorable and enjoyable experience for all the students attending your party.
Roll dough into balls (about 1 inch each).
To decorate and serve these delicious Back-to-School Cookies, you’ll need to follow a few steps. First, roll out the dough into balls about 1 inch each.
Rolling the Dough: To create uniform cookies, it’s essential to roll the dough into consistent balls. This will ensure that your cookies bake evenly and have a smooth texture.
How to Roll the Dough
- Take a small piece of dough (about 1 inch) between your hands
- Gently squeeze the dough into a ball shape, applying gentle pressure
- Use a light touch to avoid compacting the dough too much
Why Roll into Balls: Rolling the dough into balls helps to create a uniform texture and prevents the cookies from spreading too much during baking. It also makes it easier to shape the cookies into fun shapes or designs.
Tips for Perfect Balls
- Make sure to keep the balls of dough evenly sized, so your cookies bake uniformly
- If you find that the dough is too sticky, refrigerate it for about 10-15 minutes to firm it up before rolling it into balls
Now that you’ve rolled out the dough into delicious-looking balls, it’s time to move on to the decorating step of our Back-to-School Cookies Recipe!
Place on prepared baking sheet, leaving 2 inches between cookies.
To decorate and serve your back-to-school themed cookies, you’ll need to have already baked and cooled them according to the recipe instructions. If not, proceed with baking them as instructed.
First, prepare a clean and dry workspace for decorating the cookies. This will help prevent any mess or smudges from transferring to the cookies. Gather all your decorative items such as frosting, sprinkles, edible markers, etc., within easy reach.
Select one cookie at a time, depending on how many you have and how much time you have available. Hold the cookie firmly but gently with one hand, using a light touch to avoid breaking it.
With the other hand, start decorating your cookie. You can use frosting or icing to write messages such as “Happy Back-to-School”, draw simple designs like lines, circles, or shapes, or add more complex images like animals or people. Sprinkles and edible markers can be used to add colors and details.
As you decorate each cookie, consider the theme of back-to-school and incorporate elements that fit the occasion such as pencils, books, apples, etc.
Once you have decorated all your cookies, place them on a prepared baking sheet lined with parchment paper. Leave 2 inches between each cookie to allow for even spreading of toppings or frosting if needed, and prevent them from sticking together.
This is also a good time to store any leftover cookies in an airtight container or ziplock bag for future use.
Bake for 1012 minutes or until edges are lightly golden.
The art of baking and decorating cookies is a delightful experience that brings joy to both children and adults. When it comes to creating special treats for back-to-school season, Decorate & Serve cookies are the perfect way to express your creativity while providing a sweet treat for students and teachers alike.
To create these mouth-watering cookies, you’ll need to start by preheating your oven to 375°F (190°C). Next, gather your ingredients which include 2 cups of all-purpose flour, 1 tsp baking powder, 1/2 tsp salt, 1 cup unsalted butter softened, 3/4 cup granulated sugar, and 1 large egg.
Now it’s time to mix the wet and dry ingredients together. In a large mixing bowl, cream together the butter and sugar until light and fluffy. Then, beat in the egg followed by the vanilla extract. Gradually add the flour mixture to the wet ingredients, beating until just combined.
Scoop tablespoon-sized balls of dough onto a baking sheet lined with parchment paper, leaving about 2 inches of space between each cookie. Bake for 1012 minutes or until edges are lightly golden brown. You’ll know they’re ready when they’re set at the center and firm to the touch.
Remove the cookies from the oven and let them cool on the baking sheet for 5 minutes before transferring them to a wire rack to cool completely. This is where you can get creative with decorating your cookies! Choose any colors or designs you like, such as sprinkles, frosting, or edible markers.
The possibilities are endless, and these Decorate & Serve cookies will be the perfect treat for students and teachers alike. Whether you’re attending a classroom party or sending them in lunchboxes, these sweet treats are sure to bring smiles to everyone’s faces.
Allow to cool on the baking sheet for 5 minutes before transferring to a wire rack to cool completely.
The process of decorating and serving these back-to-school cookies involves several steps that contribute to their overall presentation and appeal.
To begin, after they have been baked, allow the cookies to cool on the baking sheet for exactly 5 minutes. This allows them to retain some heat while maintaining a gentle crispiness.
Following this brief resting period, carefully transfer each cookie to a wire rack. The purpose of this step is to facilitate airflow around the cookies and promote even cooling, thus preventing sogginess or soft spots.
Allowing the cookies to cool completely on the wire rack enables them to firm up further, which in turn enhances their texture. As they reach room temperature, the flavors within will also meld together beautifully, resulting in an improved overall taste experience.
While cooling, these back-to-school cookies are not only developing a pleasing aroma but also attaining the perfect balance of crunch and tenderness that makes them irresistibly delightful to enjoy with your favorite beverage.
This detailed process not only contributes to their aesthetic appeal by keeping their edges intact but also guarantees an excellent eating experience that kids will love when it’s time for a snack or dessert.

- Best Datanyze Alternatives for 2025 - April 24, 2025
- Best Hunter.io Alternatives for 2025 - April 22, 2025
- Best Lead411 Alternatives for 2025 - April 22, 2025
