Ingredients
Cocoa Powder and Sugar
- The ingredients required to make homemade chocolate syrup are relatively simple and accessible.
- Cocoa powder, which gives the syrup its characteristic flavor and color, is a must-have ingredient.
- There are several types of cocoa powder available in the market, including Dutch-processed and natural cocoa powders.
- Dutch-processed cocoa powder has been treated with an alkalizing agent to neutralize its natural acidity, resulting in a milder flavor and darker color.
- Natural cocoa powder retains its natural acidity and has a more vibrant flavor and lighter color compared to Dutch-processed cocoa powder.
- For the homemade chocolate syrup recipe, it’s recommended to use high-quality natural cocoa powder for the best flavor and texture.
- Sugar is another essential ingredient in this recipe, providing sweetness and balance to the bitter taste of the cocoa powder.
- The amount of sugar required can be adjusted according to personal preference, but a general ratio of 1:1 with the cocoa powder works well.
- Other ingredients such as milk or heavy cream can also be added to create different variations of chocolate syrup, such as white chocolate or creamy chocolate syrup.
Here are some detailed specifications for each ingredient:
Cocoa Powder:
- Type: Natural cocoa powder
- Amount: 1 cup (120g)
- Characteristics: High-quality, natural, and non-alkalized
Sugar:
- Type: Granulated sugar
- Amount: 1 cup (200g)
- Characteristics: Fine texture and pure white color
1 cup unsweetened cocoa powder
Cocoa powder is a fundamental ingredient in making homemade chocolate syrup, and its quality can significantly impact the flavor and texture of the final product.
Unsweetened cocoa powder is preferred over sweetened or Dutch-processed cocoa powder because it contains less sugar and has not been alkalized, which helps preserve more of the natural antioxidants found in cacao beans.
The cocoa powder used for this recipe should be of high quality and preferably organic to ensure that it is free from additives and preservatives.
A high-quality unsweetened cocoa powder will have a rich, intense flavor and a deep brown color, which are essential characteristics for creating a robust chocolate syrup.
It’s worth noting that some brands of unsweetened cocoa powder may contain a small amount of sugar or other additives, so it’s essential to check the ingredient label carefully to ensure that it meets your requirements.
In general, look for an unsweetened cocoa powder that is labeled as “raw,” “natural,” or “high-quality” and has been produced by a reputable manufacturer.
1 cup granulated sugar
Granulated Sugar plays a crucial role in this homemade chocolate syrup recipe, as it serves not only as a sweetener but also as an important ingredient that helps to balance out the flavors and textures of the syrup.
The cup measurement indicates that we need one cup of granulated sugar for this recipe. Granulated sugar is a type of white sugar that has been crystallized into small, granular crystals. This texture allows it to dissolve easily in water or other liquids, making it ideal for use in syrups and sauces.
When measuring out the cup of granulated sugar, be sure to use a dry measuring cup to ensure accuracy. A liquid measuring cup may not provide an accurate measurement due to the varying densities of different ingredients.
Granulated sugar is available at most grocery stores and supermarkets in various sizes, including 1-pound bags, which are equivalent to approximately four cups. If you plan on making this recipe frequently or want to have a stockpile on hand, purchasing a larger bag may be a convenient option.
It’s worth noting that granulated sugar can be substituted with other types of sugars in certain recipes, but for this homemade chocolate syrup recipe, granulated sugar is the recommended choice. Other types of sugar, such as brown sugar or confectioner’s sugar, may alter the flavor and texture of the syrup.
In addition to its use in sweetening, granulated sugar also helps to thicken the syrup by contributing to the formation of crystals, which gives the syrup a smooth and silky texture. The ratio of sugar to water is crucial in this recipe, as it affects not only the flavor but also the consistency of the final product.
Using high-quality granulated sugar will result in the best possible flavor and texture for your homemade chocolate syrup. Look for brands that are free from additives and preservatives, which can affect the flavor and shelf life of the syrup.
In summary, granulated sugar is an essential ingredient in this homemade chocolate syrup recipe, providing sweetness, texture, and a crucial balance of flavors. By following the correct measurement and using high-quality granulated sugar, you’ll be able to create a delicious and smooth syrup that’s perfect for topping ice cream, cakes, or other desserts.
Milk and Flavorings
The key ingredients used in making homemade chocolate syrup are straightforward, yet crucial for achieving the perfect taste and texture. For this recipe, you will need:
A high-quality dark or semi-sweet chocolate chip or chopped block (at least 70% cocoa solids) – This ingredient provides the rich, deep flavor that defines chocolate syrup.
Milk or a non-dairy milk alternative (such as almond or soy milk) – The choice of milk will determine the overall texture and sweetness level of your final product. Whole milk is recommended for a classic taste, while plant-based milks offer a dairy-free alternative.
Granulated sugar – This sweetener adds depth to the chocolate flavor without overpowering it, allowing you to adjust the sweetness level to your liking.
A pinch of salt – Salt balances the sweetness and enhances the overall flavor profile. Choose a flaky sea salt or kosher salt for their nuanced taste.
Optional flavorings (such as vanilla extract, peppermint oil, or hazelnut syrup) – These add an extra layer of complexity to your homemade chocolate syrup.
The choice of milk is crucial in determining the final texture and taste of your homemade chocolate syrup. Milk contains fat, protein, and sugar, which affect the way it interacts with other ingredients.
Whole milk is the most traditional choice for homemade chocolate syrup, as its high fat content helps create a rich and creamy texture when combined with cocoa powder or melted chocolate. You can use skimmed or semi-skimmed milk if you prefer a lower-fat version, but keep in mind that it will result in a thinner consistency.
Non-dairy milks like almond or soy milk work well as alternatives for those who are lactose intolerant or follow a vegan diet. They often have a lighter flavor and may alter the texture slightly, so you can adjust the sugar content to compensate. If using non-dairy milk, choose a brand that is unsweetened to maintain control over the overall sweetness level.
Flavorings add an extra layer of complexity to your homemade chocolate syrup, allowing you to experiment with unique and exciting combinations. Some popular options include:
Vanilla extract: adds a subtle creaminess and depth
Peppermint oil or extract: provides a refreshing twist with a hint of minty freshness
Hazelnut syrup: combines the richness of hazelnuts with the deep flavor of chocolate
When choosing flavorings, remember to use them in moderation. The goal is to enhance the chocolate flavor without overpowering it. Start with small amounts and adjust to taste, as some ingredients can become overwhelming if overused.
1/2 cup milk (dairy or nondairy)
The first ingredient we’ll be using for our homemade chocolate syrup recipe is 1/2 cup of milk, which can either be dairy or non-dairy in nature. This allows individuals to choose between traditional milk and plant-based alternatives such as almond milk or soy milk.
For those who prefer a more authentic taste, dairy milk provides a rich and creamy texture that enhances the overall flavor profile of the chocolate syrup. However, for those with dietary restrictions or preferences, non-dairy options serve as an excellent substitute, offering a similar consistency without any of the allergens associated with dairy.
One of the benefits of using a combination of both dairy and non-dairy milk is that it caters to diverse consumer needs, making this recipe inclusive for everyone. Whether you’re planning on serving chocolate syrup as a topping for ice cream or pancakes, knowing that your guests can enjoy it without worrying about food allergies or intolerance adds an extra layer of convenience.
The choice of milk also impacts the final consistency and taste of the chocolate syrup. Dairy milk tends to yield a thicker and more velvety texture, which works perfectly as a topping or ingredient in desserts, whereas non-dairy milk options might produce a slightly lighter consistency depending on their water content.
When selecting either dairy or non-dairy milk for your homemade chocolate syrup recipe, it’s essential to choose unsweetened varieties. This ensures that the natural sweetness from the cocoa and any added sweetener isn’t masked by the inherent sugar in the milk. By keeping the ingredients clean and simple, you can enjoy a pure, rich flavor without additives.
Ultimately, choosing between dairy and non-dairy milk for your homemade chocolate syrup recipe comes down to personal preference, dietary needs, or simply wanting to offer something inclusive to your guests. Both options work well with cocoa powder and sugar, yielding a delicious and creamy chocolate syrup perfect for topping desserts or using as an ingredient in recipes.
1 teaspoon vanilla extract
In this homemade chocolate syrup recipe, a key ingredient is 1 teaspoon vanilla extract. This small amount plays a significant role in enhancing the overall flavor and aroma of the chocolate syrup.
Vanilla extract is typically made from high-quality vanilla beans or pods that have been soaked in a solution of water and alcohol. The resulting liquid contains the extracted flavors and aromas of the vanilla, including notes of creamy sweetness, smoothness, and a hint of tropical fruitiness.
When using 1 teaspoon of vanilla extract in this recipe, it is essential to choose a high-quality product that is free from additives and artificial flavorings. Look for a reputable brand or make your own homemade vanilla extract by infusing vanilla beans in a neutral spirit such as vodka or rum.
The addition of vanilla extract serves several purposes:
- It balances the bitterness of the cocoa powder, creating a smoother flavor profile
- It enhances the overall sweetness and creaminess of the chocolate syrup
- It adds a subtle depth and warmth to the flavor
When combining the vanilla extract with other ingredients in this recipe, such as cocoa powder, sugar, and milk or cream, it helps to create a rich, velvety texture and a deep, indulgent chocolate flavor that is reminiscent of high-end hot chocolate mixes.
As you make this homemade chocolate syrup, be sure to stir the mixture well after adding the vanilla extract, as it will help to distribute the flavors evenly throughout the syrup.
Instructions
Combine Cocoa and Sugar
Cocoa and sugar are essential ingredients in making homemade chocolate syrup. To combine them effectively, you need to use a specific ratio that will yield the best flavor and texture for your syrup.
The first step is to sift together 1 cup of granulated sugar and 2-3 tablespoons of unsweetened cocoa powder into a medium-sized bowl.
Make sure to sift both ingredients thoroughly to remove any lumps or clumps that may be present. This will ensure that your syrup mixes evenly and doesn’t contain any unwanted particles.
Next, you need to whisk the sugar and cocoa mixture until it is well combined and smooth. You can use a hand mixer or a wire whisk for this purpose.
Once the mixture is smooth, add in 1/2 cup of heavy cream or milk (depending on your preference) and continue whisking until the ingredients are fully incorporated.
If you want to make your chocolate syrup more intense, you can use less cream or milk. Conversely, if you prefer a milder flavor, you can use more cream or milk.
Now, add in 1/4 teaspoon of salt and whisk until it’s fully dissolved into the mixture. Salt enhances the flavors of both cocoa and sugar and balances out their sweetness.
Finally, transfer the mixture to a saucepan over low heat and stir constantly until the syrup thickens slightly, usually around 5-7 minutes. Be cautious not to let the syrup boil or it may separate.
Once the syrup has thickened to your liking, remove it from the heat and allow it to cool completely before transferring it into an airtight container for storage in the fridge.
Cocoa and sugar are combined in a 1:2 ratio (sugar:cocoa powder) for this recipe, which provides a perfect balance between sweetness and bitterness. Feel free to adjust the proportions to suit your taste preferences.
In a medium saucepan, whisk together cocoa powder and sugar until well combined.
The key to creating a rich and decadent homemade chocolate syrup lies in following clear and concise instructions, especially when it comes to combining the ingredients. In this case, we’ll begin by preparing a mixture that will form the foundation of our syrup.
To start, we need to whisk together two essential components: cocoa powder and sugar. These dry ingredients should be combined in a medium saucepan, which is large enough to accommodate all the ingredients without overflowing. Whisking will not only ensure that these ingredients are evenly mixed but also help to remove any lumps or clumps.
The whisking process typically involves moving the utensil back and forth within the mixture in a smooth, flowing motion. For this particular task, it’s crucial to hold the saucepan over medium heat, allowing the cocoa powder and sugar to slowly melt together. This gradual process will facilitate the dissolution of these ingredients into a smooth and consistent paste.
As you continue whisking, be mindful of the temperature of the mixture, ensuring that it never exceeds 200°F (93°C). A sudden increase in heat can cause the chocolate syrup to scald or become grainy, compromising its flavor and texture.
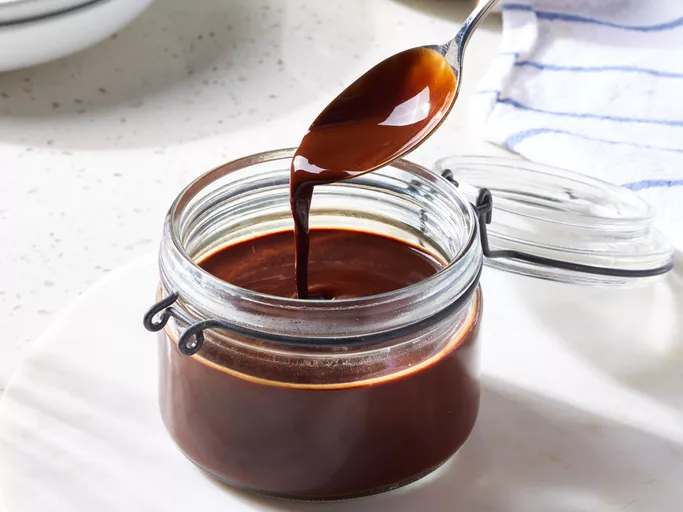
After approximately 5-7 minutes of whisking over medium heat, your cocoa mixture should have reached a uniform consistency. You can test this by lifting some of the mixture with a spoon; it should have a thick, syrupy appearance that coats the back of the spoon.
To complete the process and create our homemade chocolate syrup, remove the saucepan from the heat source and carefully pour the chocolate mixture into a clean glass bottle. This will help to prevent any remaining lumps or sediment from affecting the flavor and texture of your finished syrup.
Add Milk and Heat
To make a delicious homemade chocolate syrup, follow these easy instructions:
- Melt Chocolate in a double boiler or in the microwave in 30-second increments, stirring between each interval until smooth.
- In a separate saucepan, combine Cocoa Powder, Sugar, and a pinch of Salt.
- Add in the melted Chocolate to the dry ingredients and whisk until well combined.
- In a small bowl, whisk together Milk and Heavy Cream until smooth.
- Add the milk mixture to the chocolate mixture and whisk until well combined.
- Heat the mixture over medium heat, stirring constantly, until it comes to a simmer.
- Reduce the heat to low and let it cook for about 5 minutes or until it reaches your desired consistency.
- Remove from heat and let cool slightly before transferring it to a glass bottle with a tight-fitting lid.
- Store in the refrigerator for up to 2 weeks. Give it a good stir before using.
Tips:
- If you don’t have heavy cream, you can substitute it with more milk or half-and-half.
- You can adjust the amount of sugar to your taste.
- This recipe makes about 2 cups of chocolate syrup. You can double or triple the recipe if you want to make a larger batch.
Enjoy your homemade chocolate syrup on ice cream, pancakes, waffles, and more!
Gradually add milk to the saucepan while whisking continuously.
- The art of adding milk to the saucepan is a delicate one, especially when creating a homemade chocolate syrup recipe that requires precise measurement and gentle handling.
- Gradually add milk to the saucepan while whisking continuously is not just a recommendation; it’s an essential step in achieving a smooth, creamy texture for your chocolate syrup.
Why Whisk Continuously?
Whisking continuously serves several purposes:
- To prevent the formation of lumps, which can ruin the consistency of your chocolate syrup
- To ensure even distribution of the milk and other ingredients
- To avoid creating air pockets that can lead to an uneven or grainy texture
When adding milk to the saucepan, start with a small amount and gradually increase it while whisking continuously. This will help you maintain control over the mixture and prevent it from becoming too thick or too thin.
Tips for Whisking Continuously
To effectively whisk continuously, follow these tips:
- Use a heat-resistant whisk that’s specifically designed for cooking and mixing
- Hold the whisk at an angle to ensure it doesn’t get stuck in the saucepan or milk
- Whisk in a gentle, sweeping motion to avoid creating air pockets or splashing the mixture
- Keep your hands moving in a continuous motion to maintain a smooth, even flow of whisking
By following these guidelines and tips for adding milk to the saucepan while whisking continuously, you’ll be well on your way to creating a rich, creamy homemade chocolate syrup that’s perfect for topping ice cream, pancakes, or waffles.
Heat the mixture over medium heat, stirring constantly.
When it comes to cooking and baking, instructions are a crucial part of any recipe. They provide a clear guide on how to prepare and cook a dish, ensuring that the final product turns out as expected. In the context of our Homemade Chocolate Syrup Recipe, instructions play a vital role in helping you create a rich and decadent chocolate syrup.
The first step in making homemade chocolate syrup is to combine the ingredients. This typically involves mixing together cocoa powder, sugar, milk or cream, and sometimes vanilla extract or other flavorings. The key is to mix the ingredients well to ensure they are evenly distributed.
Once you have combined the ingredients, heat the mixture over medium heat. Stirring constantly is crucial at this stage as it helps to prevent the formation of lumps and ensures that the syrup heats evenly.
Why Constant Stirring is Important
Constant stirring while heating the mixture serves several purposes:
- Promotes even heat distribution, preventing hot spots and scorching.
- Helps to prevent lumps from forming in the syrup.
- Ensures that all ingredients are fully incorporated and dissolved.
Tips for Stirring Constantly
To make stirring easier, you can use a spatula or whisk to scrape the sides and bottom of the pan. Here are some additional tips:
- Use a heat-resistant silicone spatula that won’t scratch your pan.
- Stir in one direction only, usually from the side to the center of the pan.
- Avoid stirring too vigorously, as this can create air pockets and cause the syrup to froth.
The Final Product
After heating the mixture and stirring constantly, you should have a rich, smooth chocolate syrup. Let it cool slightly before straining it through a fine-mesh sieve into a clean container. This ensures that any remaining sediment is removed and the syrup is ready to use.
Using Your Homemade Chocolate Syrup
You can now enjoy your homemade chocolate syrup as a topping for ice cream, pancakes, waffles, or even as a dip for fruit or cake. Experiment with different flavor combinations by adding nuts, spices, or other ingredients to create unique variations.
Storage and Shelf Life
To extend the shelf life of your homemade chocolate syrup, store it in an airtight container in the refrigerator. You can also freeze it for up to 3 months. When you’re ready to use it, simply thaw it overnight in the fridge or reheat it gently before serving.
Common Issues and Solutions
Some common issues that may arise when making homemade chocolate syrup include:
- The syrup is too thick: Stirring constantly while heating the mixture can help to thin it out. Alternatively, you can add a small amount of milk or water to achieve the desired consistency.
- The syrup has lumps: Strain the syrup through a fine-mesh sieve before using it to remove any remaining lumps.
- The syrup doesn’t thicken: Check that you’re using high-quality cocoa powder and that the mixture is heated to the correct temperature (usually around 180°F to 190°F).
Conclusion
Making homemade chocolate syrup requires patience, attention to detail, and a willingness to experiment with different flavor combinations. By following these instructions and tips, you can create a rich, decadent chocolate syrup that’s perfect for topping your favorite treats.
Bring to Boil and Simmer
- To make delicious homemade chocolate syrup, follow these steps carefully.
- The first step is to Bring to Boil a cup of water in a saucepan over high heat.
- Once the water has reached a rolling boil, reduce the heat to medium-low and add in 1/2 cup of sugar, 1/4 cup of light brown sugar, and 1/4 cup of unsweetened cocoa powder.
- Stir the mixture well until the sugars have dissolved completely.
- The next step is to Simmer the mixture over medium-low heat for about 5-7 minutes, stirring constantly, until it has thickened slightly and reduced slightly in volume.
- After the simmering process is complete, remove the saucepan from the heat and let it cool slightly.
- Add in 1/2 cup of heavy cream or whole milk to the chocolate mixture and stir well to combine.
- Taste the syrup and add more sugar or cocoa powder as needed to achieve your desired level of sweetness and flavor.
- Strain the chocolate syrup through a fine-mesh sieve into a clean glass bottle or jar to remove any solids and achieve a smooth texture.
- Cover the bottle with plastic wrap or aluminum foil and refrigerate for at least 2 hours before serving.
- The homemade chocolate syrup is now ready to be used in your favorite recipes, such as hot chocolate, milkshakes, and desserts!
Bring the mixture to a boil, then reduce heat to low and simmer for 5 minutes.
To create this rich and indulgent homemade chocolate syrup, you will need to follow a series of steps that require attention to detail and adherence to proper cooking techniques.
The first step in making chocolate syrup is to combine all the ingredients in a medium saucepan. This mixture typically includes 1 cup (200g) of granulated sugar, 1/2 cup (120ml) of water, 8 ounces (225g) of dark or semi-sweet chocolate chips, and 1 teaspoon of vanilla extract.
Once the ingredients have been properly measured and added to the saucepan, the next step is to place it over medium heat. Stir the mixture constantly until the sugar has dissolved completely and the chocolate has started to melt.
The mixture will eventually start to bubble, indicating that it has reached a boil. At this point, you should immediately reduce the heat to low and simmer for exactly 5 minutes. It’s essential to maintain a gentle simmer during these 5 minutes, as high heat can cause the syrup to seize or develop an unpleasant texture.
The final step in creating your homemade chocolate syrup is to remove it from the heat source and let it cool completely before transferring it to an airtight container. This will allow you to store it safely for several weeks and use it as a delicious topping for ice cream, whipped cream, or pancakes.
Remember that homemade chocolate syrup can be quite thin when freshly made, so feel free to thicken it slightly by refrigerating it overnight. This will allow the flavors to meld together even further and result in an incredibly rich, indulgent taste experience.
Storage and Tips
Store in the Fridge
- The storage and tips for storing homemade chocolate syrup in the fridge are crucial to maintaining its quality, texture, and freshness.
- When it comes to storing homemade chocolate syrup, it’s essential to keep it refrigerated at a temperature below 40°F (4°C).
- This can be achieved by placing the container of syrup in the refrigerator, which is usually set at this temperature.
- The container itself should be airtight and hermetically sealed to prevent any external factors from contaminating or affecting the syrup’s quality.
- A good option for storage containers is glass bottles with tight-fitting lids, as they are easy to clean, airtight, and can withstand the temperature fluctuations in the refrigerator.
- Another essential tip when storing homemade chocolate syrup is to label the container with its contents and the date it was prepared.
- This way, you’ll know exactly what you have stored in your fridge and for how long, helping you maintain an organized and efficient kitchen.
- If you won’t be using the syrup immediately, consider storing it in ice cube trays, which will help you portion out small amounts of syrup as needed.
- After freezing, transfer the ice cubes to a freezer-safe container or bag for longer storage.
- When you need chocolate syrup again, simply thaw the desired number of ice cubes at room temperature, and they’ll be ready for use in your favorite recipes.
- An additional tip for maintaining the syrup’s texture is to stir it well before using it after storage, as it may separate or thicken over time.
Allow the chocolate syrup to cool completely before transferring it to an airtight container.
When it comes to storing homemade chocolate syrup, it’s essential to follow proper techniques to maintain its flavor and texture. Allowing the syrup to cool completely before transferring it to an airtight container is just the first step.
Here are some detailed tips on how to store your homemade chocolate syrup:
Cool Completely:
- Allow the chocolate syrup to cool down to room temperature before transferring it to an airtight container. This will help prevent any further separation of ingredients, which can lead to an uneven texture and flavor.
Airtight Container:
- Transfer the cooled chocolate syrup into an airtight container, making sure to leave about 1 inch of space at the top for expansion during freezing. This will prevent any accidental spills or leaks in your freezer.
Refrigerate or Freeze
You can store your homemade chocolate syrup either in the refrigerator or the freezer, depending on how you plan to use it. If you won’t be using it within a week, consider transferring it to an ice cube tray and freezing it for later use. Simply thaw the frozen chocolate cubes when needed.
Label and Date
Make sure to label your container with the date you made the syrup, so you can easily keep track of how long it’s been stored in your fridge or freezer. This will also help you ensure that your syrup is fresh and within its shelf life.
Store in a Cool, Dark Place
Avoid storing your chocolate syrup near direct sunlight, heat sources, or moisture-prone areas, as this can cause it to become stale or develop an unpleasant flavor. Keep it in a cool, dark place like the fridge or freezer for optimal storage.
By following these tips, you’ll be able to enjoy your homemade chocolate syrup at its best, with a rich and smooth texture that’s perfect for topping ice cream, pancakes, or any other dessert of your choice!
Store in the refrigerator for up to 2 weeks.
When it comes to storing homemade chocolate syrup, proper storage and handling are crucial to maintain its flavor and texture. Since you’ve prepared a significant amount of syrup, we’ll discuss how to store it effectively for up to 2 weeks.
To begin with, make sure the syrup has cooled down completely before transferring it to an airtight container. This is essential to prevent bacterial growth, which can spoil the syrup and cause foodborne illness.
For short-term storage (up to 1 week), you can store the chocolate syrup in the refrigerator at a consistent temperature of around 40°F (4°C). Keep the bottle tightly sealed, and place it in the back of the fridge where temperatures are typically more stable.
If you plan to store the syrup for up to 2 weeks, consider using glass jars with tight-fitting lids. Glass is an excellent material for storing acidic or fatty foods like chocolate syrup, as it won’t impart any flavors or odors. Additionally, glass containers can withstand temperature fluctuations better than plastic ones.
Before placing the jar in the fridge, ensure that it’s clean and dry. Any residue or moisture on the container can attract bacteria and cause spoilage.
For longer storage, consider freezing the chocolate syrup. Transfer the cooled syrup to an airtight container or freezer-safe bag, press out as much air as possible, and seal the container. Frozen chocolate syrup will keep for up to 6 months. When you’re ready to use it, simply thaw the frozen syrup in the refrigerator overnight or at room temperature for a few hours.
Regardless of storage method, always check the syrup for any visible signs of spoilage before consuming it. If the syrup has an off smell, slimy texture, or mold, discard it immediately and prepare a fresh batch.
To extend the shelf life of your homemade chocolate syrup, consider adding a few tablespoons of vodka or rum to the mixture (optional). The alcohol will act as a natural preservative, helping to prevent bacterial growth and spoilage. Just be aware that the addition of liquor will change the flavor profile slightly.
Cooler Syrup is Better
- Cooler syrups are a staple for many dessert enthusiasts, and making your own at home can be a fun and rewarding experience.
- When it comes to homemade chocolate syrup, there are a few key considerations to keep in mind.
- Quality of Ingredients: The quality of the ingredients used in your syrup will have a direct impact on the flavor and texture. Using high-quality cocoa powder or melted chocolate will result in a richer, more decadent taste.
- Storage Tips: To ensure that your homemade chocolate syrup lasts as long as possible, it’s essential to store it properly.
Here are some tips:
- Store the syrup in an airtight container, such as a glass jar with a tight-fitting lid.
- Keep the container out of direct sunlight and heat sources, as this can cause the syrup to spoil or become thickened.
- Store the syrup in the refrigerator at a temperature below 40°F (4°C). This will slow down the growth of bacteria and mold.
Shelf Life:
- Homemade chocolate syrup typically has a shelf life of around 2-3 weeks when stored properly. However, it’s essential to check the syrup for any signs of spoilage before consuming it, such as an off smell or slimy texture.
Tips for Making Better Syrup
- Use high-quality cocoa powder or melted chocolate with a high cocoa content, as this will result in a richer, more intense flavor.
- Add a pinch of salt to balance out the sweetness and enhance the flavor.
- Experiment with different types of milk or creamers to create unique flavor profiles. For example, using almond milk can result in a dairy-free and vegan-friendly chocolate syrup.
Overall, making your own homemade chocolate syrup is a fun and rewarding experience that allows you to customize the flavors and textures to your liking. With proper storage and a few simple tips, you can enjoy your delicious homemade syrup for weeks to come!
If you find that your syrup is too thin, try chilling it in the fridge or freezer for a few hours before serving.
When it comes to making homemade chocolate syrup, storage and tips can make a huge difference in preserving its flavor and texture.
Storage Tips
- Store the syrup in an airtight container in the refrigerator at a temperature of around 39°F (4°C) to prevent spoilage and bacterial growth. This will also help slow down the oxidation process that can cause the syrup to become bitter or develop off-flavors.
- If you don’t plan to use the syrup within a few weeks, consider freezing it in an ice cube tray or a glass jar with a tight-fitting lid. Frozen chocolate syrup will keep for up to 3 months and can be thawed when needed.
Temperature Control
The temperature at which you store your homemade chocolate syrup can greatly impact its texture and consistency. Here are some tips for controlling the temperature:
- If you find that your syrup is too thin, try chilling it in the fridge or freezer for a few hours before serving.
- For thicker syrup, you can heat it gently over low heat on the stovetop or in the microwave (in short intervals, checking temperature every 10-15 seconds). However, be careful not to overheat, as this can cause the syrup to separate or become grainy.
Other Tips
Here are some additional tips for making and storing homemade chocolate syrup:
- Use high-quality cocoa powder or dark chocolate for the best flavor.
- Mix the sugar with a small amount of hot water to create a paste before adding it to the cocoa, which will help dissolve the sugar and prevent lumps from forming.
- Don’t overcook the syrup or let it sit at room temperature for too long, as this can cause the formation of mold or the growth of unwanted bacteria.
Conclusion
With proper storage and temperature control, homemade chocolate syrup can be a delicious and convenient addition to your favorite drinks and desserts. Remember to use high-quality ingredients, follow the recipe carefully, and store the syrup in an airtight container at a safe temperature to ensure its flavor and texture remain optimal.
- Best Datanyze Alternatives for 2025 - April 24, 2025
- Best Hunter.io Alternatives for 2025 - April 22, 2025
- Best Lead411 Alternatives for 2025 - April 22, 2025

