Ingredients
Pan-Seared Skin
The art of cooking a perfect roasted duck involves not only mastering the roasting technique but also understanding the importance of preparing the right ingredients, particularly the pan-seared skin.
The key to achieving crispy and golden brown skin lies in the selection and preparation of the right ingredients. For a traditional roasted duck recipe, you’ll need to acquire the following ingredients:
- 1 whole duck (preferably with the skin still intact)
- 2 tablespoons of vegetable oil or duck fat
- 1 teaspoon of salt
- 1/2 teaspoon of black pepper
- 1/4 teaspoon of paprika (optional)
The pan-seared skin requires a specific combination of ingredients to achieve that perfect balance of crunch and flavor. For this, you’ll need:
- 1-2 tablespoons of unsalted butter, softened
- 1 tablespoon of olive oil
- 1 clove of garlic, minced (optional)
- 1 teaspoon of chopped fresh herbs (such as thyme or rosemary) (optional)
The combination of vegetable oil or duck fat and salt helps to create a crispy texture on the skin while adding flavor. The addition of black pepper enhances the overall flavor profile, while paprika adds a subtle smokiness if used.
When it comes to pan-searing the skin, you’ll want to use a combination of butter and olive oil. Softened butter helps to create a golden brown color, while olive oil provides a rich and nutty flavor. Adding minced garlic or chopped fresh herbs can elevate the dish with their aromatic flavors.
To achieve that perfect balance of crunch and flavor in your pan-seared skin, it’s essential to not overcook the duck. The key is to cook the duck until it reaches an internal temperature of 165°F (74°C), while ensuring the skin remains crispy and golden brown.
Crispy skin: 1 teaspoon of salt, 1/4 cup of sugar, 1 tablespoon of fivespice powder, 2 cloves of garlic minced
To achieve a crispy skin on your roasted duck, you will need to pay special attention to the ingredients used and the technique employed during the cooking process.
One of the key ingredients for creating a crispy skin is salt. Salt helps to dry out the surface of the skin, which in turn allows it to crisp up when roasted. Use about 1 teaspoon of salt per duck.
Another crucial ingredient for achieving crispy skin is sugar. Sugar helps to balance out the savory flavor of the duck and adds a touch of sweetness. Mix about 1/4 cup of sugar with your salt.
Fivespice powder, also known as Chinese five-spice powder, is another important ingredient for roasted duck. It adds depth and complexity to the dish. Use about 1 tablespoon of fivespice powder per duck.
In addition to these dry ingredients, you will also need some garlic to add flavor to your duck. Mince 2 cloves of garlic and mix it with your sugar and salt mixture before applying it to the skin.
Step-by-Step Instructions
Drying and Seasoning the Duck
To ensure a perfectly cooked roasted duck with crispy skin, follow these step-by-step instructions on drying and seasoning the bird.
Drying the Duck
After plucking and cleaning the duck, pat it dry inside and out with paper towels to remove excess moisture. This is an essential step to help create a crispy skin during roasting.
Preparation of Seasoning Mixture
- Mix together salt, brown sugar, pepper, garlic powder, onion powder, paprika, and any other desired herbs or spices in a bowl until well combined.
- This seasoning mixture will not only add flavor to the duck but also help to crisp up the skin during roasting.
Seasoning the Duck
- Rub the seasoning mixture all over the duck, making sure to coat it evenly. Pay particular attention to the breast and legs, as these areas tend to be most prone to drying out.
- Be gentle when rubbing the seasonings onto the duck’s skin, as you don’t want to tear the delicate flesh underneath.
Curing Time
Let the duck sit in the refrigerator for at least 24 hours before roasting to allow the seasonings to penetrate deeper into the meat and cure the skin. You can even leave it in the fridge for up to 48 hours if you prefer.
Roasting the Duck
Ahead of your desired cooking time, take out the duck from the refrigerator and let it sit at room temperature for about an hour before roasting. This will help ensure that the meat cooks evenly and the skin crisps up nicely.
Now, it’s ready to be roasted in a preheated oven at 425°F (220°C). For a perfectly cooked duck, roast it for about 20-25 minutes per pound, or until the skin is golden brown and crispy. Baste the duck with melted fat every 15 minutes during roasting to keep the meat moist.
Once the duck has finished roasting, let it rest for 10-15 minutes before carving and serving. This will allow the juices to redistribute throughout the meat, making each bite more tender and flavorful.
To make the perfect Roasted Duck, follow these step-by-step instructions carefully.
Step 1: Preparing the Duck
Clean and rinse a whole duck under cold water, then pat it dry with paper towels inside and out.
Step 2: Seasoning the Duck
In a small bowl, mix together salt, sugar, black pepper, and your choice of herbs and spices (such as thyme, rosemary, or garlic powder).
Step 3: Stuffing the Duck
Rub the spice mixture all over the duck, making sure to get some under the skin as well.
Step 4: Trussing the Duck
Use kitchen twine to tie the legs together at the joints and tuck the wings under the body.
Step 5: Roasting the Duck
Preheat your oven to 400°F (200°C). Place a large roasting pan in the oven to heat up for 10 minutes. Remove the pan and add a layer of duck fat or oil to prevent sticking.
Step 6: Searing the Duck
Place the duck breast-side up in the roasting pan and sear it in the hot oven for 20-25 minutes, or until the skin is golden brown.
Step 7: Baste and Roast
Reduce the heat to 350°F (180°C) and continue roasting the duck for another 30-40 minutes, basting it with the pan juices every 20 minutes or so.
Step 8: Checking for Doneness
Carefully lift the skin of the duck to check if it is brown and crispy. If not, continue roasting in 10-minute increments until desired level of crispiness is reached.
Step 9: Letting it Rest
Remove the duck from the oven and let it rest for at least 15-20 minutes before carving. This will allow the juices to redistribute and make it easier to carve.
Your perfectly roasted duck is now ready to be carved and served!
Clean and pat dry: Remove excess fat from duck by inserting your fingers under the skin; Pat dry with paper towels to help crisp up.
To begin, carefully remove the excess fat from the duck by gently inserting your fingers under the skin. This process will not only help to crisp up the skin but also prevent it from splattering during the roasting process.
Start by placing the duck on a stable and clean surface, such as a cutting board or a plate. Make sure the skin is facing upwards, allowing you to easily access the area under the skin where excess fat accumulates.
Using your fingers, carefully insert them under the skin of the duck, making sure not to tear it in the process. Gently pry up the edges of the skin and separate it from the underlying meat. Continue this process around the entire body of the duck, loosening any stubborn areas with a little patience and care.
Once you have managed to loosen all the excess fat, carefully remove it by pulling the skin away from the meat. Discard the excess fat, taking care not to spill any of the juices that may be attached to it.
With the excess fat removed, pat the duck dry with paper towels to help crisp up the skin during roasting. This step is crucial as it will allow the skin to develop a nice golden-brown color and texture. Hold the paper towel firmly against the surface of the duck, pressing down gently to absorb any remaining moisture.
Continue this process around the entire body of the duck, ensuring that all areas are dry and free from excess moisture. This may require some effort, but it will be well worth it in the end when you present a beautifully roasted duck with crispy skin.
Mix and rub seasonings: Combine salt, sugar, fivespice powder, and minced garlic in a small bowl; Rub mixture evenly onto both sides of the duck for about 10 minutes
In this crucial step of preparing the roasted duck recipe, it’s essential to mix and rub seasonings onto the duck to enhance its flavor and aroma.
To begin with, combine salt, sugar, five-spice powder, and minced garlic in a small bowl.
This mixture should be made by carefully measuring out the correct proportions of each ingredient. Start with 1 tablespoon of salt, 1 teaspoon of sugar, 1/2 teaspoon of five-spice powder, and 2 cloves of minced garlic (about 1 teaspoon). Mix these ingredients together until they’re well combined.
Next, take the duck and place it on a clean surface, breast side up. Open the cavity and rub the mixture evenly onto both sides of the duck for about 10 minutes. Make sure to cover every inch of the skin with a thin layer of the seasoning mixture.
It’s crucial to be thorough while applying the mixture so that each part of the duck absorbs an even amount of flavor. You can also make sure that you get some under the folds and crevices, as these areas are often prone to getting missed.
Be sure not to overdo it with the rubbing motion as this could lead to the mixture becoming unevenly distributed on the surface of the duck. Instead, gently press the spices onto the skin, using a gentle pressing motion to ensure they stick well.
Tips and Variations
Resting and Carving
To achieve a perfectly cooked roasted duck, it’s essential to consider several tips and variations when preparing this recipe.
Firstly, let’s focus on resting the duck before carving. After removing the duck from the oven, allow it to rest for at least 15-20 minutes. This period of resting is crucial as it enables the juices to redistribute throughout the meat, resulting in a more tender and flavorful final product.
During this resting time, it’s also essential to ensure the duck remains warm. You can do this by covering it with aluminum foil or by placing it under a low-temperature broiler (around 200°F). This will prevent the skin from cooling down too quickly, which can cause it to become soggy.
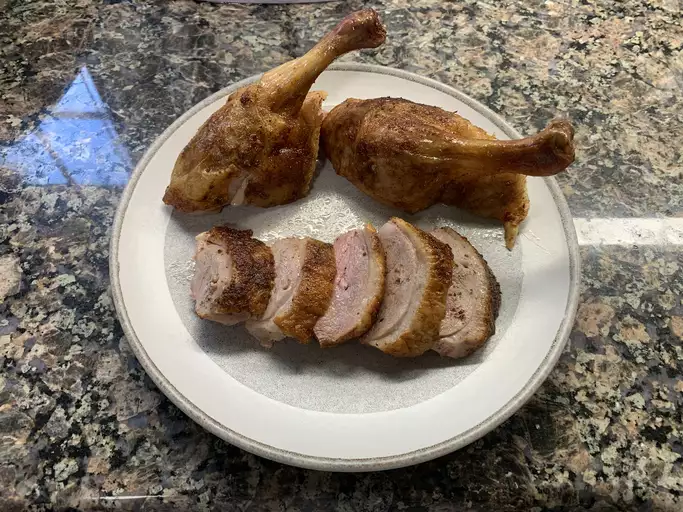
When carving the roasted duck, there are several techniques you can employ. One popular method is to carve the breast in a diagonal direction, starting from one end of the bird and working your way towards the other. This will help create neat, even slices that showcase the beautifully cooked meat.
For the leg and thigh section, you can use a more rustic approach by simply slicing through the joints with a sharp knife. This will release the individual pieces of meat, which can then be arranged on a platter or served as part of a larger dish.
Another variation to consider when carving the duck is to remove the legs and thighs before serving. You can do this by carefully twisting them off at the joints, leaving you with just the breast and wings to carve. This approach can make it easier to create uniform slices and adds an air of elegance to the presentation.
Finally, if you want to add an extra touch of drama to your roasted duck, consider carving it while it’s still warm and slightly pink in the center. This will give you the opportunity to slice into the meat as it releases its juices, creating a visually stunning effect that’s sure to impress your guests.
Overall, mastering the art of resting and carving a roasted duck requires patience, finesse, and practice. By following these tips and variations, you’ll be able to create a truly impressive dish that showcases the beauty and flavor of this magnificent bird.
The art of roasting a duck to perfection requires attention to detail and some creative flair. Here are some valuable tips and variations to enhance your roasted duck experience:
Temperature Control
To achieve tender and juicy meat, it is crucial to maintain a consistent temperature throughout the cooking process. Ensure your oven is preheated to 400°F (200°C) for optimal browning and crispiness on the skin.
Skin Preparation
The crispy skin of a roasted duck can be its most defining feature. To achieve this, pat dry the skin with paper towels, then score it in a crisscross pattern to allow fat to render during cooking.
Cutting and Seasoning
Before roasting, trim excess fat from around the neck area and make sure the cavity is clean. Rub the duck all over with salt, pepper, and your choice of aromatics such as herbs (thyme, rosemary, or sage work well), spices (cinnamon or cloves for added depth), or citrus zest.
Stuffing the Cavity
You can also add flavor to the duck by stuffing its cavity with aromatics like onions, carrots, celery, and sometimes even potatoes. This adds moisture and helps to bring out the natural flavors of the meat.
Serving Suggestions
The possibilities are endless when it comes to serving roasted duck. Try pairing it with a rich fruit sauce (e.g., cherry or orange), roasted vegetables, or even a savory grain such as wild rice or quinoa.
Lastly, remember to let the duck rest for about 10-15 minutes before carving and serving to allow the juices to redistribute throughout the meat. This is key to achieving tender and deliciously flavored roasted duck.
Roasting: Place duck on a roasting pan with some water in the bottom pan for even heat distribution. Roast at 400°F (200°C) for about an hour, then reduce to 375°F (190°C) until crispy skin is achieved.
Roasting a duck can be a bit tricky, but with some tips and variations, you can achieve a perfectly cooked dish that’s both delicious and impressive.
One key tip when roasting a duck is to place it on a roasting pan with some water in the bottom pan. This helps to distribute heat evenly throughout the cooking process, ensuring that your duck cooks consistently from start to finish.
Preheat your oven to 400°F (200°C) and place the duck on the prepared roasting pan. Roast for about an hour, or until the skin starts to crisp up and the meat is cooked through. You may need to baste the duck with its juices a few times during this process to keep it moist.
After an hour, reduce the oven temperature to 375°F (190°C) and continue roasting until the skin reaches your desired level of crispiness. Some people like their skin crispy and golden brown, while others prefer it more lightly cooked.
One variation on this basic recipe is to add some aromatics to the roasting pan with the duck. You could try adding sliced onions, carrots, or celery, as well as some herbs like thyme or rosemary. This will not only add flavor to the dish but also create a delicious broth that you can serve alongside your roasted duck.
Another variation is to glaze the duck with a mixture of honey, soy sauce, and five-spice powder before roasting. This creates a sticky, caramelized crust on the surface of the meat that’s absolutely divine. You could also try using different types of sugar or spices in your glaze for a unique twist.
Finally, don’t be afraid to experiment with different seasonings and marinades before roasting your duck. A mixture of soy sauce, garlic, and ginger can create a delicious Asian-inspired flavor profile, while a blend of herbs like parsley, basil, and oregano can add a Mediterranean flair to the dish.
With these tips and variations, you should be able to achieve a perfectly roasted duck that’s both delicious and impressive. Happy cooking!
Let it rest: After removing from oven, cover with aluminum foil and let rest for 1015 minutes before carving; This will help redistribute juices throughout the meat
To enhance the flavors and textures of your roasted duck, consider experimenting with various tips and variations during and after cooking.
One popular method to achieve a crispy skin is to score it lightly before roasting, which will allow the fat to render more easily and create a crackling surface. You can also try rubbing the skin with a mixture of salt, sugar, and spices for added depth of flavor.
For an authentic Asian-inspired flavor, marinate the duck in a mixture of soy sauce, five-spice powder, and honey before roasting. This will give the meat a rich, savory taste and a sweet glaze on the outside.
Another option is to roast the duck with aromatics like onions, carrots, and celery for added flavor and moisture. Simply chop these vegetables and place them inside the cavity of the duck during roasting.
Don’t be afraid to experiment with different herbs and spices to give your roasted duck a unique twist. For example, you can rub the meat with paprika and garlic powder for a smoky, savory flavor or try using cumin and coriander for a Middle Eastern-inspired taste.
Some chefs also swear by the technique of letting the roast rest before carving. After removing from oven, cover with aluminum foil and let rest for 10-15 minutes before carving; this will help redistribute juices throughout the meat, resulting in tender, juicy slices.
For an impressive presentation, consider roasting multiple ducks at once and arranging them on a platter or board to make a stunning centerpiece. You can also try using different sizes and shapes of ducks for added visual interest.
In terms of serving suggestions, roasted duck pairs beautifully with a variety of sides, such as steamed vegetables, rice pilaf, or roasted potatoes. For a more indulgent treat, consider serving the duck with its own sauce or gravy made from the pan drippings.
Finally, don’t be afraid to push the boundaries and try new combinations of flavors and techniques to create your own unique roasted duck recipe.
- Best Lusha Alternatives for 2025 - April 22, 2025
- Best Overloop Alternatives for 2025 - April 22, 2025
- Best 6sense Alternatives for 2025 - April 22, 2025

