
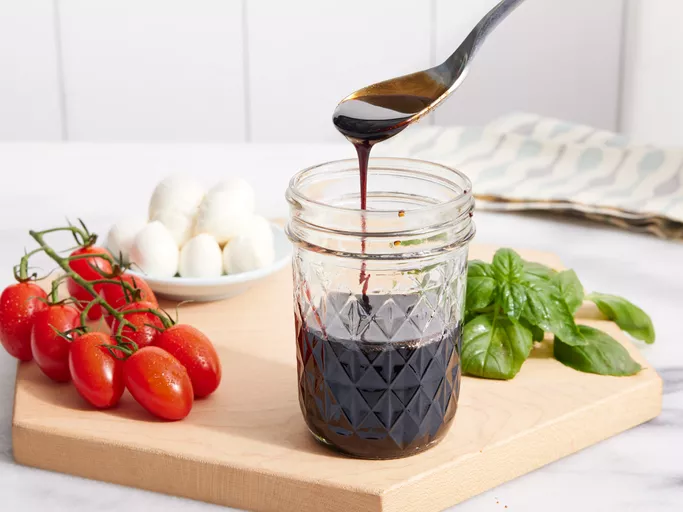
Ingredients and Equipment
Cooking Time: 30-40 minutes
To make a delicious and authentic Balsamic Glaze, you’ll need the following ingredients:
- 2 cups of balsamic vinegar: This is the main ingredient in our glaze recipe. Choose a high-quality, aged balsamic vinegar for the best flavor.
- 1/4 cup of granulated sugar: Sugar helps balance out the acidity of the vinegar and adds a touch of sweetness to the glaze.
- 1/4 teaspoon of salt: Salt enhances the flavor of the other ingredients and helps bring out the sweetness in the glaze.
- 2 tablespoons of olive oil: This is optional, but adding a small amount of olive oil can help smooth out the texture of the glaze.
In terms of equipment, you’ll need:
- A medium saucepan with a heavy bottom (stainless steel or ceramic)
- A wooden spoon or silicone spatula for stirring and scraping the sides of the pan
- A fine-mesh strainer or cheesecloth for straining the glaze
- Measuring cups and spoons for accurate measurements
Cooking time is approximately 30-40 minutes, depending on the thickness you prefer your glaze. Here’s a rough outline of the cooking process:
- Combine the balsamic vinegar, sugar, and salt in a medium saucepan and place it over medium-low heat.
- Whisk constantly until the sugar dissolves and the mixture starts to simmer (about 5-7 minutes).
- Reduce heat to low and continue cooking for another 20-30 minutes, or until the glaze reaches your desired consistency. You can test it by drizzling a small amount of the glaze onto a plate – if it holds its shape and doesn’t run, it’s ready.
- Remove from heat and let cool slightly before straining through a fine-mesh strainer or cheesecloth to remove any sediment.
That’s it! Your delicious homemade Balsamic Glaze is now ready to use as a topping for your favorite dishes, from caprese salads to grilled meats and vegetables. Enjoy!
You’ll need
The first step in making balsamic glaze is to gather all the necessary ingredients and equipment. To start, you will need:
For the glaze itself:
- 1 cup of balsamic vinegar
- 1/4 cup of granulated sugar
- 1 tablespoon of honey
- 1 teaspoon of dried thyme
- Salt and pepper to taste
- For the flavor enhancers (optional):
- 2 cloves of garlic, minced
- 1/4 cup of chopped fresh rosemary
- 1/4 cup of chopped fresh oregano
Equipment needed:
- A medium saucepan with a heavy bottom (stainless steel or enameled cast iron)
- A silicone spatula for scraping the sides and bottom of the pan
- A fine-mesh strainer or cheesecloth for lining the pan and catching sediment
- A whisk or spoon for mixing the glaze
- Glass jars with lids and rubber bands for storing the finished glaze
A note on equipment: When making balsamic glaze, it’s essential to use a saucepan that can handle high heat without burning the sugar. Stainless steel or enameled cast iron pans are ideal because they retain heat well and don’t react with acidic ingredients.
The key to making a high-quality balsamic glaze is selecting the right ingredients and having the proper equipment.
For this recipe, you will need 1 cup of good-quality balsamic vinegar.
Balsamic vinegar is made from white Trebbiano grapes that are boiled down until they are concentrated into a rich, dark liquid with a thick consistency and a strong, fruity flavor.
You will also need 2 tablespoons of granulated sugar.
The sugar helps to balance out the acidity in the balsamic vinegar and adds a touch of sweetness to the glaze.
Another important ingredient is 2 cloves of garlic, minced.
Garlic has antibacterial properties that help to preserve the glaze and add depth to its flavor.
You will also need 1/4 cup of olive oil.
Olive oil adds a richness and creaminess to the glaze that is essential for its texture and consistency.
For equipment, you will need a small saucepan with a heavy bottom.
A heavy-bottomed saucepan helps to distribute heat evenly and prevents scorching or burning of the glaze.
You will also need a wooden spoon or silicone spatula for stirring the glaze.
A thermometer is optional but helpful in achieving the perfect consistency and flavor of the glaze.
When cooking the glaze, it’s essential to use a medium-low heat setting to prevent scorching or burning.
You can also use a candy thermometer to check the temperature of the glaze and achieve the perfect consistency.
The ideal temperature for a balsamic glaze is between 220-230°F (104-110°C), at which point it will thicken slightly and have a syrupy texture.
1 cup of balsamic vinegar (minimum 6yearaged)
The ingredients for a high-quality Balsamic Glaze Recipe are essential to achieving the perfect balance of flavors and textures.
To make this glaze, you’ll need the following ingredients:
1 cup of balsamic vinegar – It’s crucial to use a minimum of 6-year-aged balsamic vinegar for an authentic flavor. Look for a product that is aged in oak barrels and has been reduced through a process called “aceto balsamico” or “balsamic glaze,” which concentrates the flavors and thickens the liquid.
Optional: honey or sugar – Depending on your desired level of sweetness, you can add 1-2 tablespoons of honey or granulated sugar to balance out the acidity of the vinegar.
For equipment, you’ll need:
- A medium saucepan – Choose a pan that’s heavy-bottomed and has a capacity of at least 2 quarts. This will allow you to cook the balsamic vinegar without it boiling over or scorching.
- A wooden spoon or silicone spatula – These are gentle on the glaze and won’t scratch the pan, making them ideal for stirring and scraping the sides of the pan as the glaze thickens.
- A fine-mesh strainer or cheesecloth – This will come in handy when straining the glaze to remove any sediment or bits that have settled at the bottom of the pan.
- A clean glass bottle with a tight-fitting lid – For storing your finished balsamic glaze, choose a dark-colored glass bottle to protect it from light and keep it fresh for longer.
1/4 cup of sugar
To make a delicious balsamic glaze, you will need the following ingredients:
- 1 cup of balsamic vinegar
- 1/4 cup of sugar (you can use granulated or brown sugar)
- A pinch of salt (optional, but recommended to bring out the flavors)
As for equipment, you will need:
- A medium saucepan with a heavy bottom (this type of pan is ideal for making sauces and glazes)
- A wooden spoon or silicone spatula for stirring
- A candy thermometer (optional, but recommended to ensure the perfect consistency)
- A clean glass jar with a lid for storing the balsamic glaze
It’s worth noting that you should use a high-quality balsamic vinegar for this recipe. Look for a brand that is labeled as “aged” or “traditional,” as these will have a more complex and rich flavor.
In addition, if you’re planning to serve the balsamic glaze at room temperature, you can skip the step of cooling it before storing it in the refrigerator. However, if you plan to use it chilled, be sure to refrigerate it first and then let it come to room temperature when you’re ready to serve.
Remember, making a good balsamic glaze takes time and patience. But with this recipe and a bit of practice, you’ll be able to create a delicious and versatile sauce that will elevate any dish!
A heavybottomed saucepan with a candy thermometer
To make a delicious balsamic glaze, you’ll need the following ingredients and equipment:
Ingredients:
- 1 cup (250 ml) good-quality balsamic vinegar
- 2 tablespoons sugar or honey (optional)
- Water (optional)
Equipment:
- A heavy-bottomed saucepan with a candy thermometer: This is the most essential piece of equipment for making balsamic glaze. A heavy-bottomed pan will help to distribute heat evenly, preventing hotspots that can burn the glaze. The candy thermometer is crucial for monitoring the temperature and ensuring it reaches the desired level.
Other helpful tools include:
- A silicone spatula or wooden spoon: This is useful for scraping the sides of the pan and folding in sugar (if using).
- A glass measuring cup: For accurate measurements of balsamic vinegar, water, and sugar.
It’s worth noting that while a candy thermometer is not strictly necessary, it makes the process much safer and more predictable. Without one, you may end up with a batch of burnt or crystallized glaze, which can be difficult to salvage.
To make a delicious balsamic glaze, you will need a few key ingredients that are readily available at most supermarkets.
The primary ingredient for this recipe is high-quality balsamic vinegar. You can choose from different types of balsamic vinegar, such as traditional or aged, depending on your personal preference and the level of flavor intensity desired.
Additionally, you will need a sweetener to balance out the acidity of the balsamic vinegar. Granulated sugar or honey are both suitable options for this purpose.
Other ingredients that can be added to enhance the flavor of the glaze include garlic, herbs, and spices. For example, you could add some minced garlic for an extra depth of flavor or a sprinkle of thyme for a hint of herbal undertones.
In terms of equipment, all you will need is a saucepan, a whisk or spatula, and a strainer or fine-mesh sieve.
The saucepan should be made of heat-resistant material such as stainless steel, non-stick, or ceramic. This is to prevent the glaze from sticking or burning during the cooking process.
A whisk or spatula will come in handy for mixing and stirring the ingredients together. Make sure it’s sturdy enough to handle the acidity of the balsamic vinegar.
For straining the glaze, you can use a fine-mesh sieve or cheesecloth to remove any impurities or sediment that may have formed during cooking.
Finally, a thermometer will come in handy if you want to check the consistency and thickness of the glaze as it cools. This is especially useful if you’re aiming for a specific texture or viscosity.
The Cooking Process
Step-by-Step Instructions
To create a rich and flavorful balsamic glaze, you’ll need to follow these step-by-step instructions.
Step 1: Gather Ingredients and Equipment
Here’s what you’ll need:
- 1 cup of high-quality balsamic vinegar
- 1 tablespoon of granulated sugar
- A medium saucepan with a heavy bottom (stainless steel or copper)
- A candy thermometer (optional, but recommended)
Make sure your equipment is clean and dry before starting the cooking process.
Step 2: Combine Balsamic Vinegar and Sugar
In a medium saucepan, combine 1 cup of balsamic vinegar and 1 tablespoon of granulated sugar.
- If using a candy thermometer, attach it to the side of the saucepan and make sure it’s secure.
Step 3: Heat the Mixture Over Low Heat
Place the saucepan over low heat and stir occasionally until the sugar dissolves completely.
- You’ll notice that the mixture will start to simmer and release a fragrant aroma.
- This step should take around 5-7 minutes, depending on the heat and the type of saucepan you’re using.
Step 4: Bring to a Boil and Reduce Heat
Once the mixture has dissolved and started simmering, bring it to a gentle boil.
- As soon as it starts boiling, reduce the heat to its lowest setting (this will help prevent scorching).
Step 5: Simmer and Reduce
Continue simmering the mixture over low heat for about 10-15 minutes.
- As you simmer, the mixture will start to thicken and reduce in volume.
- You’ll know it’s done when it reaches your desired consistency – a thick, syrupy glaze that coats the back of a spoon.
Step 6: Strain and Cool
Once the glaze has reached its desired consistency, remove it from the heat and let it cool slightly.
- Strain the glaze through a fine-mesh sieve to remove any sediment or particles that may have formed during cooking.
Step 7: Store Your Balsamic Glaze
Your balsamic glaze is now ready to use in various recipes. You can store it in an airtight container at room temperature for up to 6 months or in the refrigerator for longer storage.
- Before using, give the glaze a good stir and check its consistency – if it’s too thick, you can thin it out with a small amount of water.
Using Your Balsamic Glaze
Balsamic glaze is incredibly versatile and can be used in various dishes, such as:
- Dressing salads – toss mixed greens with cherry tomatoes, mozzarella cheese, and a drizzle of balsamic glaze for a quick and delicious salad.
- Glazing meats or vegetables – brush balsamic glaze over grilled chicken, beef, pork, or roasted vegetables during the last 10-15 minutes of cooking for added flavor and moisture.
- Topping pizzas – drizzle balsamic glaze over pizza dough before adding toppings for a flavorful twist on traditional pizza.
Remember to always use your homemade balsamic glaze within a few weeks of making it, as it will continue to thicken and develop flavor over time. Enjoy experimenting with this versatile ingredient in various recipes!
The cooking process for creating a Balsamic Glaze recipe involves several stages that transform the balsamic vinegar into a rich, thick, and sweet condiment perfect for drizzling over various dishes.
Stage 1: Reducing the Balsamic Vinegar
To begin, it’s essential to select a high-quality balsamic vinegar with a robust flavor profile. The traditional Italian method of producing balsamic glaze involves reducing the vinegar through a slow-cooking process that concentrates its flavors and thickens its texture.
Methods for Reducing Balsamic Vinegar
- Cooking in a Saucepan: Pour the balsamic vinegar into a saucepan, set over low heat, and simmer it slowly until it has reduced by half. Stir occasionally to prevent scorching.
- Using an Immersion Blender: If you have an immersion blender or food processor, blend the balsamic vinegar in short intervals while heating it in a saucepan to help break down its thick consistency.
Stage 2: Thickening and Concentrating the Glaze
Continue cooking the reduced balsamic glaze for an additional 15-20 minutes, or until it has thickened further and darkened slightly. Stir occasionally to prevent scorching.
Tips for Achieving the Perfect Consistency
- Monitor the Glaze’s Temperature: Keep an eye on the temperature of the glaze, aiming for a range between 190°F (88°C) and 200°F (93°C). If it exceeds 210°F (99°C), remove from heat immediately to prevent overcooking.
- Avoid Over-Reducing: Stop cooking the balsamic glaze when it has reached your desired consistency. Over-reducing will result in a glaze that is too thick and sticky.
Stage 3: Cooling and Storing the Balsamic Glaze
Once the balsamic glaze has cooled to room temperature, transfer it to an airtight container. Store the glaze in the refrigerator for up to two months or at room temperature for up to one week.
Tips for Extending Shelf Life
- Keep It Sealed: Always keep the balsamic glaze sealed when not in use to prevent contamination and spoilage.
- Use Clean Utensils: When handling or serving the balsamic glaze, ensure that your utensils are clean and sanitized to maintain its quality and safety.
Conclusion
The art of creating a Balsamic Glaze recipe involves patience, attention to detail, and careful temperature control. By following these stages and tips, you can produce a rich, flavorful condiment perfect for elevating various dishes with its unique blend of sweet and tangy flavors.
Mix the balsamic vinegar and sugar in a bowl until dissolved.
The first step in making a delicious balsamic glaze is to mix the balsamic vinegar and sugar together in a bowl. This is a crucial stage as it determines the flavor profile and thickness of the final product.
To start, pour 1/2 cup of high-quality balsamic vinegar into the bowl. You can use either store-bought or homemade balsamic vinegar for this recipe. If you’re using homemade balsamic vinegar, make sure it has been reduced to a thick and syrupy consistency.
Next, add 2 tablespoons of granulated sugar to the bowl with the balsamic vinegar. You can adjust the amount of sugar to your taste, but keep in mind that too much sugar can make the glaze overly sweet.
Mix the balsamic vinegar and sugar together until they are fully dissolved. This is an important step as it ensures that the flavors are evenly distributed throughout the mixture. Start by whisking the mixture gently with a fork or spoon, then gradually increase the speed of your mixing to break down any remaining lumps.
Continue to mix the balsamic vinegar and sugar until they are fully dissolved and the mixture has reached a smooth consistency. This should take about 2-3 minutes, depending on the type of balsamic vinegar you’re using and the temperature of your kitchen.
Once the mixture is smooth and free of lumps, transfer it to a saucepan over medium heat. Bring the mixture to a simmer and let it cook for about 10-15 minutes, or until it has thickened to your desired consistency. You can test the consistency by drizzling a small amount of the glaze onto a plate and letting it cool to room temperature.
As the glaze cooks, you’ll start to notice that it’s developing a rich, syrupy texture and a deep, dark color. This is due to the reduction of the balsamic vinegar and the caramelization of the sugars. Stir the glaze occasionally as it cooks to prevent scorching or sticking.
Once the glaze has reached your desired consistency, remove it from the heat and let it cool to room temperature. You can store the glaze in an airtight container in the refrigerator for up to 2 weeks, or freeze it for up to 6 months. Reheat the glaze gently over low heat before using it as a finishing sauce for your favorite dishes.
And that’s it! With these simple steps, you can create your own delicious balsamic glaze at home. This glaze is perfect for drizzling over pizzas, salads, and pasta dishes, or as a topping for meats and cheeses. Enjoy experimenting with different flavors and combinations to find your favorite way to use this versatile sauce.
Heat the mixture over medium heat, stirring occasionally, until it reaches 220°F (104°C).
The cooking process for creating a balsamic glaze involves several key steps that contribute to its rich and syrupy texture. First, it’s essential to heat the mixture over medium heat, stirring occasionally, until it reaches 220°F (104°C). This temperature is crucial in achieving the perfect consistency of the glaze.
To ensure a smooth and even cooking process, it’s recommended to use a thermometer to monitor the temperature closely. Heating the mixture too quickly or allowing it to overheat can lead to scorching or the formation of unwanted sediment at the bottom of the pan.
During the heating process, it’s essential to stir the mixture occasionally to prevent hotspots from developing and ensure even cooking. This will help to distribute heat evenly throughout the mixture, promoting a consistent texture and flavor.
Some tips for achieving the perfect consistency include:
- Using high-quality balsamic vinegar that has not been watered down or adulterated
- Adding a small amount of sugar or honey to balance out the acidity and enhance the flavor
- Stirring the mixture frequently to prevent hotspots from developing
Once the mixture reaches 220°F (104°C), remove it from heat immediately. Be careful, as the mixture will continue to thicken as it cools.
Letting the glaze cool and set is an essential step in achieving its signature texture. This process can take anywhere from a few hours to overnight, depending on the desired consistency and flavor profile.
To enhance the flavor of your balsamic glaze, consider adding other ingredients such as herbs, spices, or citrus zest. Some popular options include:
- Fresh thyme or rosemary for a herbaceous twist
- Grated ginger or garlic for added depth and complexity
- Lemon or orange zest for a bright, citrusy flavor
When storing your balsamic glaze, consider transferring it to an airtight container and placing it in the refrigerator. This will help to prolong its shelf life and maintain its texture.
Remove from heat and let cool slightly before transferring to an airtight container.
The cooking process for making balsamic glaze involves reducing high-quality balsamic vinegar to create a thick, rich, and intense condiment perfect for dressing salads, drizzling over cheese or meats, and using as a topping for various dishes. The steps involved in the cooking process are crucial to achieving the desired consistency and flavor of the glaze.
After simmering the balsamic vinegar on low heat for about 20-25 minutes, or until it has reduced by half and thickened slightly, remove it from the heat source. This marks a critical point in the cooking process, as continued heating can cause the glaze to become too thick and syrupy.
Now, let the balsamic glaze cool slightly before transferring it to an airtight container for storage. This cooling period allows the glaze to thicken further and set at room temperature.
Why Cooling is Important
- Cooling the balsamic glaze prevents it from becoming too thick or syrupy, making it easier to use in various recipes.
- It allows the flavors to meld together and intensify, resulting in a deeper and more complex taste experience.
- By cooling the glaze slightly, you can achieve a better balance between its thickness and pourability, making it ideal for drizzling or spooning over various dishes.
Tips for Storage and Usage
To ensure the balsamic glaze remains fresh for an extended period, store it in an airtight container at room temperature. You can also refrigerate or freeze it for longer storage options.
- When using the balsamic glaze, give it a good stir before application to redistribute any thickened areas.
- For best results, use the balsamic glaze within a few days of making it. The flavor and consistency may degrade over time if stored for extended periods.
In summary, removing the balsamic glaze from heat and letting it cool slightly before transferring it to an airtight container is crucial to achieving the desired texture and flavor profile. By following these steps and tips, you can enjoy your homemade balsamic glaze for various culinary applications.
The cooking process for balsamic glaze is a multi-step procedure that requires patience and attention to detail, but yields a richly flavored and deeply colored condiment perfect for elevating various dishes.
The first step in making balsamic glaze is to select a high-quality balsamic vinegar with a minimum of 6 years aging. This type of vinegar has been reduced through a process known as “barrels in series,” which involves transferring the vinegar from one barrel to another, where it is exposed to wood and oxygen, causing it to thicken and develop its characteristic flavor.
Begin by combining 1 cup of balsamic vinegar with 2 tablespoons of sugar or honey in a saucepan. The addition of sweetener serves to balance out the acidity of the vinegar and enhance its depth of flavor.
Place the saucepan over medium-low heat and whisk the mixture until the sugar has dissolved completely, creating a smooth and even consistency.
Continue to cook the mixture for approximately 10-15 minutes, or until it reaches your desired consistency. You can test the glaze by drizzling a small amount onto a chilled plate: if it holds its shape and doesn’t flow too quickly, it’s ready.
As the glaze cooks, you may notice that it thickens and develops a rich, syrupy texture. Stir occasionally to prevent scorching or burning at the bottom of the pan.
The cooking process is critical in developing the characteristic flavor profile of balsamic glaze. The reduction of the vinegar causes its natural sugars to caramelize, producing a deep brown color and intense, fruity flavors.
Remove the saucepan from the heat once the glaze has reached your desired consistency, allowing it to cool slightly before transferring it to an airtight container for storage.
Balsamic glaze is a versatile condiment that can be used to add depth and richness to various dishes, from pasta and salads to roasted meats and cheeses. It’s also a great addition to sauces, marinades, and braising liquids.
Tips for Perfecting Your Balsamic Glaze
Authenticity
To perfect your balsamic glaze, it’s essential to understand its rich history and cultural significance. Originating from Italy, this reduction of traditional balsamic vinegar has become a staple in many fine dining restaurants and home kitchens.
When attempting to recreate the authentic taste of Italian balsamic glaze at home, there are several tips to keep in mind:
Choosing the Right Ingredients
- Select high-quality aged balsamic vinegar as the base for your glaze. Traditional balsamic vinegar is made from white Trebbiano grapes and aged for a minimum of 12 years, giving it its distinct flavor.
- Some commercial balsamic vinegars may be labeled “balsamic glaze” but lack authenticity. Ensure you are using the real deal to achieve an accurate taste experience.
Preparing the Glaze
- Reduction is key to creating a rich, thick balsamic glaze. Typically, it takes about 1 cup of balsamic vinegar to reduce down to 1/4 cup of syrupy glaze.
- Allow the reduction process to occur naturally over low heat, stirring occasionally, to preserve the delicate flavors and colors within the glaze.
Tips for Achieving Authenticity
- Acidity level: Traditional balsamic vinegar has a sharp acidity, so it’s crucial not to over-reduce or cook down your glaze too much, as this may eliminate the acidity.
- Aging process: To achieve an aged flavor profile, you can age your homemade balsamic glaze for at least 30 days in a cool, dark place. This will allow the flavors to mature and develop depth.
Serving Suggestions
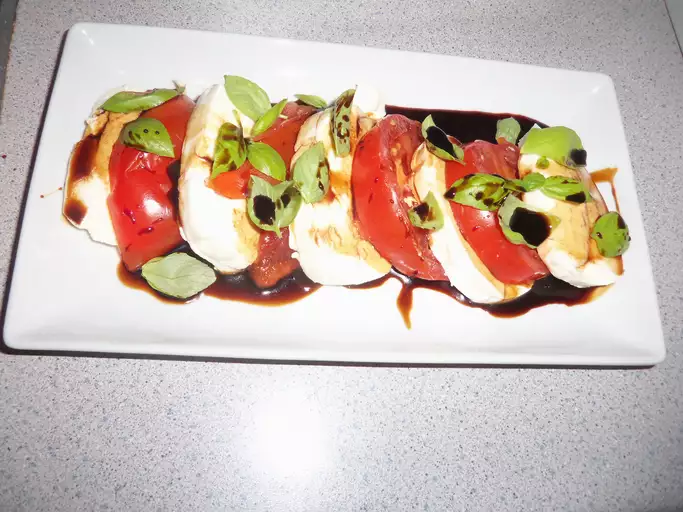
- Drizzle balsamic glaze over mozzarella cheese and fresh tomatoes to create a Caprese salad or use as a topping for bread.
- Pair the glaze with roasted meats, such as pork or beef, and serve with a side of roasted vegetables.
In summary, perfecting your balsamic glaze requires patience and attention to detail. By understanding the cultural significance behind this condiment and following these tips for authenticity, you’ll be able to recreate an impressive, authentic Italian balsamic glaze in the comfort of your own home kitchen.
According to the University of California, Davis, “balsamic glaze should have a thick, syrupy consistency and a rich, tangy flavor.”
To perfect your balsamic glaze, it’s essential to understand that achieving the right consistency and flavor is crucial. According to the University of California, Davis, a good balsamic glaze should have a thick, syrupy consistency and a rich, tangy flavor.
One way to ensure your glaze reaches the desired consistency is by simmering it for an extended period. However, be cautious not to overcook it, as this can cause the glaze to thicken too much or even burn. The ideal time to simmer balsamic glaze is between 10 to 20 minutes, depending on the initial consistency of your reduction.
When reducing balsamic vinegar, start by combining it with a small amount of water in a saucepan over low heat. As the liquid evaporates, increase the heat slightly and continue cooking until you achieve the desired thickness. Stir occasionally to prevent scorching, especially when using high-heat methods.
The quality of your balsamic vinegar is also crucial for achieving an ideal glaze flavor. Traditional balsamic vinegar from Italy is aged in wood barrels for several years, giving it a rich, complex taste and aroma. To replicate this, you can try to use a high-quality store-bought balsamic vinegar as a base and add other ingredients to enhance the flavor.
Some tips for achieving a tangy flavor include adding a small amount of acidity, such as lemon juice or wine vinegar. You can also experiment with spices like black pepper or red pepper flakes to add depth and heat to your glaze. However, remember that less is more when it comes to adding ingredients – a balsamic glaze should be bold but balanced.
For an extra-rich flavor, you can try cooking down the glaze with some fat or oil over low heat. This process is called “emulsification” and helps to create a smooth, creamy texture that coats your tongue when consumed.
Ultimately, perfecting your balsamic glaze takes practice and patience. Experiment with different combinations of ingredients and techniques until you find the one that works best for you. With time and experience, you’ll develop a sense of what makes a great balsamic glaze, from its consistency to its flavor.
When storing your finished balsamic glaze, keep it in an airtight container at room temperature or refrigerate if you’re not planning to use it within a week. As the glaze ages, its flavors will mature and intensify – this is perfectly normal and can actually contribute to its overall character.

- Best Datanyze Alternatives for 2025 - April 24, 2025
- Best Hunter.io Alternatives for 2025 - April 22, 2025
- Best Lead411 Alternatives for 2025 - April 22, 2025
