
Ingredients
Must-Have Components
The key to making a traditional British scone that’s light, fluffy, and deliciously tender lies in selecting the right ingredients.
Here are the must-have components for your basic British scone recipe:
- All-purpose flour
- Baking powder
- Granulated sugar
- Kosher salt
- Milk
- Egg, beaten (optional)
Some additional ingredients can enhance the flavor and texture of your scones, but the above components are the minimum required for a basic recipe.
Using high-quality, fresh ingredients will always result in better-tasting scones. For example:
- Choose a good-quality all-purpose flour that’s high in protein (such as bread flour or all-purpose flour with a high protein content).
- Select baking powder that is fresh and has not been stored for too long, as this can affect the rise of your scones.
- Use unsalted butter, as it’s easier to control the amount of salt in your recipe. You can also use other types of fat like lard or coconut oil if you prefer.
Keep in mind that the ratio of ingredients is crucial in making a successful scone. The general rule of thumb for British scones is to have:
- About 1 cup (200g) of flour per scone.
- 1/2 teaspoon (2g) of baking powder per 1 cup (200g) of flour.
- A pinch of salt, usually around 1/8 to 1/4 teaspoon (0.5-1g).
The type and quality of ingredients you use will affect the final product, so experiment with different options to find what works best for you.
2 cups allpurpose flour
All-purpose flour is a fundamental ingredient in baking, including traditional British scones. It serves as the base or primary constituent of many baked goods due to its neutral flavor and versatility.
In the context of this recipe for basic British scones, all-purpose flour plays a critical role in determining the texture and structure of the final product. It contributes to creating a tender yet firm crumb, essential for a classic British scone that balances delicacy with resilience.
The inclusion of 2 cups of all-purpose flour is not merely a measurement but a deliberate choice to ensure the desired consistency of the dough. This quantity is typically sufficient for yielding about 8-10 medium-sized scones after being cut and baked according to the recipe’s guidelines.
All-purpose flour, often referred to as plain flour in British baking, contains both wheat proteins and starches that react with moisture and heat during baking. It also influences how other ingredients, such as fat (butter) and liquid (milk), distribute within the dough, impacting its elasticity and overall rise.
Choosing the right all-purpose flour is crucial for this scone recipe because it directly affects the final texture and appearance of the product. Some types of flour, especially those with a high protein content, might alter the character of these British scones, making them more dense or less tender than desired.
Given the importance of all-purpose flour in baking these classic British scones, it is advisable to use a premium brand that has been stored properly to prevent degradation of quality. Freshness and consistency are key when working with flours to ensure predictable outcomes.
The neutral pH of all-purpose flour helps balance other ingredients without overpowering them or altering their flavors significantly. This makes it an ideal choice for baking scones, especially in recipes where the primary focus is on showcasing the quality of other ingredients rather than masking them with strong flavors or textures.
1/4 cup granulated sugar
Granulated sugar is a key ingredient in many baked goods, including the classic British scone. When using granulated sugar in baking, it’s essential to understand its purpose and how to use it effectively.
In the context of this basic British scone recipe, the 1/4 cup of granulated sugar serves several purposes. Firstly, it adds sweetness to the scones, balancing out the savory flavors from the other ingredients like butter, cream, and eggs.
Sugar also helps to balance the pH levels in the dough, preventing the growth of unwanted bacteria and mold. This is particularly important when working with yeast or dairy products, as sugar can help to regulate the environment and promote a healthy fermentation process.
Furthermore, granulated sugar contributes to the texture and structure of the scones. By breaking down during baking, it helps to create a tender crumb and a delicate crust. This is especially important for British-style scones, which are known for their light and flaky texture.
In terms of measurement, using 1/4 cup of granulated sugar is equivalent to about 50 grams or approximately two tablespoons plus one teaspoon of the fine white crystals. It’s essential to level off the sugar when measuring it out to ensure accuracy in the recipe.
1/2 teaspoon salt
The amount of salt required for this recipe is a crucial element in balancing the flavors of the scones. Here’s what you need to know about the salt ingredient:
For basic British scones, you will need only 1/2 teaspoon of plain white table salt. This amount may seem insignificant, but it plays a vital role in enhancing the overall taste and texture of the final product.
When measuring the salt, make sure to use a digital kitchen scale or a standard teaspoon measure to get an accurate amount. It’s essential to note that using too much or too little salt can affect the flavor profile of your scones, so be precise with this ingredient.
Salt serves several purposes in baking, including:
- Enhancing flavors and aromas
- Aiding in texture development and crumb structure
- Regulating yeast growth (in yeast-based recipes)
For this recipe, the salt helps to:
- Balance the sweetness of the sugar and other ingredients
- Complement the richness of the butter or other fats used
- Add depth and complexity to the scone’s flavor profile
In summary, the half-teaspoon amount of salt is a small but vital component in creating delicious British-style scones. Be mindful of this ingredient and ensure you measure it accurately to achieve optimal results.
1/2 teaspoon baking powder
Baking powder is a crucial ingredient in traditional British scones, as it provides the leavening action that helps the scones to rise and gives them their characteristic light and flaky texture.
The 1/2 teaspoon measurement of baking powder is relatively small compared to other ingredients used in recipes, but it plays a significant role in achieving the desired result. It’s essential to use the right amount, as too little can lead to dense scones, while too much can result in an unpleasantly soapy flavor.
The type of baking powder used is also important. Some recipes call for single-acting baking powder, which releases gas quickly and can leave a metallic taste if not balanced with other ingredients. Double-acting baking powder, on the other hand, releases gas both when it comes into contact with liquid ingredients and when it’s exposed to heat.
When using baking powder in scones, it’s essential to note that it will lose its potency over time, even if stored properly. To ensure the best results, make sure to use a fresh package of baking powder or measure out the correct amount from an old packet.
In traditional British recipes, baking powder is often combined with other dry ingredients like flour and sugar before being mixed with wet ingredients like cream and eggs. The acidity in these wet ingredients helps to activate the baking powder, which then reacts to produce carbon dioxide gas and cause the dough to rise.
1/2 cup cold unsalted butter, cut into small pieces
The first ingredient for this recipe for basic British scones is cold unsalted butter. This type of butter is essential because it contributes to the light and flaky texture of the scones.
For this ingredient, we need 1/2 cup or approximately 110g of cold unsalted butter. It’s crucial that the butter is cold as it will help create a flaky texture in the scones when they’re baked.
To make sure we don’t end up with clumps of butter in our dough, we’ll be cutting this amount of butter into small pieces before adding it to the dry ingredients. This process ensures that the butter is evenly distributed throughout the dough and doesn’t create any lumps during mixing or when the scones are baked.
Some other key points about cold unsalted butter in baking include:
- Using high-quality, fresh butter for the best flavor
- Cold temperature is essential to achieve flaky texture, not softened or melted butter
- The ratio of butter to flour may vary in different recipes but typically ranges from 1/2 cup to 3/4 cup of cold unsalted butter per 2 cups of all-purpose flour
Instructions and Tips
Mixing the Dry Ingredients
Mixing the dry ingredients is an essential step in creating a light and fluffy scone. To do this, you will need to combine three types of dry ingredients: all-purpose flour, baking powder, and salt.
Start by sieving the flour into a large mixing bowl using a fine-mesh sieve or a sifter. This helps to remove any lumps from the flour and ensures that it is evenly incorporated with the other dry ingredients.
Add the baking powder and salt to the flour and gently fold them in until they are evenly distributed throughout the flour.
To avoid compacting the mixture, use a light touch when folding the dry ingredients together. You can also sift them into the bowl in small amounts to prevent lumps from forming.
Make sure to break up any clumps of baking powder or salt with your fingers or a fork before folding them into the flour. This will ensure that they are evenly distributed throughout the mixture and help to create a light texture in your scones.
Avoid over-mixing the dry ingredients, as this can lead to a dense and tough scone. Stop mixing as soon as the ingredients are combined, and proceed with adding any wet ingredients you may need.
Preheat your oven to 400°F (200°C).
- The key to baking perfect scones lies in understanding and following proper instructions, which we’ll outline below.
- To begin with, preheat your oven to 400°F (200°C). This temperature is crucial for achieving the right texture and browning on your scones.
- Next, in a large mixing bowl, whisk together:
- 1 cup of all-purpose flour (use unsalted butter for an extra-flaky crust)
- 2 tablespoons of granulated sugar (adjust to taste)
- 1/4 teaspoon of baking powder (make sure it’s fresh and not expired)
- 1/2 teaspoon of salt (use sea salt for added depth of flavor)
- Using a pastry blender or your fingertips, rub the butter into the dry ingredients until the mixture resembles coarse crumbs.
- In a separate bowl, whisk together:
- 3/4 cup of heavy cream (or buttermilk for a tangier scone)
- 1 large egg, lightly beaten (room temperature is best)
- Combine the wet and dry ingredients until just combined; do not overmix.
- Turn the dough out onto a floured surface and gently knead it a few times before patting it into a circle that’s about 1 inch thick.
- Using a biscuit cutter or the rim of a glass, cut out scones. You can also use a knife to shape them by hand if you prefer.
- Place the scones on a baking sheet lined with parchment paper and brush the tops with a little extra cream or beaten egg for added shine and texture.
- Bake in your preheated oven at 400°F (200°C) for about 15-20 minutes, or until golden brown. A toothpick inserted into the center of one scone should come out clean when done.
- Allow the scones to cool on a wire rack before serving and enjoy your freshly baked British-style scones!
In a large mixing bowl, whisk together flour, sugar, salt, and baking powder.
To create a delicious batch of Basic British Scones, follow these step-by-step instructions and tips.
Step 1: Prepare the Dry Ingredients
- In a large mixing bowl, whisk together
- 2 1/4 cups of all-purpose flour
- 3 tablespoons of sugar
- 1/2 teaspoon of salt
- 2 teaspoons of baking powder
Step 2: Add the Liquid Ingredients
- In a separate bowl, combine
- 3/4 cup of cold unsalted butter, cut into small pieces
- 3/4 cup of buttermilk, or regular milk with 1 tablespoon of white vinegar or lemon juice
Step 3: Combine the Dry and Liquid Ingredients
- Add the liquid ingredients to the dry ingredients and mix until the dough starts to come together.
- Gently fold in any remaining flour or sugar that may not have been fully incorporated.
Tips and Reminders:
- To ensure your scones turn out light and flaky, it’s essential to keep the butter cold and handle the dough gently.
- Don’t overmix the dough, as this can lead to tough scones.
- Use a light touch when handling the dough, especially when shaping the scones.
Final Step: Shape and Bake the Scones
- Turn the dough out onto a floured surface and gently knead it a few times until it comes together in a cohesive mass.
- Pat the dough into a circle that’s about 1 inch thick.
- Use a biscuit cutter or the rim of a glass to cut out scone shapes.
- Place the scones on a baking sheet lined with parchment paper and bake in a preheated oven at 400°F (200°C) for 15-20 minutes, or until golden brown.
Creaming the Butter and Liquid Ingredients
To make delicious basic British scones, it’s essential to cream together the butter and liquid ingredients correctly. This process requires patience and a gentle touch to ensure that the mixture becomes light and fluffy.
Firstly, take a large mixing bowl and add in the cold butter. Make sure to use high-quality, salted butter for the best flavor. Next, measure out your dry ingredients, such as all-purpose flour, sugar, and any other desired seasonings or leavening agents, and set them aside for now.
Now, it’s time to cream together the butter and liquid ingredients. This is the most critical step in making scones. Take a separate mixing bowl or a stand mixer with a paddle attachment and add in the cold butter. Begin by beating the butter on its own until it becomes light and fluffy.
Next, gradually add in your wet ingredients, which may include heavy cream, milk, eggs, or any other desired flavorings. Continue to beat the mixture until it’s smooth, creamy, and fully incorporated. Be careful not to overbeat at this stage, as this can lead to a dense scone.
Once you’ve reached the correct consistency, stop beating and scrape down the sides of the bowl with a spatula. This ensures that all ingredients are well mixed together.
Now it’s time to add in your dry ingredients. Gradually pour them into the wet mixture while gently folding them together until just combined. Be careful not to overmix at this stage, as this can lead to a tough scone.
The final step is to shape and bake the scones. Turn out the dough onto a floured surface and gently knead it until it becomes smooth and pliable. Pat the dough into a circle that’s about 1 inch thick, then use a biscuit cutter or the rim of a glass to cut out your scone shapes.
Place the scones on a baking sheet lined with parchment paper, leaving space between each scone for even baking. Brush the tops with a little extra milk or egg wash and bake in a preheated oven at 400°F (200°C) for about 15-20 minutes, or until golden brown.
Remove the scones from the oven and let them cool on a wire rack for a few minutes before serving. Serve warm with your favorite toppings, such as jam, cream, or clotted cream!
Add cold butter pieces and use a pastry blender or your fingertips to work it into the dry ingredients until the mixture resembles coarse crumbs.
The process of creating delicious British scones begins with a combination of ingredients and techniques that result in a light, fluffy, and flavorful treat.
To start, you’ll need to gather your dry ingredients, which typically include all-purpose flour, sugar, baking powder, and salt. It’s essential to use cold ingredients for this recipe, as warm temperatures can cause the butter to melt, resulting in a dense scone.
Next, add cold butter pieces to the dry ingredients. Using a pastry blender or your fingertips, work the butter into the mixture until it resembles coarse crumbs. This process is called “cutting” the butter and is crucial for creating a flaky texture in the finished scones.
Instructions
- Preheat the oven to 400°F (200°C) and line a baking sheet with parchment paper.
- In a large mixing bowl, whisk together the flour, sugar, baking powder, and salt.
- Add cold butter pieces to the dry ingredients and use a pastry blender or your fingertips to work it into the mixture until it resembles coarse crumbs.
- Gradually add heavy cream or buttermilk to the mixture, stirring with a fork until the dough comes together in a shaggy mass.
- Turn the dough out onto a floured surface and gently knead it a few times until it comes together.
- Pat the dough into a circle that is about 1 inch (2.5 cm) thick.
- Use a biscuit cutter or the rim of a glass to cut out scones. Gather the scraps, re-form the dough, and cut out additional scones.
Place the scones on the prepared baking sheet, leaving about 1 inch (2.5 cm) of space between each scone.
Tips
- To ensure your scones are light and fluffy, handle them gently and avoid overworking the dough.
- For an extra-flaky texture, try folding the dough in half a few times before cutting out the scones.
- Don’t overbake the scones – they’re done when they’re lightly golden brown on the edges and still slightly tender in the center.
Now that you have this basic recipe, feel free to experiment with different flavors and ingredients to create unique variations of British scones!
Use a fork to whisk in 3/4 cup heavy cream or buttermilk, stirring with a gentle touch.
To ensure the success of your Basic British Scones, it’s essential to pay close attention to the instructions, particularly when incorporating liquid ingredients into the dough.
When whisking in heavy cream or buttermilk, use a fork to gently stir the mixture. This will help prevent overmixing and preserve the delicate texture of the scones.
The amount of liquid added is crucial, so make sure to whisk in exactly 3/4 cup of heavy cream or buttermilk at a time. This will aid in maintaining the perfect balance of moisture and structure in your scones.
Gentle stirring is vital when incorporating the cream or buttermilk. Overmixing can lead to tough, dense scones that are unpleasant to eat. To avoid this, use a light touch with the fork and make sure not to over-stir the mixture.
By following these simple tips and instructions, you’ll be well on your way to creating delicious Basic British Scones that will impress even the most discerning palates.
Tips for Perfect Scones
Shaping and Baking
The quest for perfect scones is a daunting task that can leave even the most seasoned bakers scratching their heads. However, with a few simple tips and techniques, you’ll be on your way to producing light, fluffy, and deliciously tender British-style scones.
One of the key factors in achieving perfect scones is the type of flour used. For traditional British scones, it’s essential to use self-raising flour that contains baking powder. This will ensure that your scones rise beautifully and maintain their shape while baking.
Another critical aspect of making great scones is the handling of the dough. Overworking the dough can lead to tough, dense scones that are more like rocks than soft, fluffy treats. To avoid this, gently mix the ingredients together until they form a shaggy dough, then stop mixing as soon as it comes together in a cohesive mass.
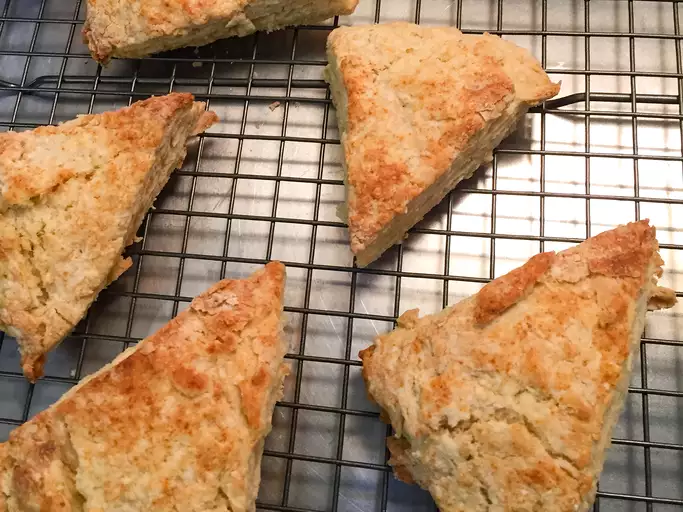
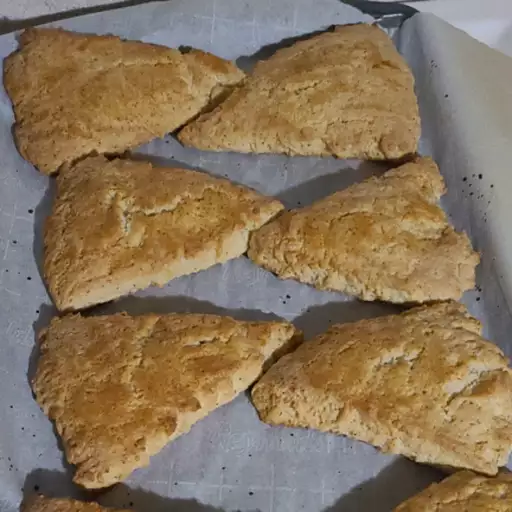
Shaping your scones is an art in itself. For perfect scones, you’ll want to shape them into triangles or wedges, rather than balls or rounds. To do this, divide the dough into 8-10 equal pieces and roll each piece into a ball. Place the balls onto a baking sheet lined with parchment paper, leaving about an inch of space between each scone.
Next, use your thumb to gently press down on each scone, creating a triangle shape. This will help the scones bake evenly and prevent them from spreading too much during baking.
Baking is where the magic happens, and it’s essential to get this right for perfect scones. To do this, preheat your oven to 400°F (200°C). Place the scones on a middle rack in the oven, leaving about an inch of space between each scone.
Bake the scones for 12-15 minutes, or until they’re golden brown. To check if they’re done, gently tap the bottom of one with your finger; if it sounds hollow, they’re cooked through and perfect.
Finally, remove the scones from the oven and let them cool on a wire rack for at least 10-15 minutes before serving. This will help them retain their texture and prevent them from becoming soggy or soft.
And there you have it – the secret to making perfect British-style scones that are sure to impress even the most discerning palates. With these simple tips and techniques, you’ll be well on your way to creating deliciously tender scones that are sure to become a staple in your household.
Turn dough out onto a floured surface, gently knead it a few times until it comes together in a cohesive mass.
The key to creating perfect scones lies in understanding how to handle the dough gently and effectively. The first step involves turning out the dough onto a floured surface, ensuring that it doesn’t stick and can be worked with ease.
Gently knead the dough a few times until it starts to come together as a cohesive mass. This process should be done lightly, avoiding any vigorous action that may lead to over-working the dough.
It’s crucial to note that scone dough is delicate and can become tough if mishandled. The goal is to develop the gluten in the dough just enough for it to hold its shape without becoming too dense or chewy.
As you knead, pay attention to the dough’s texture and consistency. It should start to take on a slightly firmer feel but still remain soft to the touch. If it becomes too sticky, add a small amount of flour. Conversely, if it starts to become too dry, lightly mist it with water.
Once you’ve achieved the right consistency, use your hands or a rolling pin to shape the dough into a circular or oblong shape, about 1-2 inches thick. Don’t overwork the dough at this stage, as it can cause the scones to become dense and heavy.
Achieving the perfect balance of lightness and flakiness in your scones requires patience and finesse when working with the dough. By handling it gently and giving it enough time to come together, you’ll be rewarded with tender, buttery, and utterly delicious British-style scones.
Use a biscuit cutter or the rim of a glass to cut out scones; gather scraps, reform dough, and cut additional rounds.
- The key to making perfect scones lies in the technique of cutting them out. To ensure that you end up with beautifully rounded and even scones, it’s essential to use a biscuit cutter or the rim of a glass.
- Start by placing your chilled dough on a floured surface, such as a countertop or pastry mat. This will prevent the dough from sticking and make it easier to work with.
- Take your biscuit cutter or the rim of a glass and press down gently into the center of the dough. Rotate the cutter or glass as you press to ensure that it cuts through the entire circle of dough.
- Once you have cut out one scone, lift it up and place it on a baking sheet lined with parchment paper. Repeat this process until all of your dough is used up.
- If there are any scraps left over after cutting out your initial rounds of scones, don’t be afraid to gather them together and reform the dough. You can then cut out additional rounds of scones using your biscuit cutter or glass.
- It’s worth noting that you may need to re-chill the dough for a few minutes before cutting out additional rounds. This will help the dough to firm up again and make it easier to work with.
- Remember, the goal when cutting out scones is to keep them as uniform in size as possible. This ensures that they bake evenly and look their best when served.
- As you continue to cut out your scones, take care not to twist or stretch the dough. This can cause the scones to become misshapen and lose their texture.
- Finally, place all of your cut-out scones on a baking sheet lined with parchment paper, leaving about an inch of space between each scone to allow for even baking.
- Now that you have cut out your scones, it’s time to bake them. Preheat your oven to 400°F (200°C) and place the scones on the middle rack.
- Bake the scones for 15-20 minutes, or until they are golden brown. Remove the scones from the oven and let them cool on a wire rack before serving.

- Best Lusha Alternatives for 2025 - April 22, 2025
- Best Overloop Alternatives for 2025 - April 22, 2025
- Best 6sense Alternatives for 2025 - April 22, 2025
