
Ingredients
Cereals
Cereals are an essential part of baking, particularly when it comes to traditional breads like caraway rye. The ingredients list for this recipe highlights the importance of whole grains in achieving the desired flavor and texture.
The primary cereal grain used in this Dutch Oven Caraway Rye Bread Recipe is rye flour. Rye flour is a type of coarse, dark flour made from rye grains, which are rich in fiber and have a distinct nutty flavor. There are different types of rye flour available, including light, medium, and dark ryes, each with its own unique characteristics and uses.
The use of caraway seeds in this recipe is another example of the importance of cereal grains in bread-making. Caraway seeds are the seeds of the caraway plant, a member of the parsley family, and have a distinctive nutty flavor that complements the rye perfectly. Like rye flour, caraway seeds are high in fiber and nutrients, making them an excellent addition to this recipe.
Oats and other whole grains can also be used to add depth and complexity to this bread. Some recipes for caraway rye may include oats or barley flour to enhance the flavor and texture of the final product. The use of these additional cereals allows bakers to create a more nuanced and interesting flavor profile that showcases the unique characteristics of each grain.
When working with whole grains, it’s essential to note that they can be quite dense and may require adjustments to the recipe. Whole grain flours can also behave differently depending on factors like humidity and temperature, so some experimentation and flexibility are often necessary when baking with these ingredients.
The combination of rye flour, caraway seeds, oats (or barley), and other whole grains creates a delicious and complex flavor profile that’s perfect for this Dutch Oven Caraway Rye Bread Recipe. By incorporating these cereal ingredients, bakers can create a truly authentic and mouth-watering bread that’s sure to impress anyone who tries it.
1 ½ cups of caraway rye flour
In this recipe for Dutch Oven Caraway Rye Bread, a key ingredient that sets this bread apart from others is the use of caraway rye flour.
Caraway rye flour, also known as rügenmehl or rye meal, is a type of whole grain flour made from dark German rye grains and is typically coarser than other types of flour.
The addition of caraway seeds to the dough provides an intense nutty flavor and aroma, while also contributing to the distinctive texture of this bread.
To make this Dutch Oven Caraway Rye Bread, you will need 1 ½ cups of caraway rye flour, which should be stored in an airtight container to preserve its flavor and aroma.
1 cup of whole wheat flour
When it comes to making a delicious Dutch Oven Caraway Rye Bread, the choice of ingredients plays a crucial role in achieving that perfect blend of flavors and textures.
The first ingredient on our list is 1 cup of whole wheat flour, which serves as the base for our bread. Whole wheat flour provides a nuttier flavor and a denser texture compared to all-purpose flour, making it an excellent choice for this recipe.
Here are some key characteristics of whole wheat flour that make it ideal for baking:
- Higher fiber content: Whole wheat flour contains more dietary fiber than all-purpose flour, which can help with digestion and provide a feeling of fullness.
- Nutty flavor: The unique nutty flavor of whole wheat flour complements the caraway seeds and other ingredients in our recipe, creating a delicious and complex taste experience.
- Denser texture: Whole wheat flour produces a denser bread with a more pronounced crumb, which holds its shape well when sliced and toasted.
It’s worth noting that whole wheat flour can be quite dense and heavy, so it may require a bit of extra liquid to achieve the right consistency. However, in this recipe, we’ve taken care to balance out the ingredients to ensure that the bread rises beautifully and retains its moisture.
In summary, using 1 cup of whole wheat flour as the base for our Dutch Oven Caraway Rye Bread provides a rich, nutty flavor and a dense texture that complements the other ingredients perfectly. This ingredient plays a crucial role in creating the distinctive character of this delicious bread recipe.
Leavening Agents
Bread making involves the use of various ingredients that provide structure, texture, and flavor to the finished product. For a Dutch Oven Caraway Rye Bread recipe, specific ingredients are required to achieve the desired characteristics.
The primary ingredient in this bread is rye flour, which contains less gluten than wheat flour and contributes to a denser, heavier texture. Whole grain or dark rye flour can be used for added nutrition and flavor.
Wheat flour, typically all-purpose flour, serves as the secondary ingredient and provides elasticity to the dough. The ratio of rye to wheat flour can vary depending on personal preference and regional traditions.
The role of salt is not only to enhance flavors but also to control yeast growth and help preserve the bread. A moderate amount of salt, about 2% of the total weight of the dough, is usually sufficient.
Sugars, such as brown sugar or honey, play a significant role in promoting browning during baking and contribute sweetness to balance out the bitterness of rye flour.
Leavening agents are used to facilitate rising in bread. For this recipe, active dry yeast is commonly employed due to its convenience and effectiveness.
Caraway seeds, which provide a distinct flavor and aroma, are added as a seasoning ingredient. The amount of caraway seeds can be adjusted according to individual taste preferences.
Water serves as the primary liquid component in this recipe, although some recipes may include milk or other liquids for added richness and moisture.
In conclusion, combining rye flour with wheat flour, salt, sugars, yeast, caraway seeds, and water creates the perfect blend for a delicious Dutch Oven Caraway Rye Bread Recipe.
1 teaspoon active dry yeast (e.g., SAF Instant Yeast)
The ingredients for a traditional Dutch Oven Caraway Rye Bread recipe typically include:
Main Ingredients:
- 2 cups of bread flour
- 1 cup of rye flour
- 1 teaspoon of salt
- 1 tablespoon of sugar
Rising Agents:
- 1 teaspoon active dry yeast (e.g., SAF Instant Yeast)
Miscellaneous Ingredients:
- 1/4 cup of caraway seeds
- 2 tablespoons of butter, melted
- 1 egg, beaten (optional)
- 1 tablespoon of vinegar (e.g., apple cider vinegar)
- Water as needed for dough hydration
Optional Ingredients:
- Carrot tops or other herbs for added flavor and nutrition
Some notes on the ingredients:
- The active dry yeast should be fresh to ensure proper rising of the dough.
- Rye flour can vary in its flavor and texture depending on the brand or type, so feel free to experiment with different options.
- Caraway seeds add a distinctive nutty flavor to the bread, but you can omit them if you prefer a milder taste.
- The melted butter and beaten egg (if using) help enrich the dough’s texture and flavor.
- The vinegar helps balance the flavors in the dough, but feel free to adjust or omit it if you don’t have it on hand.
Sweeteners and Flavor Enhancers
In the realm of baking, especially when it comes to traditional breads like caraway rye, understanding the role of ingredients is crucial for achieving that perfect balance of flavors and textures.
Sweeteners in this context are often minimal or nonexistent, as many rye bread recipes rely on the natural sweetness of the grains and sometimes a hint from molasses or dark sugars. However, they can significantly affect the overall taste if added in excess. Common sweeteners include:
- Honey
- Sugar (white or brown)
- Molasses (blackstrap being particularly common for its robust flavor and nutritional value)
- Dark sugars like turbinado or demerara, which can add a richer sweetness without the molasses’ distinct flavor
Flavor enhancers in bread recipes are often spices, herbs, and sometimes even coffee or tea extracts. They not only enhance but also complement the natural flavors of the ingredients.
Caraway seeds, for instance, provide a distinct flavor reminiscent of anise or licorice when they’re ground up during the dough-making process. Other notable flavor enhancers include:
- Cocoa powder (in some darker, more robust breads)
- Black tea leaves
- Cardamom for an aromatic twist in sweeter breads
- Salt – while not a sweetener, it significantly impacts taste, especially when used in contrast to other ingredients
In the case of Dutch Oven Caraway Rye Bread, the primary focus is on using caraway seeds for their unique flavor and nutritional benefits. The minimal use of sweeteners is reflective of the bread’s traditional origins, aiming to preserve the earthy taste of rye without overpowering it.
1 tablespoon brown sugar
The first ingredient we’re focusing on is 1 tablespoon brown sugar. Brown sugar is a type of refined sugar that retains some of its molasses content, which gives it a richer flavor and darker color compared to white sugar. In the context of the Dutch Oven Caraway Rye Bread Recipe, this small amount of brown sugar serves several purposes:
Enhances flavor: The brown sugar adds a subtle depth to the bread’s flavor profile, complementing the earthy taste of caraway seeds and the malty sweetness of the rye flour.
Promotes browning: The small amount of brown sugar helps create a golden-brown crust on the bread during the baking process, which is achieved through the Maillard reaction – a chemical reaction between amino acids and reducing sugars that occurs when food is cooked, resulting in the formation of new flavor compounds and browning.
Balances flavors: Brown sugar also helps to balance out the savory and slightly bitter notes present in the caraway seeds and rye flour, contributing to a more harmonious flavor profile overall.
The use of brown sugar as an ingredient is particularly well-suited for this recipe due to its compatibility with the bold flavors and textures of the other ingredients. Here’s how it interacts with some of the key components:
- Rye flour: The earthy, nutty taste of rye flour pairs nicely with the subtle sweetness of brown sugar.
- Caraway seeds: The slightly bitter and nutty flavors of caraway seeds are balanced by the hint of sweetness from the brown sugar.
- Yeast: The yeast fermentation process is encouraged by the presence of sugar, which helps to create a light, airy texture in the finished bread.
In summary, the addition of 1 tablespoon brown sugar is an integral part of the Dutch Oven Caraway Rye Bread Recipe, contributing to its rich flavor profile, golden-brown crust, and harmonious balance of flavors.
Salt and Spices
The success of any bread recipe, including the Dutch Oven Caraway Rye Bread, largely depends on the quality and balance of its ingredients. When it comes to baking rye bread, particularly with caraway seeds, there are specific ingredients that play crucial roles.
Caraway seeds, for instance, are a key component of traditional rye bread. They add not only flavor but also texture and aroma. Caraway seeds have a slightly bitter taste and are commonly used in European baking, especially in German and Dutch recipes.
The use of salt is another critical element in baking rye bread. Salt enhances the flavors of other ingredients, acts as a preservative to extend the shelf life of the bread, and affects yeast activity, thereby influencing dough rise. The type of salt used can also impact the taste of the final product; for example, using sea salt might provide a more complex flavor profile compared to regular table salt.
Spices and seasonings are integral in creating the distinct flavor profiles of various breads. In traditional Dutch Oven Caraway Rye Bread recipes, besides caraway seeds, other spices like black pepper or coriander might be used. The addition of these spices not only enhances the taste but also contributes to the aromatic profile of the baked loaf.
Another critical component in making high-quality bread is the type and quality of flour. Rye flour, which gives rye bread its unique flavor and texture, has a slightly lower gluten content than wheat flour, leading to a denser crumb. The choice between different types of flours (e.g., light or dark rye) can significantly impact the final product’s taste and appearance.
The water used in baking can also affect the outcome, especially concerning texture and freshness. Tap water can sometimes have additives that might alter dough behavior negatively. Some bakers prefer using filtered water for a more consistent result.
In summary, ingredients such as caraway seeds, salt, spices and seasonings, flour types (especially rye), and even water play crucial roles in making Dutch Oven Caraway Rye Bread successful. The right balance of these elements not only contributes to the loaf’s flavor but also its texture and shelf life.
1 teaspoon salt
Salt plays a crucial role in this Dutch Oven Caraway Rye Bread recipe, serving not only as a flavor enhancer but also as an essential ingredient for bringing out the natural flavors of the other components. The use of salt in cooking and baking is multifaceted; it not only seasons food but also helps control bacteria growth, preserves moisture, and aids in the activation of enzymes.
In this recipe, 1 teaspoon of salt is recommended. This amount may seem modest compared to recipes that call for larger quantities of salt, but it’s essential to remember that rye bread typically uses less salt than other types of bread due to its unique flavor profile and the fact that caraway seeds contribute a distinct savory taste.
The use of 1 teaspoon of salt in this recipe is not only about achieving the right balance of flavors but also about respecting the traditional characteristics of Dutch oven-baked rye bread. Rye flour, being naturally denser and darker than wheat flour, requires less salt to prevent it from tasting too bitter or astringent.
The type of salt used can also make a difference in the flavor profile of the final product. For this recipe, a finely ground kosher salt is recommended as it dissolves evenly and doesn’t add any unwanted texture to the bread. This ensures that each bite tastes consistent without having to worry about encountering clumps or large crystals of salt.
In summary, the use of 1 teaspoon of salt in this Dutch Oven Caraway Rye Bread recipe is a deliberate choice aimed at striking the perfect balance between flavors while adhering to traditional rye bread baking methods and ingredient ratios. It’s an essential component that complements the other ingredients beautifully without overpowering them.
Instructions
Preliminary Steps
Preliminary steps are an essential part of any recipe, including the Dutch Oven Caraway Rye Bread Recipe. These initial steps prepare you for the main cooking process, ensuring that your ingredients are ready and your equipment is set up correctly.
The preliminary steps in this recipe can be broken down into three categories: ingredient preparation, equipment setup, and environmental control.
Ingredient Preparation
Mix caraway seeds with 1 tablespoon of water to rehydrate them. This will help the seeds release their flavor and aroma during baking. Let it sit for at least 30 minutes to allow the seeds to soften.
Autolyse the flour, salt, and sugar by mixing them together in a bowl using a wooden spoon or a stand mixer with a dough hook attachment. The autolyse process involves breaking down the starches in the flour, which will help create gluten during the kneading phase.
Mix the rehydrated caraway seeds and any additional ingredients (such as chopped onion or grated cheese) into the autolysed mixture.
Equipment Setup
Preheat your Dutch oven to 450°F (230°C). You can use a thermometer to ensure it reaches the correct temperature. Make sure to preheat it at least an hour before baking.
Prepare your dough scraper and bench or a lightly floured surface for kneading. You’ll want to dust the surface with flour to prevent sticking.
Environmental Control
Ensure your kitchen is at room temperature (around 70-75°F or 21-24°C) for optimal yeast activity. Yeast thrives in warm environments, which will help it ferment the sugars and produce carbon dioxide.
Once you’ve completed these preliminary steps, you’re ready to move on to the main dough mixing and kneading phase of the Dutch Oven Caraway Rye Bread Recipe.
Proof active dry yeast by mixing it with warm water (about 100°F to 110°F)
To proof active dry yeast, you will need to mix it with warm water in a clean container. This process is called “proofing” the yeast because it allows you to determine if the yeast is still active and viable for use in bread making.
The temperature of the water is crucial when proofing yeast. The ideal temperature range is between 100°F to 110°F (38°C to 43°C). If the water is too hot, it can kill the yeast, while water that is too cold may not activate the yeast properly.
To mix the yeast with warm water, follow these steps:
- Mix one packet of active dry yeast (usually 2 1/4 teaspoons) with 3 tablespoons to 1/2 cup of warm water in a clean container.
- Stir gently to dissolve the yeast and let it sit for 5-10 minutes, or until the mixture becomes frothy and bubbly.
During this time, the yeast should begin to activate and produce carbon dioxide gas. You will notice a slight foam or bubbles on the surface of the water.
If the mixture does not become frothy after 10-15 minutes, it is possible that the yeast has expired or is no longer viable for use in bread making. However, if the mixture becomes active and bubbly within the expected time frame, you can proceed with using the yeast in your recipe.
Let mixture rest for about 5 minutes, or until frothy
In the process of making a delicious Dutch Oven Caraway Rye Bread, it’s essential to follow specific instructions to achieve the perfect loaf. Let’s break down the instruction “Let mixture rest for about 5 minutes, or until frothy” into more detail.
This step is crucial in allowing the yeast to activate and start fermenting the sugars in the dough. When mixing together the ingredients, it’s not uncommon for the initial mixture to be quite dense and starchy. However, by letting it rest for 5 minutes, several things occur:
- The yeast starts to break down the starches into simple sugars, producing carbon dioxide gas in the process.
- The dough begins to release its gluten strands, allowing the mixture to become lighter and more aerated.
- Any excess air bubbles trapped within the dough start to dissipate, creating a smoother texture.
During this resting period, the mixture will typically start to develop a foamy or frothy appearance on its surface. This is due to the carbon dioxide gas produced by the yeast, which gets trapped in the air pockets, making it appear lighter and more airy. It’s essential not to mistake this foam for the actual dough itself; instead, it’s a sign that the yeast is working effectively.
When checking if your mixture has reached the frothy stage, gently lift the edge of the bowl with a spatula or spoon to inspect the surface. If you notice a thin, even layer of foam covering most of the surface area, it’s likely ready for the next step in the recipe.
Keep in mind that this resting period can vary depending on several factors, such as the temperature of your environment, the type and amount of yeast used, and the initial mix consistency. However, 5 minutes is a good starting point; you can always extend or shorten the time based on observation and experience.
Once the mixture has reached the desired level of frothiness, proceed with adding any additional ingredients as per the recipe instructions. It’s essential to move swiftly and efficiently during this process, ensuring that the dough remains in a favorable environment for continued fermentation.
Mixing Dough
When it comes to mixing dough, especially for traditional bread recipes like Dutch Oven Caraway Rye Bread, understanding the process is crucial to achieving the right texture and flavor.
The key to successful dough mixing lies in combining ingredients in a specific order, while also applying the correct techniques to incorporate air, develop gluten, and distribute flavors evenly. Here’s a step-by-step guide on how to mix the dough for Dutch Oven Caraway Rye Bread:
Step 1: Combining Dry Ingredients
- Mix together flour, rye flour, salt, sugar, and caraway seeds in a large bowl.
- Use a whisk or a wooden spoon to incorporate the ingredients evenly.
- This step helps to distribute the dry ingredients uniformly and ensures that they are well combined.
Step 2: Adding Yeast Mixture
- In another bowl, whisk together yeast, warm water, and a pinch of sugar.
- This mixture is called the “yeast starter.”
- Allow the yeast starter to sit for about 5-10 minutes, or until it becomes frothy and bubbly.
Step 3: Adding Wet Ingredients
- Add the yeast starter mixture to the dry ingredients bowl.
- Mix the wet ingredients into the dry ingredients using a wooden spoon or a stand mixer with a dough hook attachment.
- Pull and fold the dough gently to develop gluten and distribute flavors evenly.
Step 4: Kneading and Folding
- Knead the dough on a floured surface for about 5-10 minutes, or until it becomes smooth and elastic.
- Fold the dough onto itself several times to develop gluten and create tension in the dough.
- Repeat this process of kneading and folding for about 20-30 minutes, or until the dough reaches your desired level of development.
Step 5: Resting and Shaping
- Punch down the dough to release any air bubbles that may have formed during resting.
- Shape the dough into its final form, either as a round loaf or oblong bread.
By following these steps and techniques, you’ll be able to create a delicious Dutch Oven Caraway Rye Bread with a dense, chewy crumb and a rich, slightly sweet flavor.
Combine caraway rye flour and whole wheat flour in a large bowl
To begin making this delicious Dutch Oven Caraway Rye Bread, it’s essential to start by combining two types of flour in a large bowl.
The first step involves mixing together caraway rye flour and whole wheat flour in the bowl. The caraway rye flour, which is the primary component of this recipe, will provide the distinctive flavor and dense texture characteristic of traditional rye bread.
The whole wheat flour, on the other hand, adds a nutty flavor and extra nutritional value to the bread. By combining these two types of flour, you’ll create a complex and rich flavor profile that is quintessential of authentic rye bread.
When measuring out your flours, make sure to use 1 cup of caraway rye flour and 1/2 cup of whole wheat flour. This ratio will give you the perfect balance between the bold flavors of the caraway rye flour and the earthy undertones of the whole wheat.
Mix these dry ingredients together until they are just combined, being careful not to overmix. A light dusting of flour on the surface will indicate that you’ve reached the ideal consistency.
Add salt, sugar, and yeast mixture to the dry ingredients
To execute this task effectively, it’s crucial to comprehend the importance of the ingredients involved and their roles in the bread-making process. The dry ingredients, which typically include flour, caraway seeds, rye flour, and other optional spices or grains, should be meticulously measured and prepared for the next step.
The yeast mixture, which consists of yeast rehydrated in warm water with a pinch of sugar to activate its enzymatic activity, is now ready to combine with the dry ingredients. This step is critical as it introduces the leavening agent responsible for the bread’s rise and development.
The mixture of salt and sugar is typically added separately due to their distinct effects on yeast growth and fermentation rates. Salt inhibits yeast growth, but in controlled amounts, it helps to regulate fermentation and enhances flavor, while sugar acts as a food source for the yeast to facilitate its metabolic processes.
To add these mixtures to the dry ingredients, ensure you’re using a clean and sanitized environment to prevent contamination. Gradually pour the yeast mixture into the dry ingredients, followed by the mixture of salt and sugar. The order in which these components are added may vary based on personal preference or the specific recipe being used.
Using a rubber spatula or a similar utensil, gently fold and combine all the ingredients until they form a uniform dough. Be cautious not to overmix, as this can lead to a dense bread. The goal is to create a cohesive mixture that retains its shape when formed into a loaf.
With each ingredient now incorporated, the next step in the Dutch Oven Caraway Rye Bread Recipe involves kneading and proofing the dough. This process will develop the gluten structure, allowing for an even crumb and crust texture in your finished bread.
Knead dough using a stand mixer with a dough hook attachment or by hand for about 10 minutes
To knead the dough for the Dutch Oven Caraway Rye Bread, you have two options: using a stand mixer with a dough hook attachment or doing it by hand.
Using a Stand Mixer with a Dough Hook Attachment:
- Add the dough to the stand mixer bowl and attach the dough hook. Ensure that all ingredients are well incorporated.
- Knead the dough for about 10 minutes at a slow speed. This will help develop the gluten in the flour, giving your bread its signature texture and structure.
- You can check on the dough periodically to ensure it is not overmixing or underdeveloped. Stop the mixer if necessary to adjust the speed or scrape down the sides of the bowl.
Kneading by Hand:
- Dust your work surface with a small amount of flour or cornmeal to prevent sticking.
- Place the dough on the floured surface and begin kneading, pushing down with the heel of your hand and folding the dough back onto itself.
- Knead for about 10 minutes, maintaining a consistent rhythm and gentle pressure. This will help develop the gluten in the flour.
After kneading, you can either shape the dough into its final form or let it rest and relax before shaping, which is often done after the first rise (also known as bulk fermentation).
Results and Tips
Dutch Oven Crust Development
The process of developing crust on Dutch oven-baked bread is a complex interaction of factors involving heat, moisture, and gluten structure.
One of the primary benefits of baking in a Dutch oven is that it allows for a steamy environment, which promotes crust development by activating enzymes that strengthen the gluten network and help to create a more robust crumb texture.
The Maillard reaction, a chemical reaction between amino acids and reducing sugars that occurs when food is cooked, also plays a crucial role in crust browning and development. This reaction requires the presence of heat, water, and oxygen, all of which are readily available in the Dutch oven environment.
Tip 1: Ensure the right temperature – The ideal temperature for baking bread in a Dutch oven is between 450°F to 500°F (230°C to 260°C). This high temperature helps create a crispy crust by driving off excess moisture and promoting rapid Maillard reaction activity. Make sure your oven is preheated and the pot is at the correct temperature before adding the dough.
Tip 2: Use a steamy environment – Dutch ovens trap moisture, creating an ideal environment for bread to rise and develop a crispy crust. Place a small amount of water in the bottom of the oven or use a cast-iron pan with water to create steam during baking.
Tip 3: Handle the dough gently – Gentle handling is essential to minimize damage to the gluten structure, which can lead to uneven crumb texture and poor crust development. Avoid over-working or stretching the dough excessively.
Tip 4: Use the right type of flour – All-purpose flour contains a higher amount of protein than other types of flours, making it an excellent choice for bread that requires a robust crust. However, using high-protein flour (such as bread flour) can result in even better crust development.
Tip 5: Monitor the proofing time – Proofing allows yeast to convert sugars into carbon dioxide, which helps bread rise and develop flavor. Over-proofed dough will not produce a robust crumb texture or crisp crust. Monitor your dough’s proofing time closely and intervene if necessary.
By following these tips and allowing for proper crust development in the Dutch oven environment, you can achieve an exceptionally crispy crust with excellent browning and flavor on your caraway rye bread.
Overall, achieving great results from a Dutch oven-baked loaf requires understanding and manipulating the complex interplay of heat, moisture, gluten structure, and Maillard reaction activity. By doing so, you will unlock the full potential of your dough and enjoy an incredibly delicious, crispy crusted caraway rye bread.
Preheat Dutch oven (e.g., Emile Henry Made In France) to 450°F
The results of preheating a Dutch oven, such as an Emile Henry Made In France one, to 450°F are multifaceted and beneficial for baking Dutch Oven Caraway Rye Bread.
Why Preheat to 450°F?
This high temperature is essential for creating a crispy crust on the bread. When you preheat your Dutch oven to 450°F, it ensures that the initial blast of heat will instantly set the exterior of the dough, helping to create a sturdy crust that retains moisture inside.
Benefits of Preheating to 450°F
- Even Baking: Preheating to 450°F ensures even baking and prevents hotspots. This helps your bread to cook consistently, reducing the risk of undercooked or overcooked areas.
- Crispy Crust: The high temperature contributes to a crispy crust on the bread. A well-crafted crust enhances the texture and appearance of your finished loaf.
- Prevents Sticking: Preheating the Dutch oven to 450°F helps prevent the dough from sticking to the sides or bottom of the pot during baking. This makes it easier to remove the finished bread.
Tips for Preheating Your Dutch Oven
Here are a few tips to keep in mind when preheating your Dutch oven to 450°F:
- Use the Right Dutch Oven: For best results, use a high-quality Dutch oven like Emile Henry Made In France. These pots are made from refractory ceramic materials that retain heat well and distribute it evenly.
- No Need to Add Insulation: Unlike some other baking methods, preheating your Dutch oven to 450°F does not require additional insulation. The pot’s design and material work together to maintain a consistent temperature throughout the cooking process.
- Monitor Your Oven Temperature: To ensure accurate results, monitor the temperature of your oven closely. You may need to adjust the temperature slightly based on your specific oven’s performance.
Conclusion
Preheating a Dutch oven to 450°F is an essential step in baking delicious Caraway Rye Bread. By following these tips and understanding the benefits of high-temperature preheating, you can achieve a crispy crust and a well-baked loaf every time.
Place dough into Dutch oven, cover with lid
The results of baking a delicious Dutch Oven caraway rye bread are well worth the effort, and with these tips, you can achieve a perfect loaf every time.
Tips for Achieving Success:
- Carefully shape the dough: After kneading, gently shape the dough into a ball and place it in the prepared Dutch oven. This ensures that the bread develops a smooth, even texture and promotes proper rising.
- Respect the temperature and time: The Dutch oven is preheated to 450°F (230°C), which allows for a perfect crust formation. Covering the pot with a lid during baking helps maintain an ideal temperature of around 425-435°F (220-225°C) for about 45 minutes.
- Don’t overmix or overbake: Overworking the dough can lead to tough, dense bread, while overbaking causes it to dry out. Remove the loaf from the oven when it reaches an internal temperature of around 190-200°F (88-93°C).
Benefits of Using a Dutch Oven: This type of cookware is perfect for baking bread due to its even heat distribution and retention of moisture, resulting in a crust that’s both crispy on the outside and soft inside. The caraway seeds add an aromatic flavor and delightful texture.
Tips for Perfect Crust Formation: A Dutch oven with a lid allows steam to condense within the pot, creating a natural pressure cooker effect. This promotes even cooking and helps the crust develop a crispy texture while maintaining the interior’s softness.
Bake for 3040 minutes or until internal temperature reaches 190°F
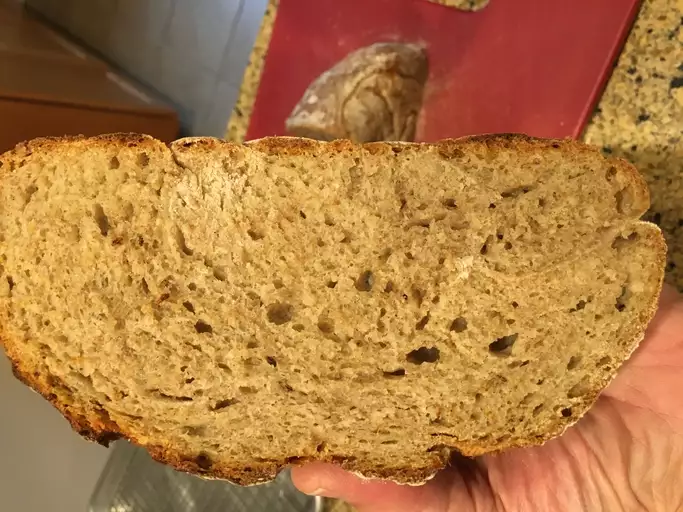
The results you can expect from baking this delicious Dutch Oven Caraway Rye Bread for 30-40 minutes or until the internal temperature reaches 190°F are truly impressive. This bread will be perfectly cooked, with a crispy crust and a soft interior that is full of flavor.
When it comes to achieving those ideal results, there are a few tips you can follow to ensure success. Firstly, make sure your Dutch oven is preheated properly before placing the dough inside. A hot pot is essential for creating the perfect crust.
Another important factor is temperature control. Use an instant-read thermometer to check the internal temperature of the bread, which should reach 190°F. This will help prevent overcooking or undercooking the bread.
Timing is also crucial in this recipe. Bake for 30-40 minutes, and then start checking the internal temperature. If it’s not yet at 190°F, cover the pot with foil to prevent overcooking and continue baking until the desired temperature is reached.
Finally, be mindful of your oven’s temperature fluctuations. Dutch ovens can be quite unpredictable, so keep a close eye on the bread during the baking time and adjust as needed.
By following these tips, you’ll be able to achieve that perfect golden-brown crust and soft interior that is characteristic of a well-made rye bread.
Additionally, consider the following suggestions to enhance your Dutch Oven Caraway Rye Bread experience:
- For an even more flavorful loaf, try adding other ingredients like dried cranberries or chopped nuts to the dough.
- Experiment with different types of caraway seeds or add a hint of anise for a unique twist on this traditional rye bread.
- Don’t be afraid to get creative with your toppings – caraway seeds are a perfect complement to a variety of cheeses, meats, and spreads!
Remove from heat and let rest in pot for at least 10 minutes
Once you have completed the kneading process and shaped the dough, it’s time to let it rest and allow the flavors to meld together.
To remove from heat, carefully lift the pot off the stovetop or cooking device, taking care not to spill any of the liquid contents. Place the Dutch oven on a heat-resistant surface, away from any direct heat sources.
Next, let the bread rest in the pot for at least 10 minutes to allow it to relax and redistribute its ingredients. This step is crucial for the development of the crumb structure and flavor of the bread. During this time, the starches will begin to gelatinize, creating a tender and moist texture.
As the bread rests, you can observe how the caraway seeds will start to infuse their distinct flavor and aroma into the dough. This is an exciting moment in the bread-making process, as it marks the beginning of the Maillard reaction – a chemical reaction between amino acids and reducing sugars that enhances the flavor and color of the bread.
To enhance the flavor and texture of your Dutch oven caraway rye bread, be sure to follow these tips:
- Use a high-quality rye flour with a good balance of acidity and flavor.
- Avoid over-mixing the dough, as this can lead to a dense and tough crumb.
- Make sure to use enough caraway seeds, as they will not only add flavor but also provide a lovely texture to the bread.
- Let the bread rest for at least 10 minutes in the pot, allowing it to relax and redistribute its ingredients.
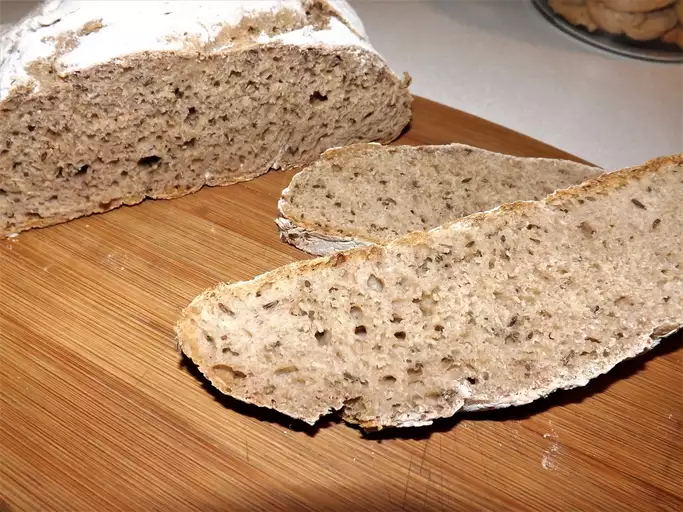
By following these tips and allowing your Dutch oven caraway rye bread to rest and develop properly, you will be rewarded with a deliciously dense and moist loaf with an intense flavor and aroma. The combination of the rye flour, caraway seeds, and careful handling during the bread-making process will create a truly exceptional bread that is perfect for sandwiches, toast, or simply enjoying on its own.

- Best Datanyze Alternatives for 2025 - April 24, 2025
- Best Hunter.io Alternatives for 2025 - April 22, 2025
- Best Lead411 Alternatives for 2025 - April 22, 2025
