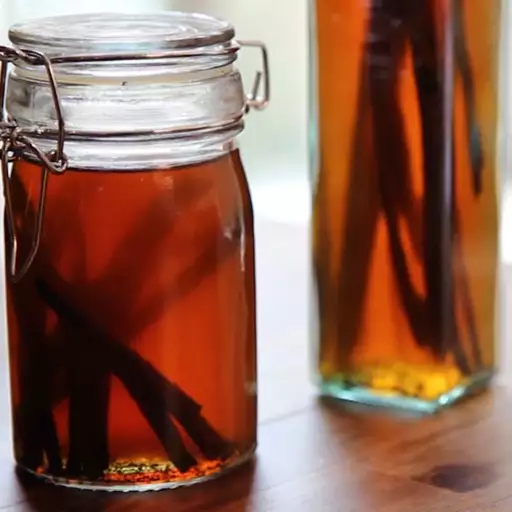
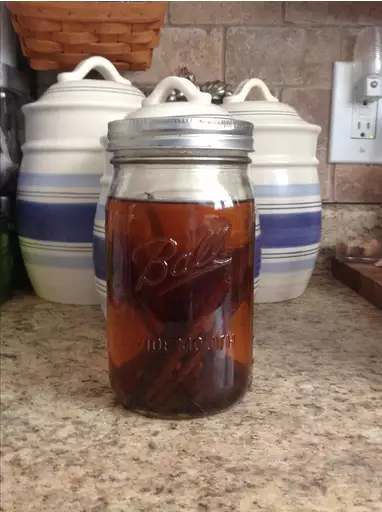
Ingredients and Equipment
Selecting High-Quality Vanilla Beans
To create high-quality homemade vanilla extract, selecting premium vanilla beans is crucial.
The quality of vanilla beans is determined by factors such as origin, freshness, and curing method.
Look for vanilla beans from reputable sources that cultivate high-quality vanilla orchids in tropical regions with optimal climates.
High-grade vanilla beans are typically grown in Madagascar, Tahiti, or Mexico, where the ideal climate conditions enable the production of aromatic and flavorful pods.
Avoid vanilla beans that have been sitting on shelves for extended periods as they may lose potency and aroma over time.
Newly harvested vanilla beans have a rich, creamy smell and a slightly sticky texture when wet; look for these characteristics when selecting fresh beans.
The curing method also plays a significant role in determining the quality of vanilla beans. Hand-rolled or hand-picked beans are considered superior to mass-produced beans that may have been machine harvested or cured.
When shopping for vanilla beans, inspect them carefully for any signs of moisture or mold on the surface, as these can lead to spoilage and affect flavor.
Avoid buying vanilla beans with visible cracks, soft spots, or holes, as these are indicative of poor curing or storage conditions.
The appearance of the vanilla bean is also an indicator of quality. High-quality vanilla beans have a deep brown color, slightly sticky texture, and a rich, creamy aroma when moistened.
The quality of vanilla beans greatly affects the flavor and aroma of homemade vanilla extract. Choose high quality vanilla beans that are plump, moist, and have a rich, sweet fragrance.
To make high-quality homemade vanilla extract, it’s essential to start with excellent ingredients and equipment.
Ingredients
Vanilla beans
Choose plump, moist vanilla beans that have a rich, sweet fragrance. This will greatly impact the flavor and aroma of your homemade vanilla extract. Look for high-quality beans from reputable sources or consider purchasing them from specialty stores.
Neutral spirit (such as vodka)
You’ll need a neutral-tasting spirit to act as a solvent for extracting the flavors and aromas from the vanilla beans. A good quality, colorless vodka is ideal for this purpose.
Canning jars
Use clean, dark glass canning jars with tight-fitting lids to store your homemade vanilla extract.
Equipment
- Mortar and pestle: This is a necessary tool for grinding the vanilla beans into fine particles that will easily release their flavors and aromas.
- Cutting board: Use a clean, flat surface to cut the vanilla beans in half lengthwise before using the mortar and pestle.
- Measuring cups and spoons: Accurate measurements are crucial when making homemade vanilla extract, so ensure you have reliable measuring equipment on hand.
In addition to these essential ingredients and equipment, it’s also a good idea to have some basic kitchen tools on hand, such as a fine-mesh strainer or cheesecloth for filtering the vanilla extract before transferring it to canning jars.
Mixing the Alcohol and Vanillin
To start making homemade vanilla extract, you will need two primary ingredients: vanilla beans and a high-proof alcohol such as vodka or bourbon.
The type of vanilla bean used can impact the flavor of the final product, with Madagascar, Tahitian, and Mexican vanilla beans being popular options for their distinct flavor profiles. For this recipe, we recommend using high-quality vanilla beans to ensure the best flavor results.
For the alcohol, you will need a minimum of 80 proof (40% ABV) as it is crucial for effectively extracting the flavors from the vanilla beans. Vodka and bourbon are popular choices due to their neutral or mild flavor profiles that won’t interfere with the natural sweetness of the vanilla extract.
Aside from the ingredients, you will also need a few pieces of equipment to prepare the vanilla extract. A clean glass jar with a tight-fitting lid is necessary for storing the mixture as it prevents exposure to air and contamination. The size of the jar may vary depending on your desired yield and storage space.
A sharp knife or pair of scissors will be used to cut the vanilla beans into small pieces, ensuring they release their flavors effectively during the extraction process. You can also use a vegetable peeler to remove the outer skin of the bean before cutting it, resulting in more flavorful extract.
Finally, an optional tool that comes in handy is a coffee filter or cheesecloth for straining the mixture after steeping, removing excess particles and achieving a smooth final product.
Combine 1/2 cup of neutral tasting vodka (such as Ever clear) with 1/4 cup of pure glycerin in a small saucepan. This mixture will help to extract the vanillin from the vanilla beans.
To make a homemade vanilla extract, you will need the following ingredients and equipment:
Ingredients:
Vanilla Beans
These are the main component of your homemade vanilla extract. Look for high-quality, real vanilla beans that have not been treated with any chemicals or additives.
Pure Glycerin (1/4 cup)
This ingredient helps to extract the vanillin from the vanilla beans and preserve the flavor of the extract. You can find glycerin at most pharmacies or online.
Vodka (such as Everclear, 1/2 cup)
Vodka is used as a solvent to help extract the vanillin from the vanilla beans. You can use any neutral-tasting vodka, such as Everclear, for this purpose.
Equipment:
- A small saucepan: This will be used to heat the glycerin and vodka mixture to help extract the vanillin from the vanilla beans.
- A mason jar or glass container with a lid (for storing the homemade vanilla extract)
Preparation and Extraction Process
Cutting and Soaking the Vanilla Beans
To create a high-quality homemade vanilla extract, it’s essential to follow proper preparation and extraction processes, including cutting and soaking the vanilla beans.
The first step in preparing your vanilla beans is to choose high-quality ones with minimal blemishes or mold growth.
Next, you’ll want to cut each bean in half lengthwise using a sharp knife, taking care not to crush them. This will help increase their surface area and allow for better extraction of the delicate compounds within.
Once your beans are cut, place them in an airtight container or jar with a lid. The size of the container will depend on the number of beans you’re using and how strong you like your vanilla extract to be.
You can either use a glass jar with a tight-fitting lid or a plastic container specifically designed for storing liquids, such as a Tupperware container.
For each 1/4 cup of vanilla beans, we recommend adding 1 cup (8 ounces) of high-quality vodka. This will serve as the solvent to extract the flavor and aroma from the beans.
If you prefer a more intense or stronger extract, you can reduce the amount of vodka while increasing the number of vanilla beans proportionally.
Now that your beans are ready for soaking, place the lid on the container securely and store it in a cool, dark place. The ideal location is a cupboard or pantry with minimal temperature fluctuations and away from direct sunlight.
The general rule of thumb for extraction time is to let the mixture sit for at least 2-3 months, shaking the container every day or two. This will allow the vanilla compounds to seep into the vodka and create a rich, aromatic flavor.
However, it’s worth noting that some vanilla enthusiasts may recommend a longer extraction period of up to 6 months or even a year for an even more intense extract.
To check on the progress of your extraction, simply give the mixture a good stir every few weeks. You can also test the strength by pouring a small amount onto a plate and letting it sit at room temperature for about an hour before tasting. If you prefer a stronger or weaker flavor, adjust the number of vanilla beans accordingly.
Once your homemade vanilla extract is ready, transfer it to a smaller container with a tight-fitting lid for storage. We recommend using dark glass bottles with lids to protect the extract from light and keep it fresh for an extended period.
For optimal flavor preservation, store your homemade vanilla extract in the refrigerator once opened. This will slow down the aging process and prevent bacterial growth.
The benefits of making your own homemade vanilla extract include:
Cost-effective compared to buying pre-made vanilla extracts
Customizable strength levels based on individual preferences
Ability to choose high-quality, fresh vanilla beans directly from a local supplier or farmers market
Potential for more intense flavor by allowing the mixture to sit longer or using a higher ratio of beans to vodka
Cut 68 high quality vanilla beans in half lengthwise to release their flavor and aroma compounds. Place them in a clean glass jar with the vodka glycerin mixture, making sure that all of the beans are completely submerged.
The preparation and extraction process for homemade vanilla extract involves several key steps to ensure the optimal release of flavor and aroma compounds from high-quality vanilla beans.
To begin, select 68 high-quality vanilla beans that are plump, fragrant, and free of blemishes. Cut each bean in half lengthwise to facilitate the extraction process, making sure to cut them carefully to avoid crushing or bruising the delicate vanilla tissue.
This will expose the interior of the bean to the extraction liquid, allowing for a more efficient release of flavor and aroma compounds. The cut beans should be placed in a clean glass jar, as this will prevent any contamination of the extract during the extraction process.
The next step is to prepare the vodka-glycerin mixture that will serve as the solvent for extracting the flavor and aroma compounds from the vanilla beans. A 1:2 ratio of vodka to glycerin is typically used, although some recipes may vary depending on personal preference.
Mix the vodka and glycerin together in a small bowl or measuring cup until they are fully incorporated. Be careful not to create any foam when mixing, as this can lead to uneven extraction results.
Once the vodka-glycerin mixture is prepared, pour it over the cut vanilla beans in the glass jar, making sure that all of the beans are completely submerged under the liquid. This will help to ensure even extraction and prevent any mold or bacterial growth on the beans during the incubation period.
The final step in preparing the extract is to seal the glass jar tightly with a lid or cork, making sure that no air can enter or leave the container during the extraction process. It’s essential to keep the extract away from direct sunlight and heat sources, as this can cause the flavors and aromas to degrade.
Allow the mixture to incubate for at least 6-8 weeks, shaking the jar every few days to ensure even extraction. The longer the vanilla beans steep in the liquid, the stronger and more complex the flavor of the extract will be. Some recipes may call for a shorter or longer incubation period, depending on personal preference.
After the desired incubation time has passed, strain the mixture through a butter muslin or cheesecloth into a clean glass bottle. Discard the solids and reserve the liquid extract, which can be used immediately in recipes or stored for future use.
Steeping and Aromatization
Preparing high-quality vanilla extract at home requires attention to detail and a bit of patience, but it’s worth the effort for the superior flavor and aroma it imparts to baked goods, desserts, and beverages.
Materials Needed
- 1 cup (250ml) vodka or other high-proof liquor
- 3-4 vanilla beans, split lengthwise
- A clean glass jar with a lid ( Mason jars work well)
- A paper funnel (optional but helpful for messy ingredients)
Step 1: Preparation of Vanilla Beans
To get the most out of your vanilla beans, gently scrape off any seeds from the inside and discard them. Cut each bean into two or three pieces, depending on their length.
Step 2: Steeping in Vodka
- Place a paper towel under the jar to prevent slipping.
- Pour the vodka over the cut vanilla beans.
- Cover the jar with the lid and gently shake it to mix.
Step 3: Extraction Process
The key to a good homemade vanilla extract is allowing the flavors of the vanilla to infuse into the vodka over time. Store the jar in a dark place like a pantry or cupboard, shaking it every few days for the next two weeks.
Aromatization and Steeping Duration
For optimal flavor and aroma, let the vanilla beans steep in the vodka for at least 4-6 weeks. You can also steep them longer – up to three months or more, depending on your preference and the strength of the extract you’re aiming for.
Pouring the Vanilla Extract
Once your desired extraction period is complete, strain the liquid through a fine-mesh sieve into another clean glass bottle. Discard the vanilla beans or use them in baked goods or desserts.
Seal the jar and let it sit in a cool, dark place for 24 weeks, shaking it every few days to help extract the vanillin. This process will allow the flavors to meld together and create a rich, complex aroma.
The preparation and extraction process for homemade vanilla extract involves combining high-quality vanilla beans with a neutral spirit, such as vodka or bourbon.
Start by slicing a few vanilla beans thinly to increase their surface area for infusion.
Next, place the sliced vanilla beans in a clean glass jar and cover them with a sufficient amount of the chosen neutral spirit. A general rule of thumb is to use 1/2 cup of vodka or bourbon for every 4-5 vanilla beans.
The mixture should be left to infuse for several weeks, allowing the flavors and aroma compounds to extract from the vanilla beans into the liquid.
Now, let’s break down the preparation and extraction process into a step-by-step guide:
- Combine sliced vanilla beans with a neutral spirit in a clean glass jar.
- Cover the vanilla beans completely with the chosen spirit.
- Seal the jar and let it sit in a cool, dark place for 24 weeks, shaking it every few days to help extract the vanillin.
This process will allow the flavors to meld together and create a rich, complex aroma. After the extraction period, you can filter the liquid through a coffee filter or cheesecloth into another container, discarding the solids. The resulting homemade vanilla extract is now ready for use in your favorite recipes!
Bottling and Storage
Filtering and Bottling
The process of bottling and storing homemade vanilla extract involves several steps to ensure its quality and shelf life.
Here are the key considerations for bottling and storage:
Bottling
Once your homemade vanilla extract has been filtered, it is ready to be bottled. Choose clean, dark-tinted glass bottles with tight-fitting lids to prevent light from affecting the flavor and aroma.
Cleanliness
Make sure the bottles are thoroughly cleaned and sterilized before use. You can do this by washing them in hot soapy water, rinsing, and then sanitizing them in boiling water or a dishwasher.
Labeling
Label each bottle with the date it was made, the type of vanilla beans used (if multiple), and any other relevant information. This will help you keep track of how long they’ve been stored.
For filtering and bottling in the context of homemade vanilla extract:
Filtering
You can filter your homemade vanilla extract through a coffee filter or cheesecloth to remove any sediment. This is optional but recommended for clarity and appearance.
Bottling after filtering
After filtering, pour the extract into the prepared bottles, leaving about 1/4 inch of space at the top. Secure the lids tightly to prevent air from entering the bottle.
Storage considerations:
Dark place
Store the bottled vanilla extract in a dark place, such as a cupboard or pantry, to prevent light from affecting its flavor and aroma.
Cool temperature
Keep the bottles at a cool room temperature (around 60°F to 70°F) to slow down any potential spoilage. Avoid storing them near direct sunlight or heat sources.
Shelf life:
Average shelf life
Homemade vanilla extract can last for up to two years when stored properly in a clean, dark environment. However, the quality may degrade over time, and it’s best to check on it periodically.
Check for spoilage
Regularly inspect your homemade vanilla extract for any signs of spoilage, such as mold, sediment, or an off smell.
It’s essential to note that homemade vanilla extract may not have the same shelf life as store-bought varieties. However, with proper bottling and storage, you can enjoy a high-quality, flavorful extract for an extended period.
Strain the mixture through cheesecloth or a coffee filter into small glass bottles, discarding the solids. Store the homemade vanilla extract in a cool, dark place to preserve its flavor and aroma.
The final step in making homemade vanilla extract involves bottling and storing the mixture to ensure its quality and shelf life.
Strain the mixture through cheesecloth or a coffee filter into small glass bottles, discarding the solids that have settled at the bottom of the jar or container.
This straining process is crucial in removing any impurities or sediment from the extract, which can affect its flavor and aroma over time.
Once you have strained the mixture, transfer it to small glass bottles with tight-fitting lids. This will help prevent contamination and preserve the flavors of the extract.
It’s essential to choose glass bottles for storing homemade vanilla extract because they are non-reactive and won’t impart any flavors or odors to the extract.
Next, store the homemade vanilla extract in a cool, dark place. The ideal storage conditions for vanilla extract include temperatures between 50°F to 70°F (10°C to 21°C) and away from direct sunlight.
This will help preserve its flavor and aroma by preventing oxidation and spoilage of the liquid.
By storing your homemade vanilla extract in a cool, dark place, you can enjoy the full potential of its flavors for an extended period, typically up to 2-3 years.
However, it’s worth noting that homemade vanilla extract may not have the same shelf life as store-bought varieties, which are often preserved with added preservatives or flavor enhancers.
If you plan to use your homemade vanilla extract within a few months, you can store it in a pantry or cupboard at room temperature. Just ensure that the bottles are tightly sealed and kept away from heat sources or direct sunlight.
Labeling and Gift-Giving (Optional)
To bottle and store homemade vanilla extract, it’s essential to use a clean environment to prevent contamination and spoilage. First, ensure that all equipment and containers are sterilized with hot water or by washing them in the dishwasher on high heat.
Next, carefully pour the extracted liquid into glass bottles with tight-fitting lids using a dropper or measuring spoon to minimize spills and ensure accurate measurement. This will help prevent oxidation and preserve the flavor and aroma of the extract.
The best containers for bottling homemade vanilla extract are dark-tinted or amber-glass bottles, which shield the liquid from light exposure that can cause it to degrade over time. Additionally, these types of glass protect the extract from heat and oxygen more effectively than clear glass bottles do.
Once bottled, store the homemade vanilla extract in a cool, dry place with minimal temperature fluctuations. It’s best not to store it near direct sunlight or sources of strong odors, as this can cause it to lose its potency and aroma over time. For long-term storage, consider placing the bottles in a cupboard or pantry that maintains a consistent temperature between 60°F (15°C) and 70°F (21°C).
For labeling, use a permanent marker or a label maker to create labels with the extract’s name, date of preparation, and any necessary instructions for usage. Be sure to include information about the percentage of vanilla bean in the extract (if applicable), as well as any specific handling or storage requirements.
Gift-giving optional packaging can enhance the presentation of your homemade vanilla extract. Consider using decorative glass bottles with ribbons or gift tags, and pair them with other gourmet items like artisanal sugars, spices, or specialty teas to create a thoughtful gift for friends or family members who appreciate homemade goodies.
Before gifting, make sure to wrap the bottle in brown paper or a decorative box to prevent it from getting scratched or damaged during transport. This will also help maintain its aesthetic appeal and add an extra layer of protection to the extract inside.
You can label the bottles with the date and ingredients used, as well as any additional information you’d like to include. If you’re giving the extract as a gift, consider adding a decorative label or ribbon to make it more special.
Once you have prepared your homemade vanilla extract, it’s essential to properly bottle and store it to preserve its flavor and aroma.
You will need clean glass bottles with tight-fitting lids, which can be found at most home goods or kitchen supply stores. It’s also a good idea to have some decorative labels or ribbons on hand to make your gift-giving process more special.
To start, carefully fill each bottle about 1/4 full of your homemade vanilla extract. You can use a measuring cup or pouring jug to ensure the correct amount. Make sure to leave enough space at the top for the lid, as well as any additional ingredients or decorations you plan to add.
Next, label each bottle with the following information:
Date
Record the date that you prepared the vanilla extract, so you can track its shelf life and ensure it’s fresh when giving it as a gift.
Ingredients Used
Include a list of the ingredients used to make the vanilla extract, such as vanilla beans, vodka, and sugar. This information is essential for anyone who may have food allergies or preferences.
Additional Information
You can also include any additional details about your homemade vanilla extract, like the type of vanilla bean used, the ratio of ingredients, or any special instructions for use.
Once you’ve labeled each bottle, consider adding a decorative label or ribbon to make it more visually appealing. This will not only add a touch of elegance but also make your gift stand out from store-bought extracts.
To ensure the vanilla extract remains fresh, store it in a cool, dark place, such as a pantry or cupboard. Avoid storing it near heat sources or direct sunlight, as this can cause the flavor and aroma to degrade quickly.
- Best Lusha Alternatives for 2025 - April 22, 2025
- Best Overloop Alternatives for 2025 - April 22, 2025
- Best 6sense Alternatives for 2025 - April 22, 2025

