Ingredients
Main Ingredients
The key to a delicious yeast roll recipe lies in its ingredients, which are carefully selected to bring out the perfect blend of flavors and textures.
The main ingredients required for this quick yeast rolls recipe include:
FLOUR
We will need 2 cups of all-purpose flour for this recipe. You can use either bread flour or all-purpose flour, but keep in mind that bread flour will give your rolls a chewier texture.
SUGAR
A small amount of sugar is added to the dough to help balance out the flavors and promote browning during baking. You’ll need 1 tablespoon of sugar for this recipe.
YEAST
The star of the show, yeast! Active dry yeast or instant yeast will work well in this recipe. Make sure to check the expiration date before using it. We need 2 teaspoons of active dry yeast for this recipe.
SALT
A pinch of salt is added to enhance the flavors and help control yeast growth. You’ll need 1/4 teaspoon of salt for this recipe.
MILK
We will need 1 cup of warm milk (around 105°F to 115°F) for this recipe. You can use whole, low-fat or nonfat milk; just make sure it’s not too hot or cold.
EGG
A single large egg is added to the dough to enrich its texture and flavor. Make sure your egg is at room temperature before using it.
MELTED BUTTER
We will need 2 tablespoons of melted butter for this recipe, which will be used as a topping for our rolls.
Optional ingredients include:
- Sesame seeds or poppy seeds for added texture and flavor
- Honey or maple syrup for extra sweetness
- Fresh herbs, such as parsley or rosemary, for a fragrant twist
With these ingredients, you’re ready to start making your quick yeast rolls recipe!
1 cup warm water (around 100°F)
The first ingredient in our Quick Yeast Rolls Recipe is 1 cup of warm water, which serves as a crucial component for activating the yeast and initiating the fermentation process. The ideal temperature for this initial step is around 100°F (38°C), neither too hot nor too cold.
The purpose of using warm water is to awaken the yeast from its dormant state, allowing it to start breaking down the sugars present in the dough and producing carbon dioxide gas as a byproduct. This process will cause the dough to rise, giving our rolls their light and airy texture.
Warm water also plays a role in dissolving the sugar and other ingredients that are added later in the recipe, ensuring they are evenly distributed throughout the dough. A consistent temperature of 100°F helps prevent any potential hotspots or cold spots within the mixture, promoting uniform growth and development of the yeast.
The use of warm water instead of boiling water is deliberate to avoid killing off the yeast, which would render it ineffective in activating the fermentation process. Similarly, using ice-cold water could slow down the yeast’s activity, resulting in an incomplete or uneven rise. Therefore, maintaining a temperature around 100°F provides the optimal environment for yeast activation and growth.
By using this warm water, you are creating an ideal atmosphere for your yeast to thrive and contributing to the overall success of our Quick Yeast Rolls Recipe. The result will be soft, fluffy rolls that are perfect for serving with a variety of meals or as a side dish on their own.
2 teaspoons sugar
The key to making delicious quick yeast rolls lies in the quality and balance of their ingredients.
To start, you will need 1 packet (2 1/4 teaspoons) Active Dry Yeast, which provides the leavening power for your rolls.
You will also need 2 teaspoons sugar, a small amount that helps feed the yeast and promote fermentation.
The rest of the ingredients include 1/4 cup warm water, 2 cups all-purpose flour, 1 teaspoon salt, 2 tablespoons butter, melted, and an egg, beaten for egg wash.
For added flavor, you can also use herbs or garlic powder to give your rolls a unique taste.
The balance of these ingredients is crucial, as too much sugar can inhibit yeast activity and cause the dough to rise unevenly, while too little sugar may result in under-leavened rolls.
By carefully measuring and combining the right amounts of each ingredient, you will be well on your way to creating a batch of soft, fluffy quick yeast rolls that are perfect for snacking or as a side dish at family meals.
2 teaspoons active dry yeast
Active dry yeast is a type of yeast that is commonly used in baking to help dough rise and give bread its light and airy texture. In the context of the Quick Yeast Rolls Recipe, 2 teaspoons of active dry yeast are required to activate the fermentation process.
The key characteristics of active dry yeast include its ability to withstand high temperatures and its long shelf life. When used in baking, active dry yeast ferments the sugars present in the dough, producing carbon dioxide gas as a byproduct. This process causes the dough to rise, resulting in light and fluffy bread products.
Active dry yeast is typically sold in the form of small white granules or flakes and can be found in most supermarkets or baking supply stores. When using active dry yeast in recipes, it’s essential to follow proper storage and handling procedures to maintain its potency and effectiveness.
To activate 2 teaspoons of active dry yeast for the Quick Yeast Rolls Recipe, you will need to combine it with a small amount of warm water (around 105°F to 115°F). Letting the mixture sit for 5-10 minutes allows the yeast to dissolve and release its carbon dioxide bubbles, ensuring that it is fully activated before adding it to the rest of the ingredients.
The benefits of using active dry yeast in baking include increased volume, improved texture, and a more complex flavor profile. It’s an essential ingredient for many types of bread and baked goods, including quick yeast rolls, pizza dough, and artisanal breads.
4 cups all purpose flour
All-purpose flour is one of the most versatile ingredients in baking, and it’s a staple in many recipes, including our quick yeast rolls. It serves as the foundation for the dough, providing structure and texture. When measuring 4 cups of all-purpose flour, it’s essential to use a digital kitchen scale or a dry measuring cup to ensure accuracy.
Unbleached, all-purpose flour is the preferred choice in this recipe because it contains a higher protein content than bleached flour. This makes it an ideal candidate for yeast-based doughs like our quick yeast rolls, where the development of gluten is crucial. The high protein level contributes to the formation of strong, elastic strands, giving the rolls their signature texture and shape.
The type of wheat used in all-purpose flour also plays a significant role in its performance. Most commercial flour is made from hard red winter wheat or hard white wheat, which produces a higher protein content than soft wheat varieties. This difference in protein content affects the final product’s characteristics, with hard wheat resulting in stronger gluten development.
The presence of other ingredients in all-purpose flour, such as iron, thiamin, niacin, folic acid, and riboflavin, may also contribute to its overall performance in yeast-based recipes. These added nutrients can enhance the dough’s ability to rise, affecting the final texture and appearance of the rolls.
When substituting all-purpose flour with other types or brands, it’s crucial to consider their protein content and wheat type. Using a lower-protein flour may require adjusting the yeast quantity or rising time, while switching to a higher-protein flour could result in over-proofing or a denser texture. It’s also worth noting that different regions or countries may use varying types of wheat or produce flours with distinct characteristics.
1 teaspoon salt
The ingredients used in this recipe are essential for achieving the perfect balance of flavors and textures in our Quick Yeast Rolls.
One key ingredient in this recipe is 1 teaspoon salt, which serves several purposes beyond adding flavor to the dough.
Salt helps control yeast growth, prevents over-proofing, and enhances the overall taste and texture of the rolls.
The quantity of salt used is relatively small compared to other ingredients, but its impact on the final product should not be underestimated.
In baking, salt can be a bit tricky to work with because it can affect the hydration levels in dough and influence yeast activity.
However, when using yeast as we do in this Quick Yeast Rolls recipe, a small amount of salt is beneficial for balancing out the sweetness from sugar or honey and preventing an over-sweet taste.
The sodium chloride, or table salt, used here is the most common form of salt available in most kitchens.
When selecting a salt for this recipe, consider using kosher salt or sea salt if you have either on hand, as they can add more complex flavors to your rolls.
Remember that when measuring salt, it’s essential to use a digital scale or a kitchen teaspoon measuring spoon to ensure accuracy and consistency in your dough.
This will help achieve the best possible texture and flavor for your Quick Yeast Rolls.
Instructions and Tips
Mixing the Dough
Mixing the dough for quick yeast rolls requires some care and attention to detail. Here are some instructions and tips to help you mix the dough successfully:
Step 1: Combine Wet Ingredients
- Begin by combining the warm milk, sugar, and vegetable oil in a large mixing bowl.
- Add the yeast to the wet ingredients and stir gently to dissolve.
Step 2: Add Dry Ingredients
- After proofing the yeast, add the flour, salt, and any other dry ingredients called for in the recipe to the wet ingredients.
- Use a wooden spoon or a stand mixer with a dough hook attachment to mix the dough until it comes together in a shaggy mass.
Step 3: Knead the Dough
Kneading is an important step in developing the gluten in the dough, which will help your rolls rise and give them texture.
- Knead the dough for 5-10 minutes on a floured surface or using a stand mixer with a dough hook attachment.
- Use a gentle, pushing-down motion to push the dough forward, then use your hands to fold it back onto itself.
- Continue kneading until the dough becomes smooth and elastic.
Step 4: Let the Dough Rise
After kneading the dough, place it in a lightly oiled bowl, cover it with plastic wrap or a damp cloth, and let it rise in a warm, draft-free place.
- The rising time will depend on the temperature of your environment, but it should take about 1 hour for the dough to double in size.
In a large mixing bowl, combine warm water and sugar. Sprinkle yeast over the mixture and let it sit for 510 minutes until foamy.
To achieve perfectly risen Quick Yeast Rolls, it’s essential to follow a few key instructions and tips throughout the process.
First, start by preparing your ingredients in advance. For this recipe, you’ll need warm water, sugar, yeast, flour, salt, and any desired flavorings or herbs.
The initial step involves creating an environment that’s conducive to yeast growth. In a large mixing bowl, combine 1 cup of warm water and 2 teaspoons of sugar. The ideal temperature for this mixture should be around 105°F to 115°F (40°C to 46°C).
Next, sprinkle 1 teaspoon of active dry yeast over the mixture and let it sit for 5-10 minutes until foamy. This step is crucial as it allows the yeast to activate and start fermenting.
After the yeast has activated, add 2 cups of all-purpose flour, 1/4 teaspoon of salt, and any desired flavorings or herbs to the bowl. Mix the ingredients together using a wooden spoon or a stand mixer until a shaggy dough forms.
Knead the dough on a floured surface for 5-10 minutes until it becomes smooth and elastic. You can also use a stand mixer with a dough hook attachment for this step.
Place the dough in a greased bowl, cover it with plastic wrap or a damp cloth, and let it rise in a warm place for about 1 hour, or until it has doubled in size.
Punch down the dough and divide it into 8-10 equal pieces. Roll each piece into a ball and flatten it slightly into a disk shape using your palms.
Place the rolls onto a baking sheet lined with parchment paper, leaving about 1 inch (2.5 cm) of space between each roll.
Bake the rolls in a preheated oven at 375°F (190°C) for 12-15 minutes, or until they’re golden brown.
To ensure your Quick Yeast Rolls turn out light and fluffy, remember to use warm water, don’t overmix the dough, and let the yeast activate for the recommended amount of time.
Add flour, salt, and any other desired flavorings (such as herbs or spices) to the bowl.
When it comes to making quick yeast rolls, having the right ingredients and following a clear set of instructions are crucial to achieving success.
To start with, you’ll need to combine the dry ingredients in one bowl and the wet ingredients in another. In this case, we’re talking about adding flour, salt, and any other desired flavorings (such as herbs or spices) to the bowl.
Here’s a tip: always use a digital kitchen scale to measure your ingredients accurately, especially when it comes to yeast rolls. Yeast is a delicate ingredient, and too little of it can result in dense rolls that don’t rise properly.
Now, let’s talk about adding flour. When measuring out flour for your yeast rolls, it’s essential to use the “scoop-and-level” method. This involves scooping the flour into a measuring cup using a spoon and then leveling it off with a straight edge or knife. This ensures that you’re getting an accurate measurement, rather than packing the flour down too tightly.
As for salt, use a high-quality sea salt or kosher salt for the best flavor. Don’t overdo it with the salt, though – yeast rolls are meant to be lightly seasoned, and too much salt can overpower the other flavors in the recipe.
If you’re using herbs or spices as desired flavorings, now is the time to add them. Mix well to distribute the flavors evenly throughout the dough. Some popular options for quick yeast rolls include dried onion flakes, garlic powder, or Italian seasoning.
One final tip: when combining the dry ingredients and wet ingredients, make sure to mix everything together just until they form a shaggy dough. Overmixing can lead to tough, dense yeast rolls that don’t rise properly.
Once you’ve added all your desired flavorings and combined the ingredients, it’s time to move on to the next step in the recipe – kneading the dough!
Shaping and Baking the Rolls
Tips for Fluffy Rolls
- Shaping and baking the rolls are crucial steps in making delicious quick yeast rolls.
- The process begins with shaping the dough, which requires gentle hands to avoid developing the gluten too much.
- To achieve fluffy rolls, it’s essential to handle the dough delicately and shape them into uniform shapes.
Here are some tips for shaping the rolls:
- Use a light touch when handling the dough to prevent developing the gluten too much.
- Shape the rolls gently, using a combination of stretching and folding motions.
- Make sure the rolls are even in size to ensure uniform baking.
- Pull the dough outwards instead of pushing it down, to create a smooth surface.
- Fold the edges under to seal the rolls and prevent them from opening during baking.
Once shaped, the rolls are ready for the final baking step.
To achieve fluffy rolls, it’s crucial to follow some key guidelines:
- Bake at a high temperature, around 400°F (200°C), to create a crispy crust.
- Use steam in the oven, by placing a pan of water on the bottom rack, to promote even baking and browning.
- Avoid overmixing the dough before shaping, as this can lead to dense rolls.
- Bake for the right amount of time, around 12-15 minutes for small rolls, or until they’re golden brown.
- Let the rolls cool completely on a wire rack before serving, to allow them to retain their texture and flavor.
By following these tips and guidelines, you’ll be able to create delicious, fluffy quick yeast rolls that are perfect for any occasion.
Punch down the dough and roll out into a sheet about 1/4 inch thick.
To shape and bake the rolls, you will first need to punch down the dough after it has risen. This step helps to release any air bubbles that have formed in the dough and redistribute the yeast, ensuring even growth and a lighter texture in your finished rolls.
Once the dough is punched down, divide it into 8-10 equal pieces, depending on how large you want your rolls to be. You can use a pastry cutter or simply tear off pieces from the main dough mass to create the individual roll components.
Next, roll out each piece of dough into a ball and then flatten it slightly into an oval shape. Use your thumbs to create a dimple in the center of each roll, which will help the dough to rise evenly during baking.
Place the rolls onto a baking sheet lined with parchment paper, leaving about 1 inch of space between each roll to allow for even rising and spreading during baking.
Now, let the rolls rise for another 30-45 minutes, or until they have doubled in size. During this time, preheat your oven to 375°F (190°C). Once the rolls are done rising, bake them for 12-15 minutes, or until golden brown.
The key is to not overbake the rolls, as this can cause them to dry out and lose their softness. You want them to be lightly golden in color and still slightly tender when you remove them from the oven.
Use a biscuit cutter or the rim of a glass to cut out rounds of dough. Gather scraps, reroll, and cut more rolls.
- To shape and bake the rolls, start by using a biscuit cutter or the rim of a glass to cut out rounds of dough.
- Gently press down on the dough with the cutter or glass to create even edges around each roll.
- The size of the cutter or glass will determine the final diameter of your rolls, so choose one that suits your preferences for small, medium, or large rolls.
- As you cut out the rounds, gather any scraps of dough and reroll them into a single piece to avoid wasting any dough.
- Rerolling the scraps will also help to prevent the dough from becoming tough and dense as it’s rolled multiple times.
- Once the dough has been rerolled, use the biscuit cutter or glass again to cut out additional rounds of dough until all the dough has been used up.
- You should now have a collection of round rolls that are ready to be placed on a baking sheet lined with parchment paper and baked to perfection in the oven.
Bake at 375°F for 1215 minutes until golden brown.
To shape and bake the rolls to perfection, follow these detailed steps:
First, let’s prepare the dough according to the recipe. Once it has risen and become light and fluffy, punch it down to release any air bubbles.
Turn the dough out onto a floured surface, such as a countertop or a silicone mat. Divide the dough into 8-10 equal pieces, depending on how large you want your rolls to be.
Roll each piece into a ball and then use your hands to shape it into an oblong roll. Place the rolls onto a baking sheet lined with parchment paper, leaving about 1 inch of space between each roll to allow for even rising.
Now that our rolls are shaped, let’s focus on baking them. Preheat your oven to 375°F (190°C) and place the baking sheet inside. The recommended baking time is 12 minutes and 15 seconds, or until golden brown.
Keep an eye on the rolls as they bake, rotating the baking sheet halfway through the cooking time to ensure even browning. You can also use a toothpick to check for doneness – if the toothpick comes out clean, your rolls are ready!
Once the rolls have finished baking, remove them from the oven and let them cool on a wire rack for 5-10 minutes before serving. This will help the rolls retain their shape and make them easier to handle.
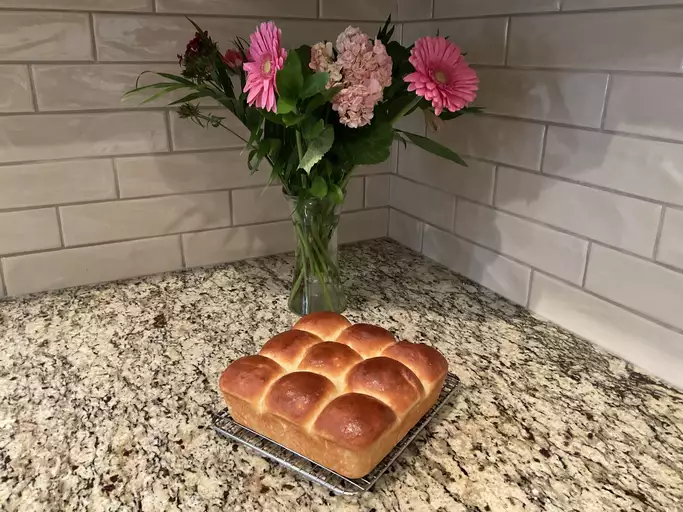
The result is a batch of soft, fluffy, and deliciously golden yeast rolls that are perfect for snacking or accompanying your favorite meals. Enjoy!
- Best Dun & Bradstreet (DNB) Alternatives for 2025 - April 24, 2025
- Best Seamless.ai Alternatives for 2025 - April 22, 2025
- Best Coldlytics Alternatives for 2025 - April 22, 2025

